Regeneration
To be regenerated generally means to be 're-born; brought again into existence; formed anew'. Another way of describing the words meaning is the idea of a place or object being 'restored to a better state' this definition in particular intrigued me most.
Regeneration can be described as the process of replacing or restoring something thats damaged or missing parts to its full function or even a whole new purpose.
Regenerative architecture has two focuses; it is an architecture that focuses on conservation. and performance through a focused reduction on the environmental impacts of a building. It is embodied in the material selection, reduced energy consumption, and intelligence
Regenerative design upgrades the old mantra of “recycle, reduce and reuse” to “restore, renew and replenish.” Imagine a building that actively contributes back to the ecosystem. Regenerative design examines how buildings and products can be designed to minimize their environmental impact and improve the health of ecosystems.
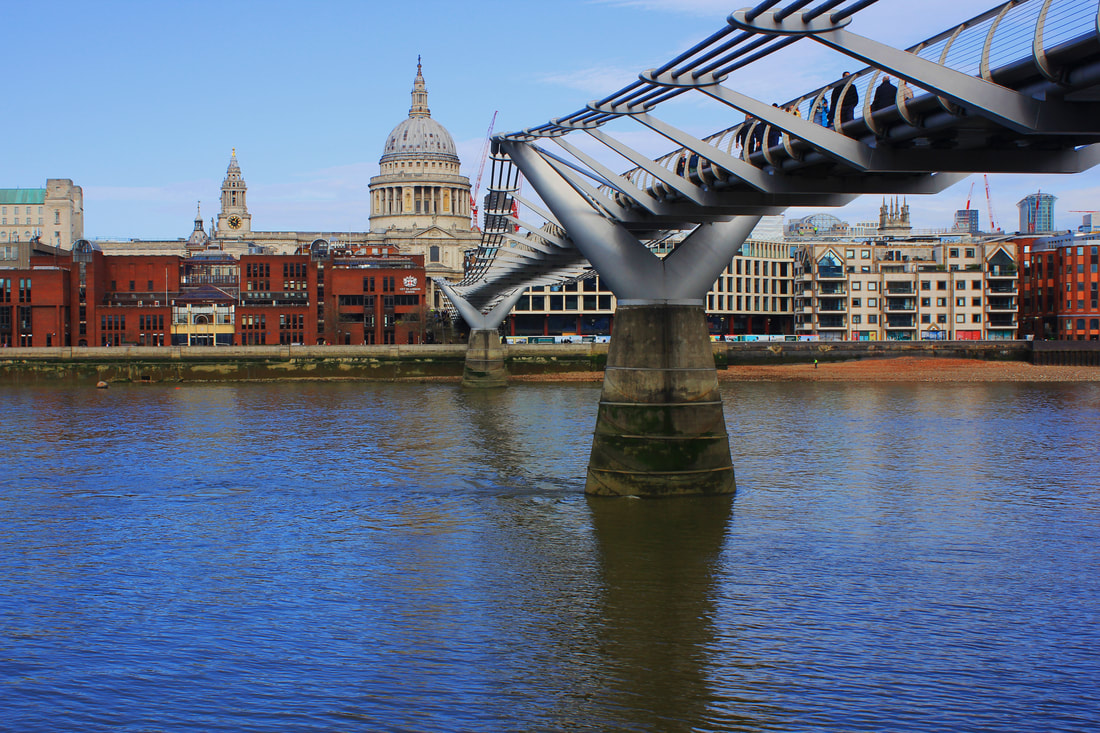
When considering this idea of regeneration I want to explore two ideas the idea of observing the change in architecture over the passing of time to do this I could look at old photographs and take pictures in the same locations but in present time and compare the change and contrast from then to now.
Another way I would like to look at this is to approach the more ecological and environmental side I would like to take littered materials left on the street such as old plastic bottles or can and give them a new purpose making them into pieces of art instead of discarded trash.
Regeneration can be described as the process of replacing or restoring something thats damaged or missing parts to its full function or even a whole new purpose.
Regenerative architecture has two focuses; it is an architecture that focuses on conservation. and performance through a focused reduction on the environmental impacts of a building. It is embodied in the material selection, reduced energy consumption, and intelligence
Regenerative design upgrades the old mantra of “recycle, reduce and reuse” to “restore, renew and replenish.” Imagine a building that actively contributes back to the ecosystem. Regenerative design examines how buildings and products can be designed to minimize their environmental impact and improve the health of ecosystems.
When considering this idea of regeneration I want to explore two ideas the idea of observing the change in architecture over the passing of time to do this I could look at old photographs and take pictures in the same locations but in present time and compare the change and contrast from then to now.
Another way I would like to look at this is to approach the more ecological and environmental side I would like to take littered materials left on the street such as old plastic bottles or can and give them a new purpose making them into pieces of art instead of discarded trash.
Pete Robinson
'The first artist who I am looking at in this project about regeneration is Pete Robinson I am look at his work to explore the architecture and' passage of time idea I wanted to explore in the start of this project.
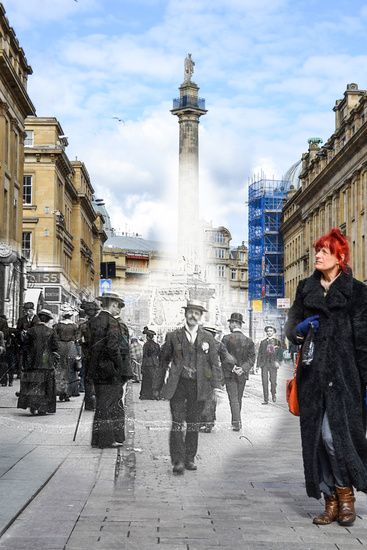
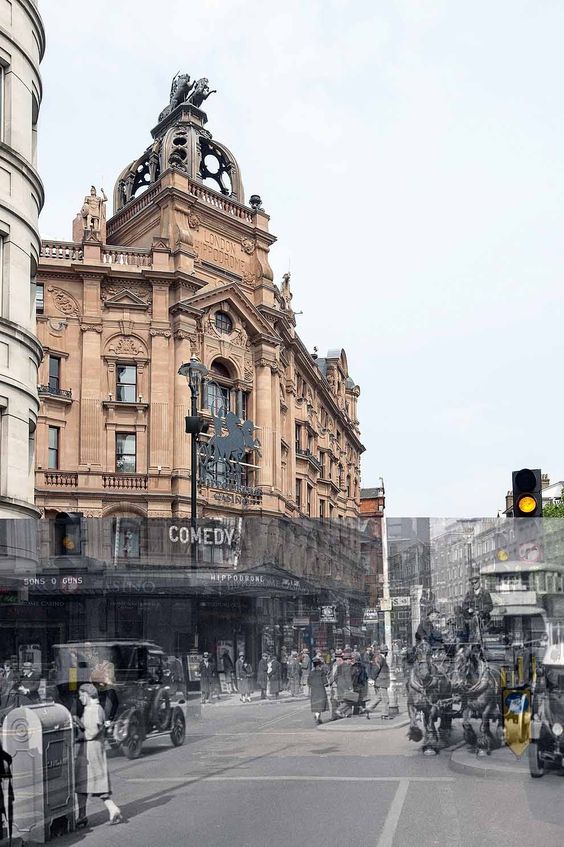
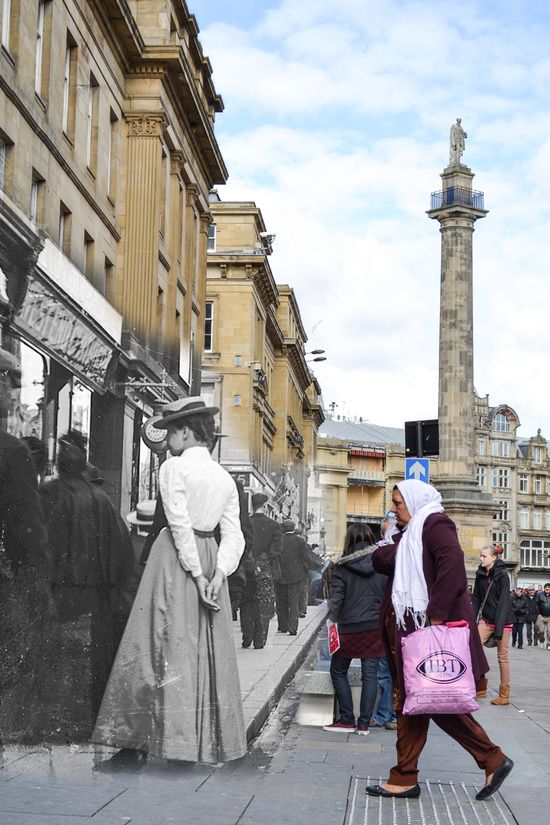
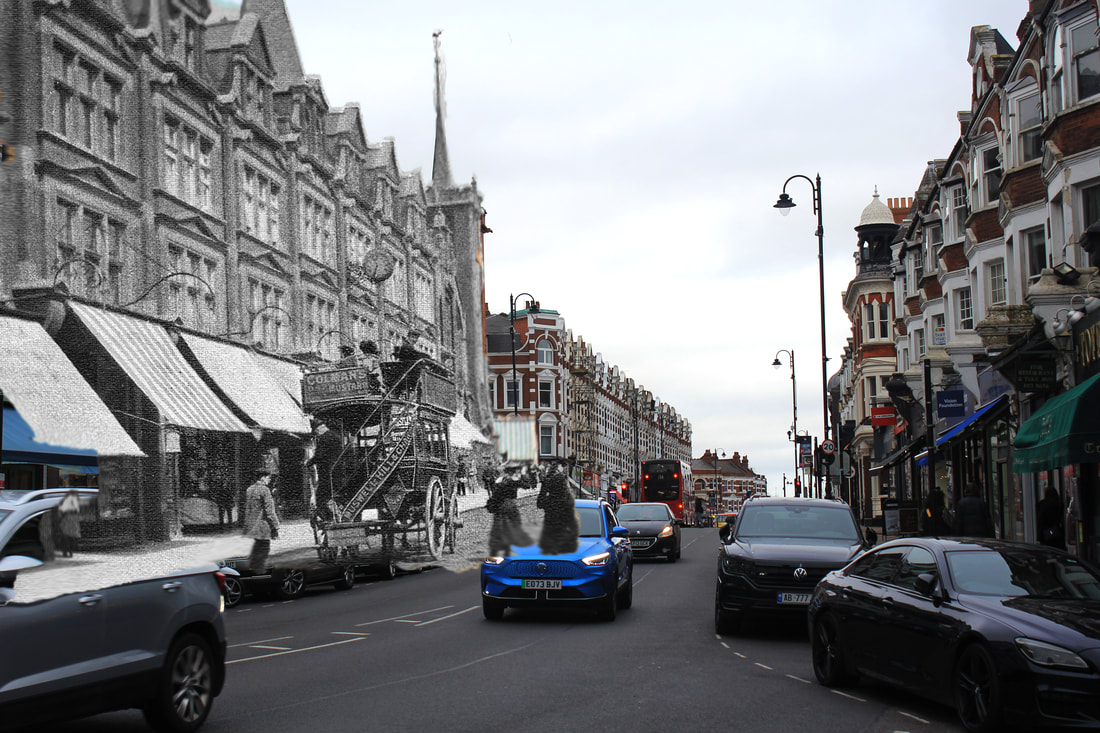
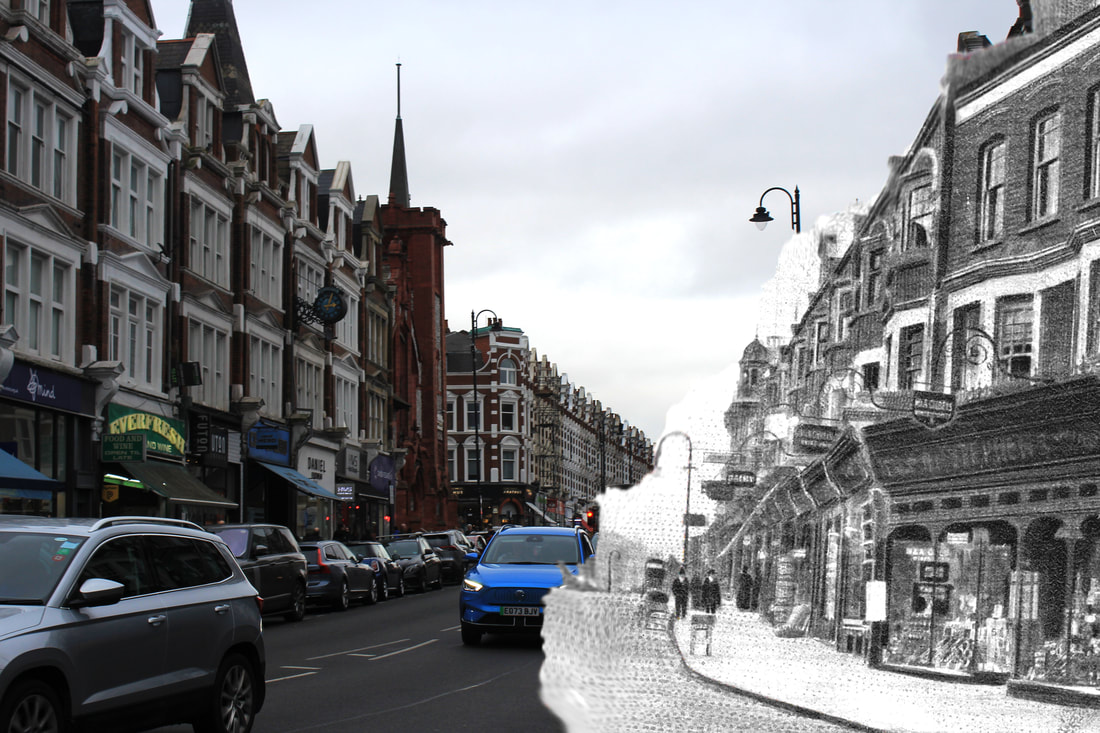
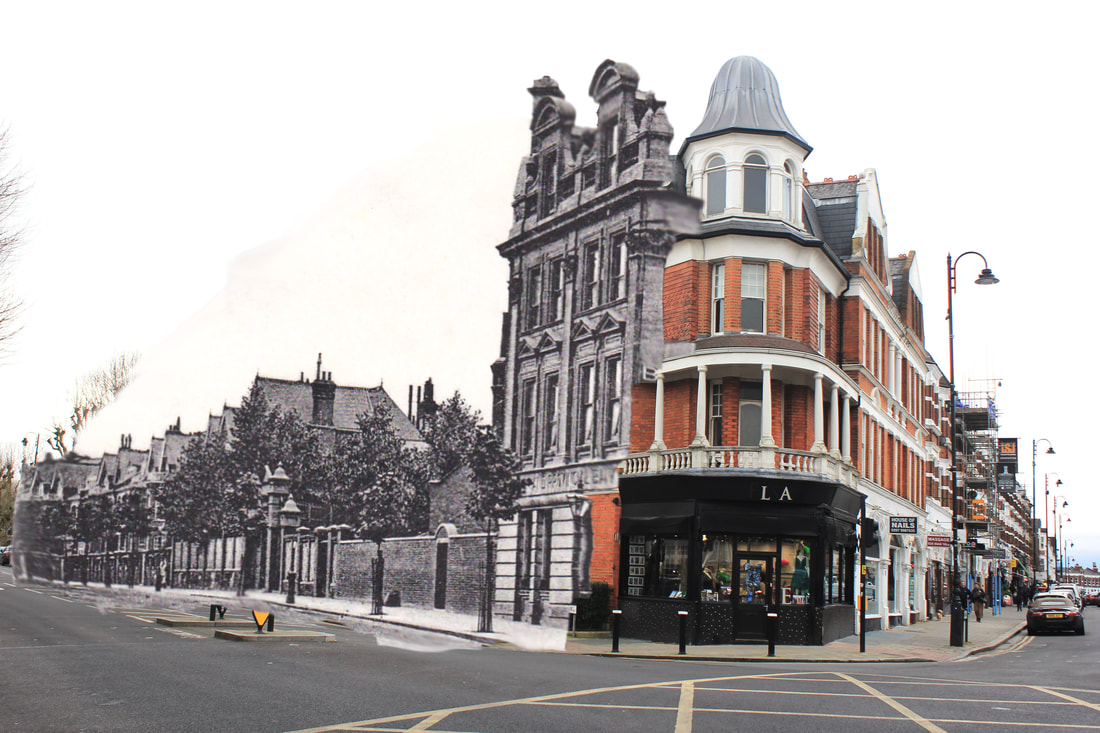
Robinsons series of photographs called 'Ghosts of Tyneside's Past' where he has managed to merge Newcastle's past and present together is exactly the type of work that I wanted to look at and recreate in my own home town. This technique that he's using is called 'Time Travel' photography and really helps to show mortality and time's relentless change. The images that Robinson has taken have been featured in the Evening Chronicle, Living North Magazine and The Crack Magazine.
The 'Ghosts of Tyneside's Past' Exhibition was featured at the world famous Castle Keep in Newcastle from 21st June to 21st September 2013. Ringtons Tea and Newcastle Building Society also commissioned Pete to use these skills for their advertising campaigns.
- ''Ever stop and wonder what places you know and love might have looked like in a previous life? Or lamented the loss of beautiful buildings to younger generations as they feign indifference? Local photographer Pete Robinson does; so much so he felt compelled to create a photographic glimpse into the past – via the future – and his captivating ‘time travel photography’ technique has expertly revealed some ghosts of Tyneside’s past'' - Living North Magazine. ‘Scenes from yesteryear merge with modern-day Tyneside in these stunning snaps’’ - Evening Chronicle
- ‘‘There’s nothing quite so poignant as the past. Thankfully Pete Robinson has the necessary skills and artistic nous to bring the past very much into the present by merging together photographs that appear to show horses and carriages trotting past modern day trains’’ The Crack Magazine
- ''This eight-week exhibition seamlessly merges modern-day images of Tyneside settings with scenes from the past, beautifully blurring the two to conjure poignant pictures of Newcastle that provoke nostalgia and familiarity in equal measure. Skylines new and old are brought together with genuine artistic flair'' Accent Magazine
These things said by various magazines and articles show the impact of the the photography work that Pete Robinson has shared with people.
Examples of his work:
|
|
|
Old photographs of Muswell Hill
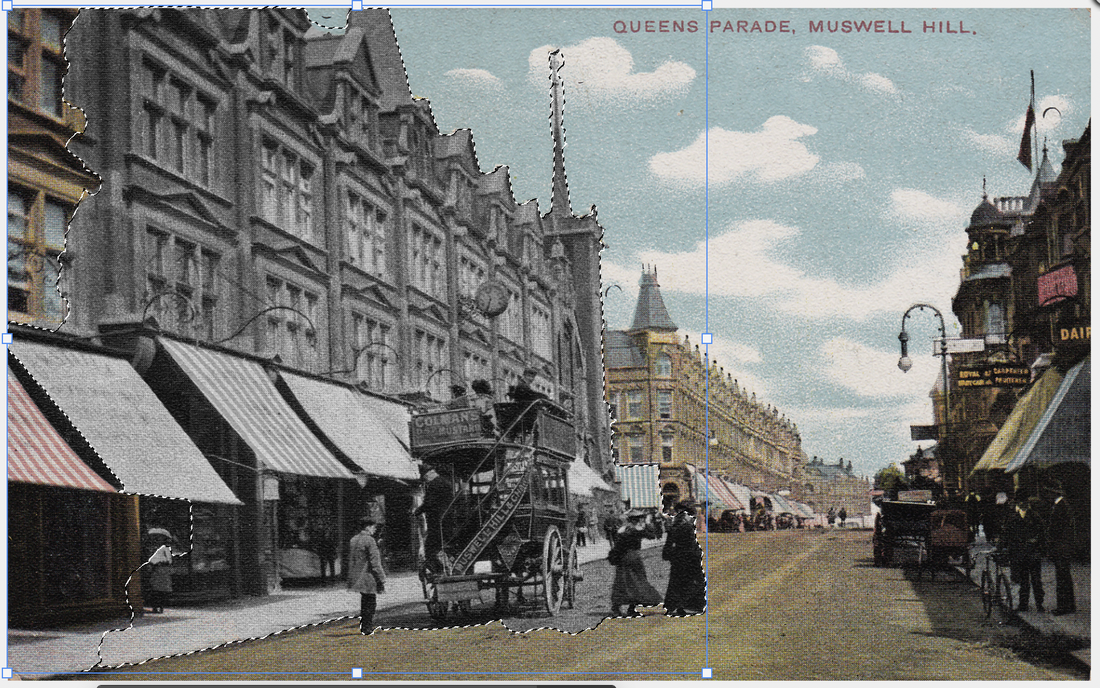
I have Found old photographs of Muswell hill from various time periods on at the https://mhfga.org/history-in-pictures website these photographs are in different formates some are in colour, some are black and white and a couple of them are even in a postcard type of format
These photographs are good because I managed to get a good variety between different time periods and different qualities and formates like polaroids or post caed photographs it gives me more to work with in photoshop.
My new photographs of Muswell Hill
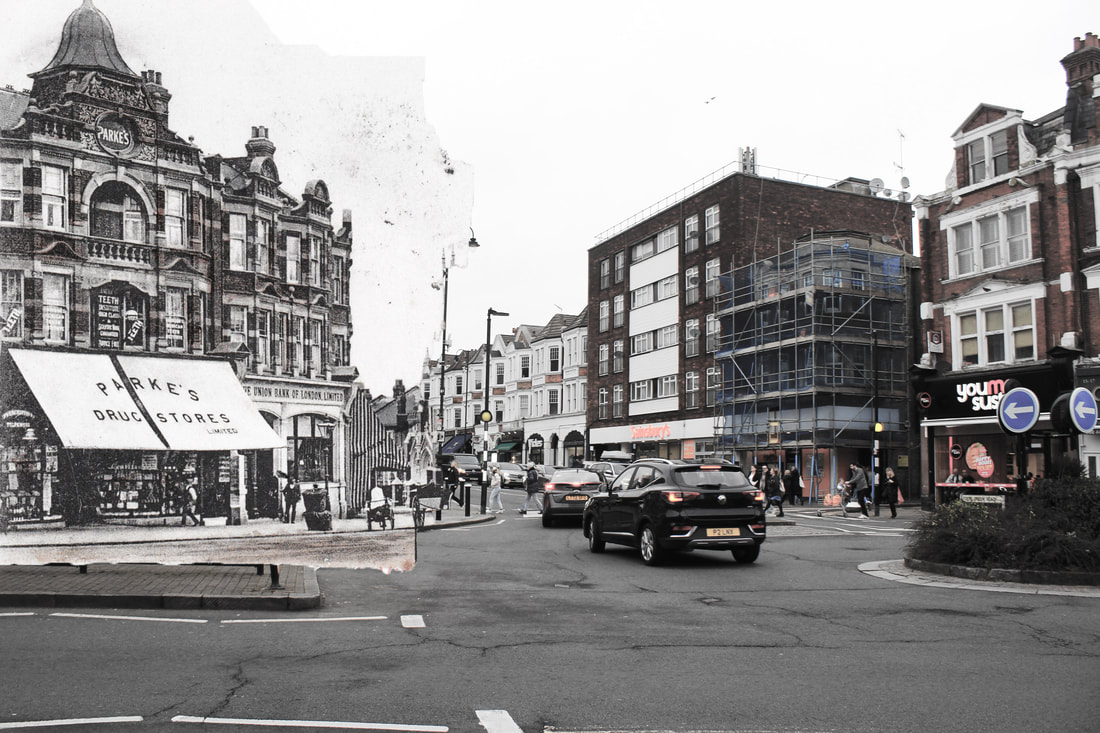
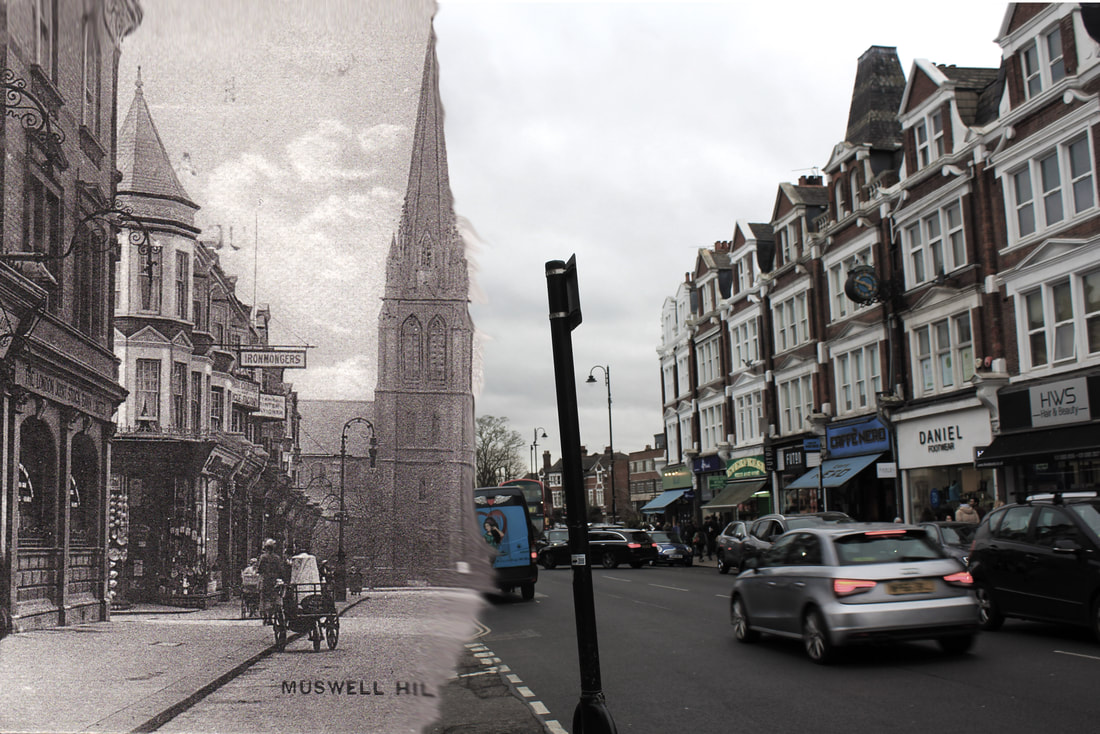
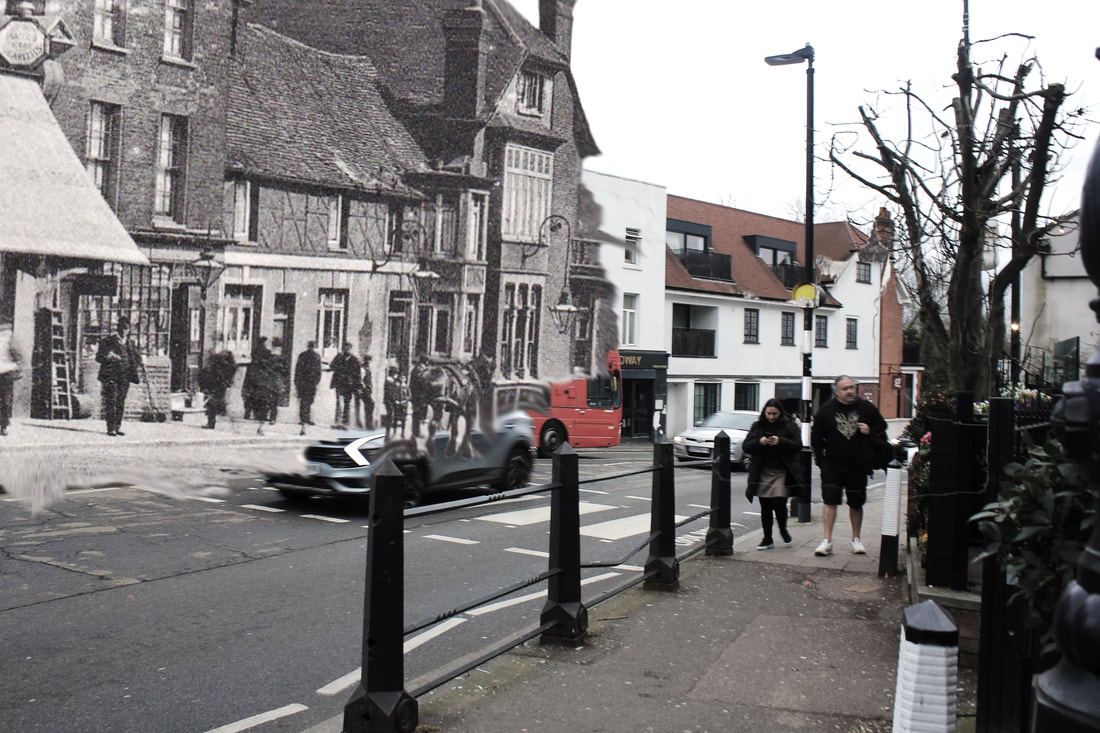
When taking these photographs I have tried to replicate the photographs I have found from the past I have attempted to photograph from the same position so that when in photoshop I can overlay them more effectively because they will line up better.
WWW
What went well with these photographs is that I have managed to capture pictures of a lot of the different locations from the past at similar angles making it easier for when I move to edit them in photoshop
EBI
These photographs could be even better if I could take picture with less people in the foreground or background to make the architecture the main focus in the photographs
Editing process:
When editing these photographs in photoshop I needed to start with two different photographs both of the same location one depicting the past and one the present, the first thing I do in my editing process is to use the selection tool to outline the area of my past picture that I want to copy and move over to the new photograph.

|
|

|
|
Since I have my area outlined and selected I can edit it before I move it over so I first lower the vibrancy and saturation to make it black and white this is to further the contrast between the two time eras that I am showing, now that its black and white I can copy it and past it onto the present day picture I took of the same area and I finally adjust brightness, contrast and add some blurring to make the layering more seamless.
Final photographs
With these final photoshopped photographs i have tried to replicate the photographs and I have attempted overlay the photograph in the same position so that they will line up more seamlessly effectively showing both past and present in one photograph.
|
|
WWW
What went well with these photographs is that I have managed to make the layering line up well and by using black and white for the past photographs it really helped to further highlight the contrast between the passing of time in the two photos
EBI
These photographs could be even better if I could have got more clear photographs for the present day photographs
without vehicles like bus or cars in the way
My dog sighs (Paul stone)
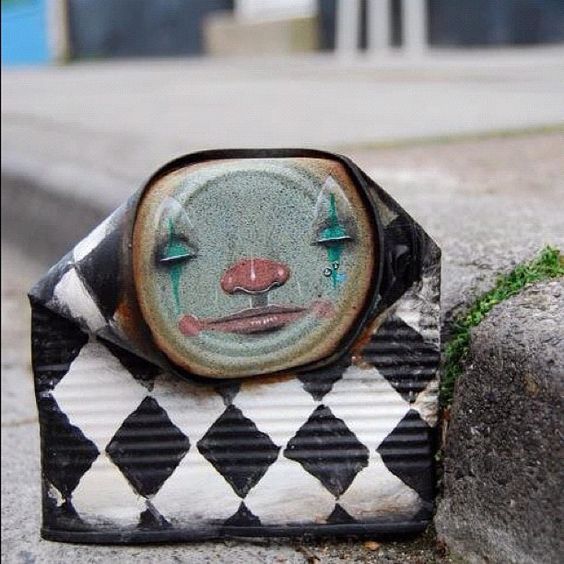
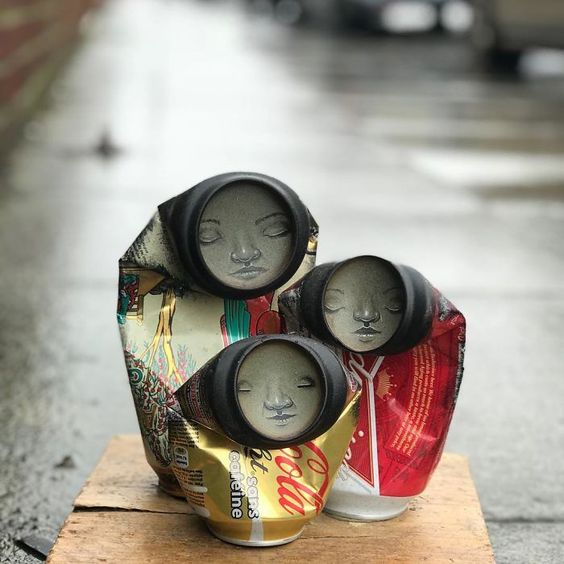
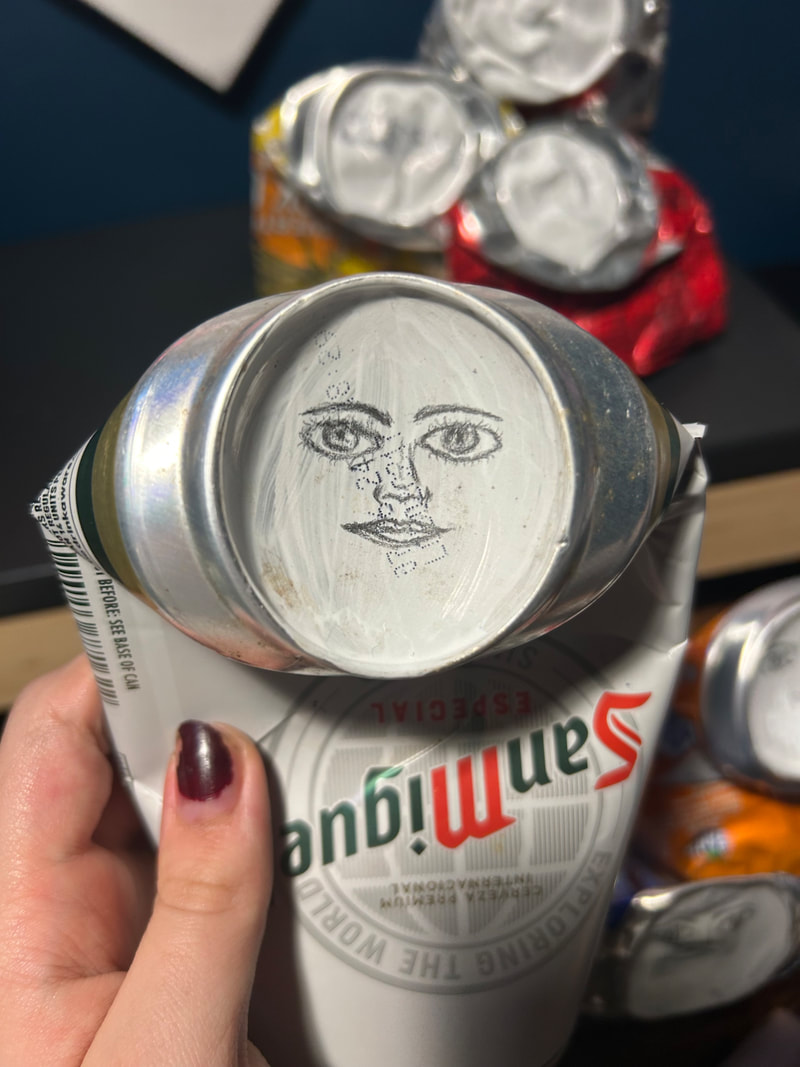
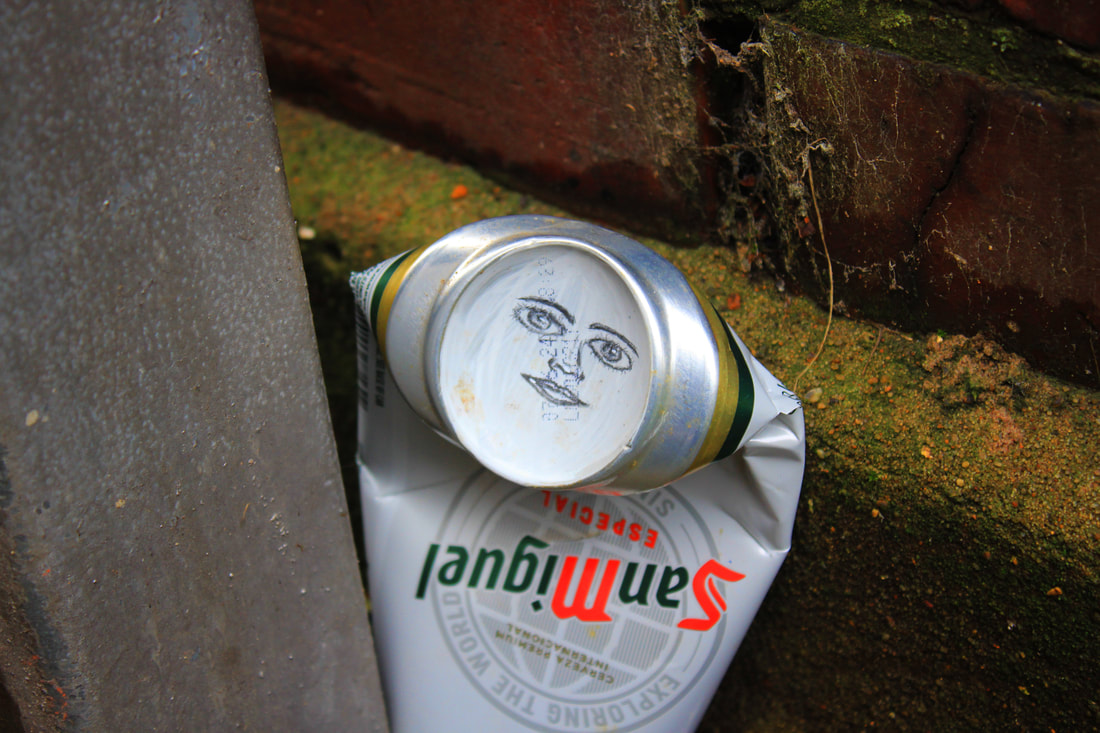
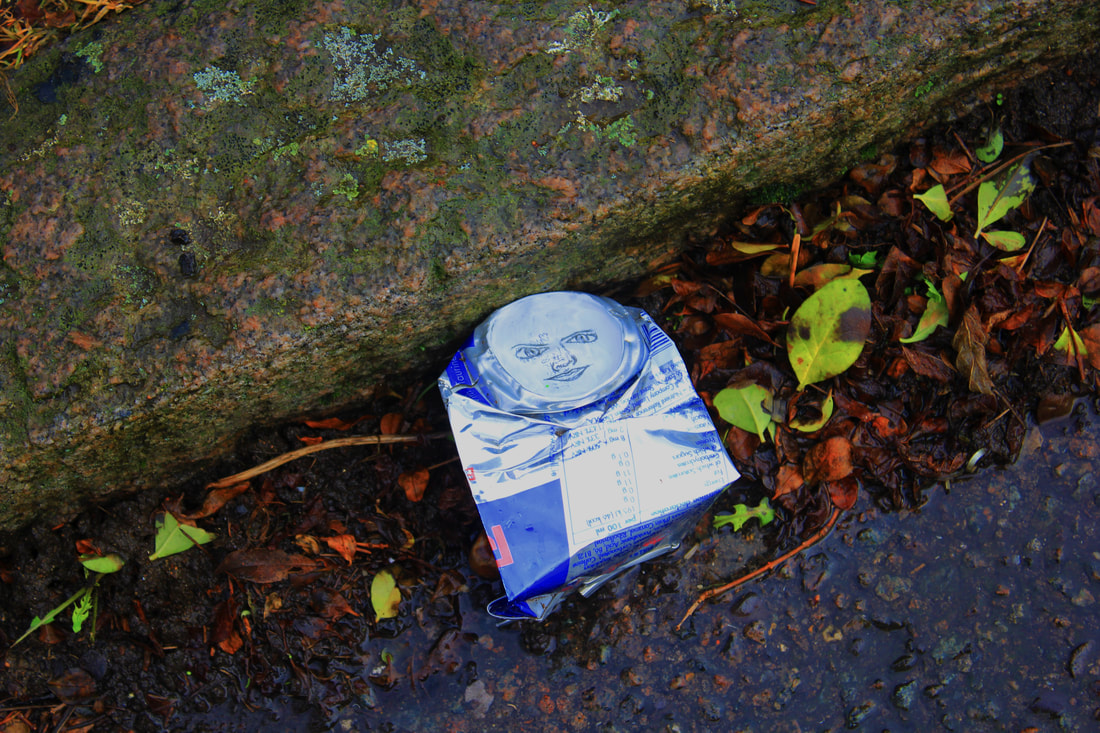
The next photographer I looked at is a street artist called My Dog Sighs who's style is characterized by the combination of melancholic and often naive portraiture with the use of found materials including abandoned food cans, this idea translates into my theme of regeneration well because he takes these found materials from the street and transforms them into something new.
After 10 years of giving his art away for free as part of the now infamous My Dog Sighs has this year finally found himself strapped in to a well-deserved rise. With an incredible international following in Israel, Japan and of course the UK, five sold out shows under his belt, and a strong following of staunchly loyal fans on social media; My Dog Sighs is fast becoming an important figure on the contemporary art scene.
My Dog Sighs (MDS) is a Portsmouth-based street artist, filmmaker, and author. Formerly a primary school teacher, MDS decided to quit his 'safe job' to pursue his passion for independent art.
Known initially for his ‘Everyman’ character, a child-like drawing offering uplifting expressions to the people of Portsmouth, MDS went on to coin the term ‘Free Art Friday’, helping to expand and define an international movement of artists who leave their work in the street for passers-by to find and keep. MDS has since staged multiple international sold-out shows and has garnered worldwide acclaim and recognition.
He has shared that he is a street artist before everything else, and Selling work in the gallery, print releases, all of those things are there to enable MDS to have fun on the street they provide an income and freedom to have a studio and to have time and space to explore the stuff on the street. He has expressed that the production of work on the street are the things that give him a chance to play and explore because when working in a closed space there are time and space limitations but working in an outdoor environment and that's exciting and freeing.
Examples of his work:
|

|
|
Making process:
To make these pieces I have combined art and photography first thing I had to do was gather materials for this I used discarded cans littered on the road and pavement I then brought these home and used pliers to unfold some which were run over by cars and flattened,

|

|

|
|
|
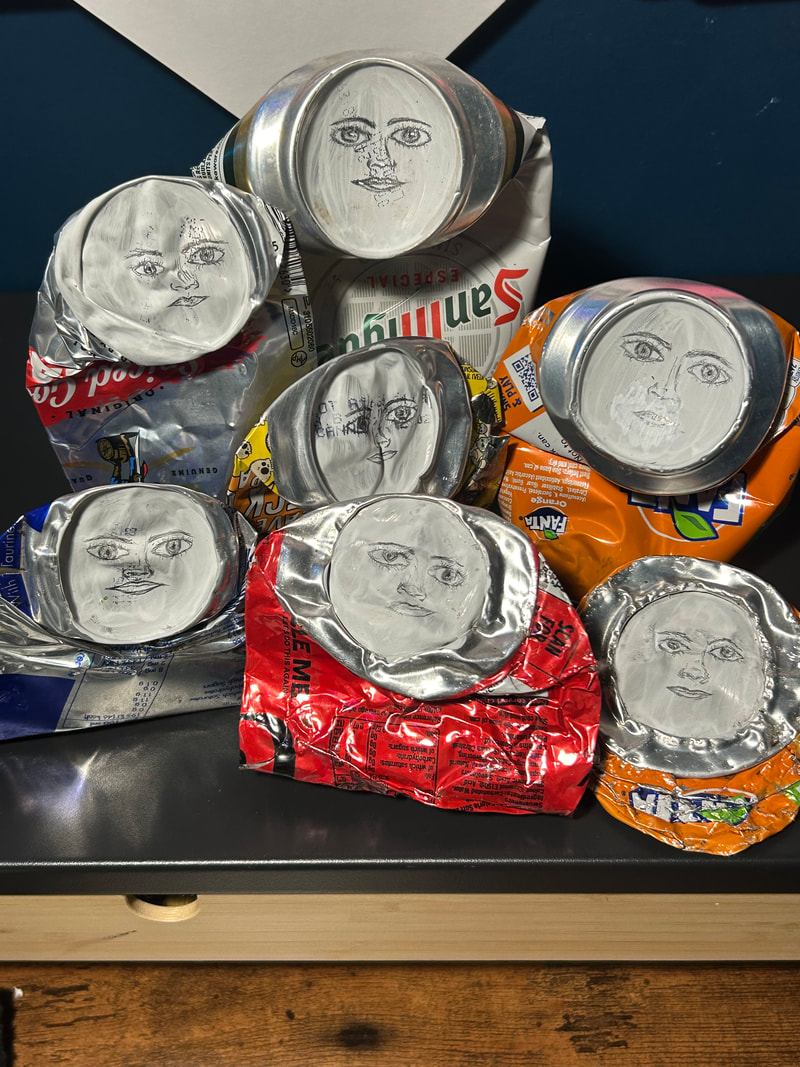
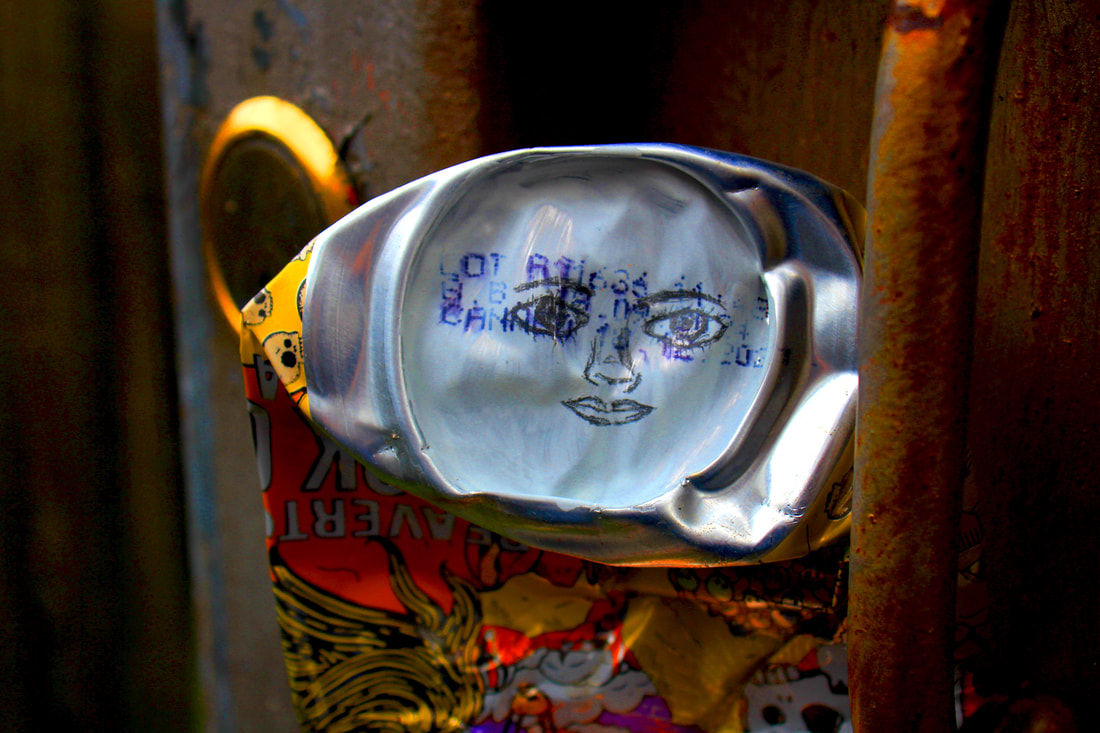
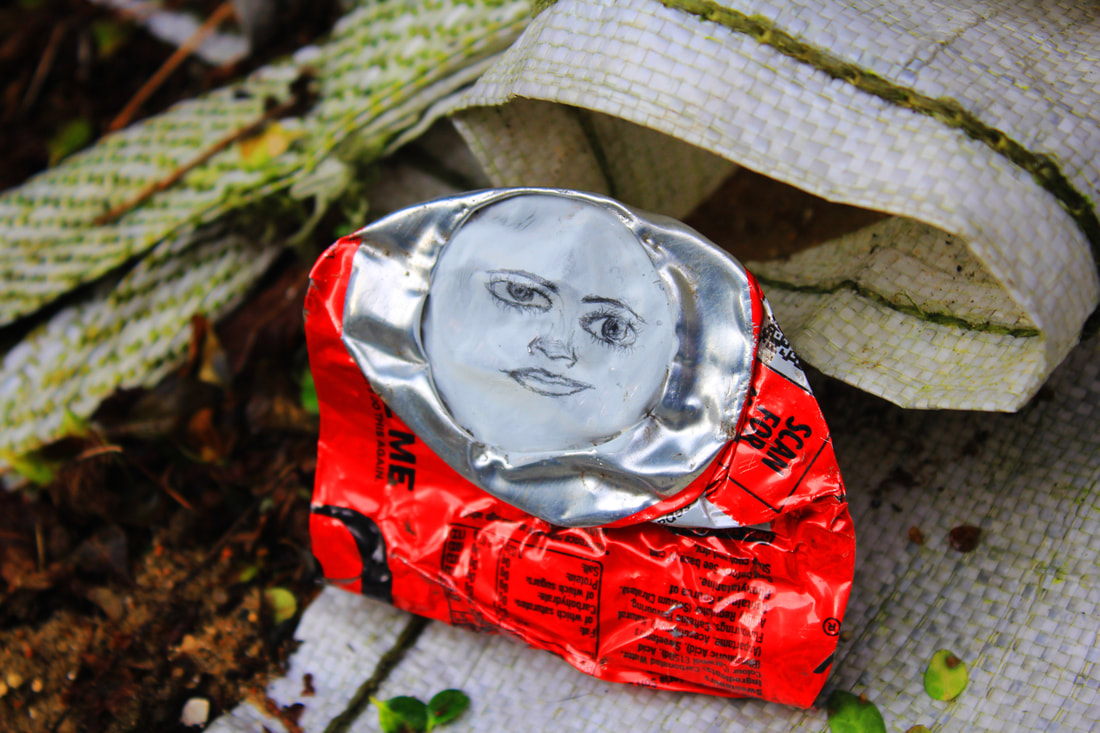
once I had them in a useable state I used a white acrylic paint to create a base on the bottom of each can which I could draw on with pencil I have drawn faces on each different can like Stone does in his work and I have finally taken them out and photographed them in different locations on the street.
My taken photographs
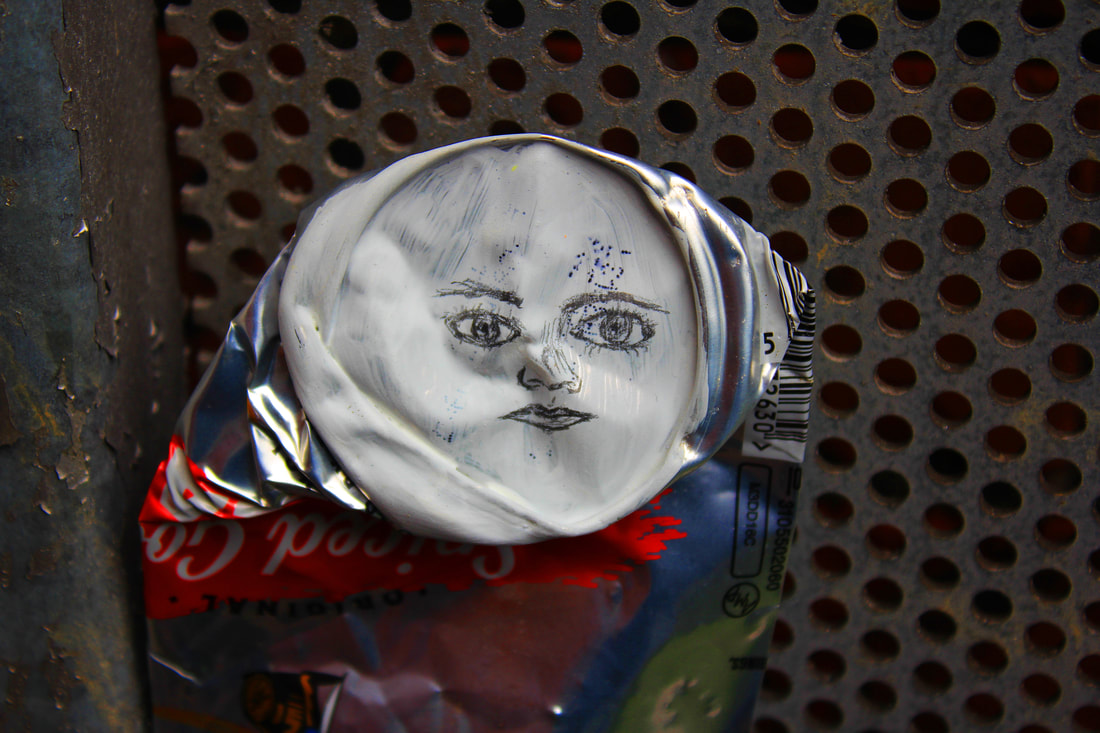
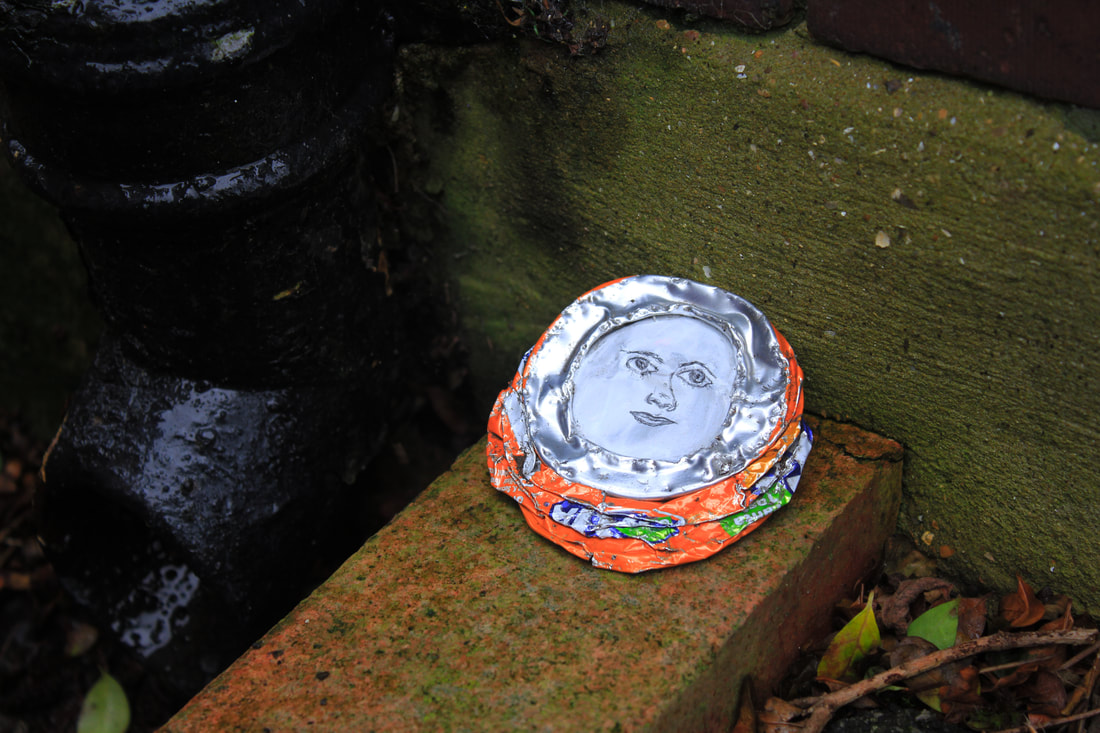
Once I had repurposed these old cans I wanted to take them back out onto the streets to take photographs of them in similar environments to where I originally found them.
WWW
What went well with these photographs is that I have managed to successfully draw face on to the white painted bases of
the cans some are slightly disfigured because of the crumpled up cans I think this adds to the effect of repurposing I have also effectively photographed each of these finished pieces in different locations in the street, on the pavement and in an alley
this helps to show where I found each of these discarded cans
EBI
These photographs could be even better if I could try using different types of discarded cans like this artist uses old food
cans I could also experiment with using paint on the actual cans and coloured pencil when drawing the different faces on the bottoms of the different cans
Final photographs
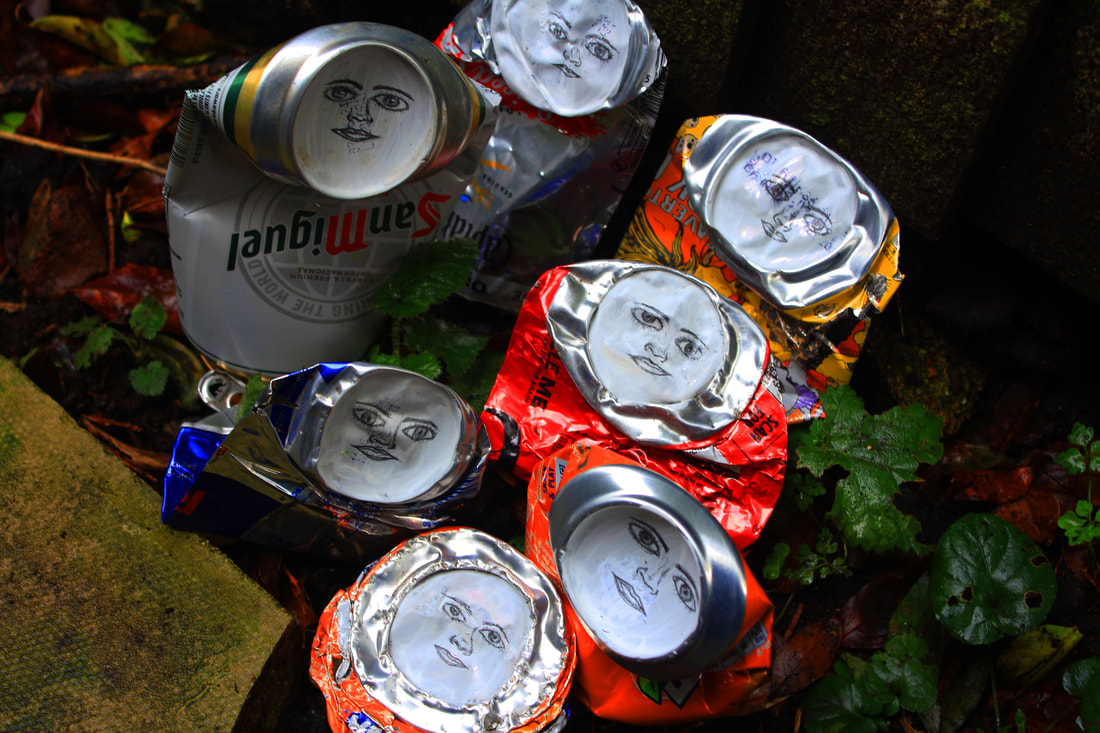
With these final photographs I have picked out my favourite and most successful photographs and taken them into to photoshop to edit them adjusting the contrast, brightness, vibrancy and the saturation to make the pictures the best they can be and further highlight the colours and details in both the can and the environments I have photographed them each in.
|


|
|
|
WWW
What went well with these photographs is that I have managed to capture the vibrant colours through photoshop enhancing both the objects and the surrounding environment as well as enhancing the quality and the highlights
EBI
These photographs could be even better if I could take more photographs of the cans randomly grouped together
Veronika Richterova
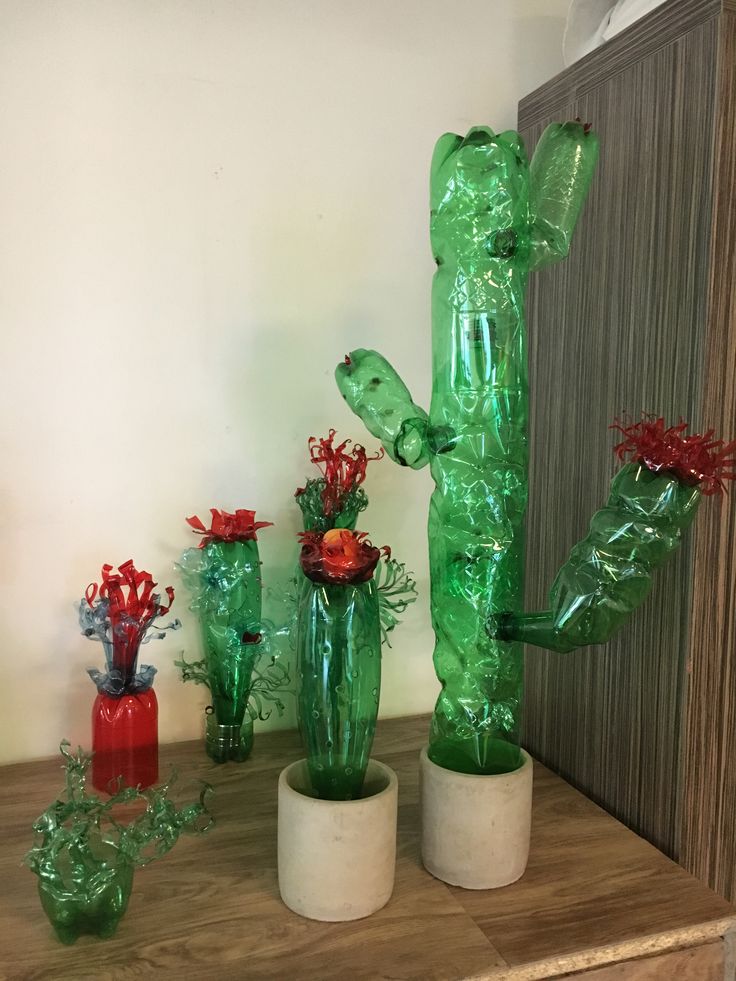
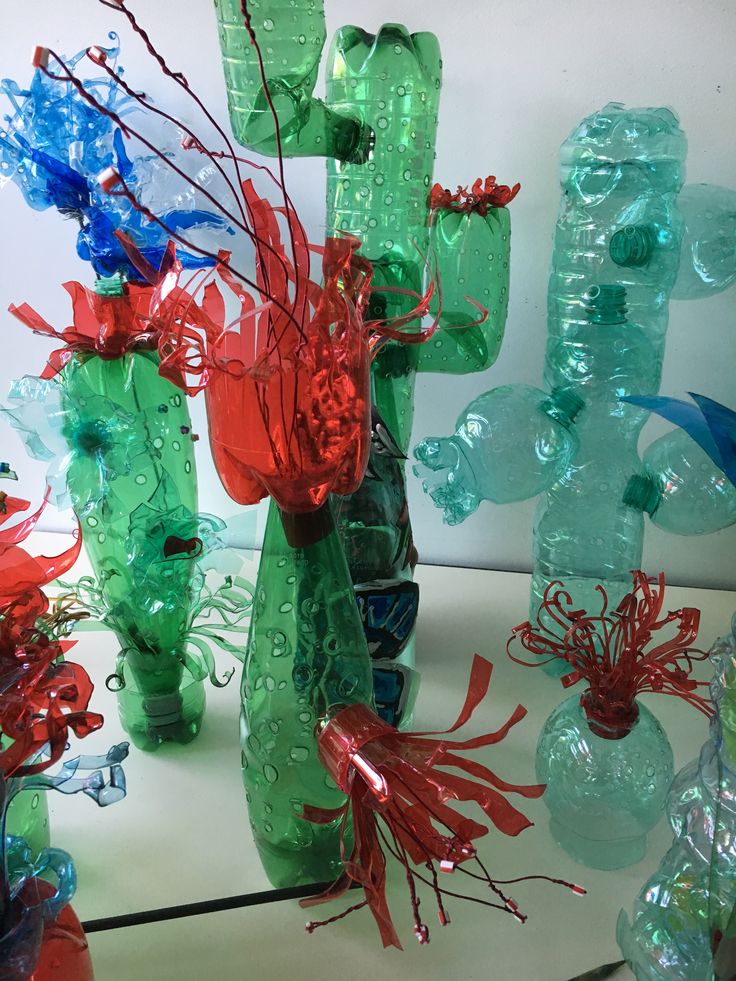
The third and final artist I have looked at before deciding which direction I want to continue to develop further in this project is a Czech artist called Veronika Richterova who creates beautiful artworks by repurposing plastic PET bottles. The artist uses various methods of cutting, heating, and assemblage to build colorfully translucent forms of everything from crocodiles to chandelier light fixtures and even plants. Besides creating these whimsical objects from the recycled bottles, she has also collected over 3,000 PET plastic objects from 76 countries she wrote about the history and usage of plastic in her article a tribute to PET. Richterová calls her work PET-ART as PET is the abbreviation of polyethylene terephthalate, the technical name for the common plastic she works with.
Richterová has become something of a guru when it comes to upcycling plastic bottles to create nature-inspired and cartoonish sculptures. The environmentally-conscious artist started her plastic practice (dubbed PET-ART) in 2004 and has been developing methods to reshape plastic objects into artworks ever since.
I am really intrigued by this idea of repurposing plastic bottles to make different sculptural type pieces and how I could translate this into my project of regeneration and all the different way I can approach and develop this further.
Examples of her work:
|
|
|
Editing process:
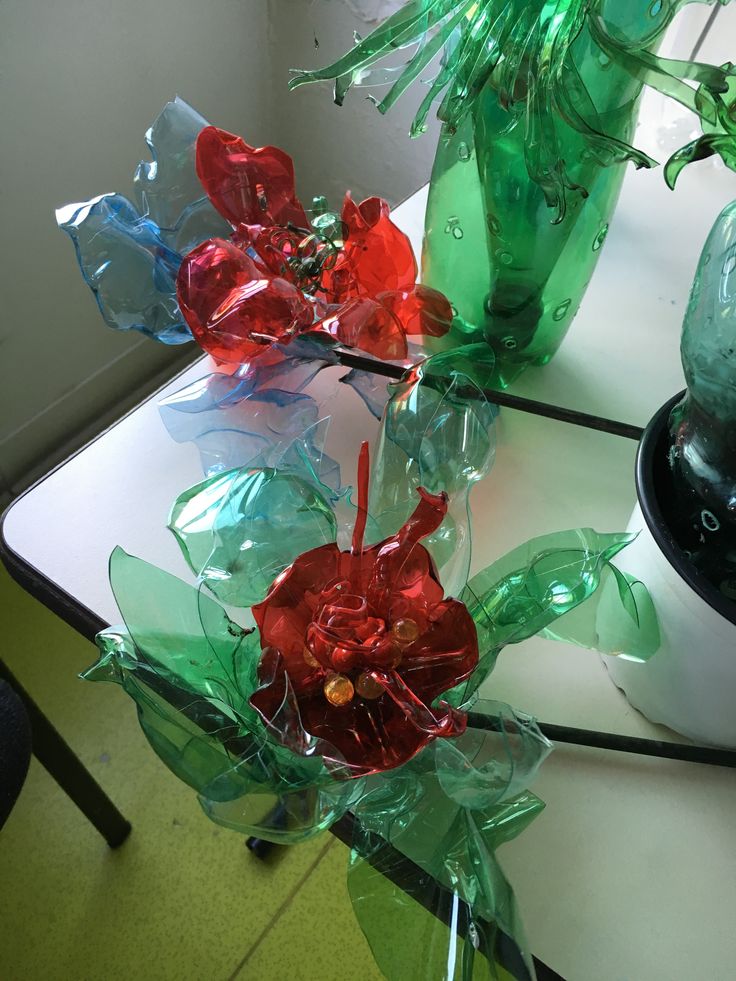
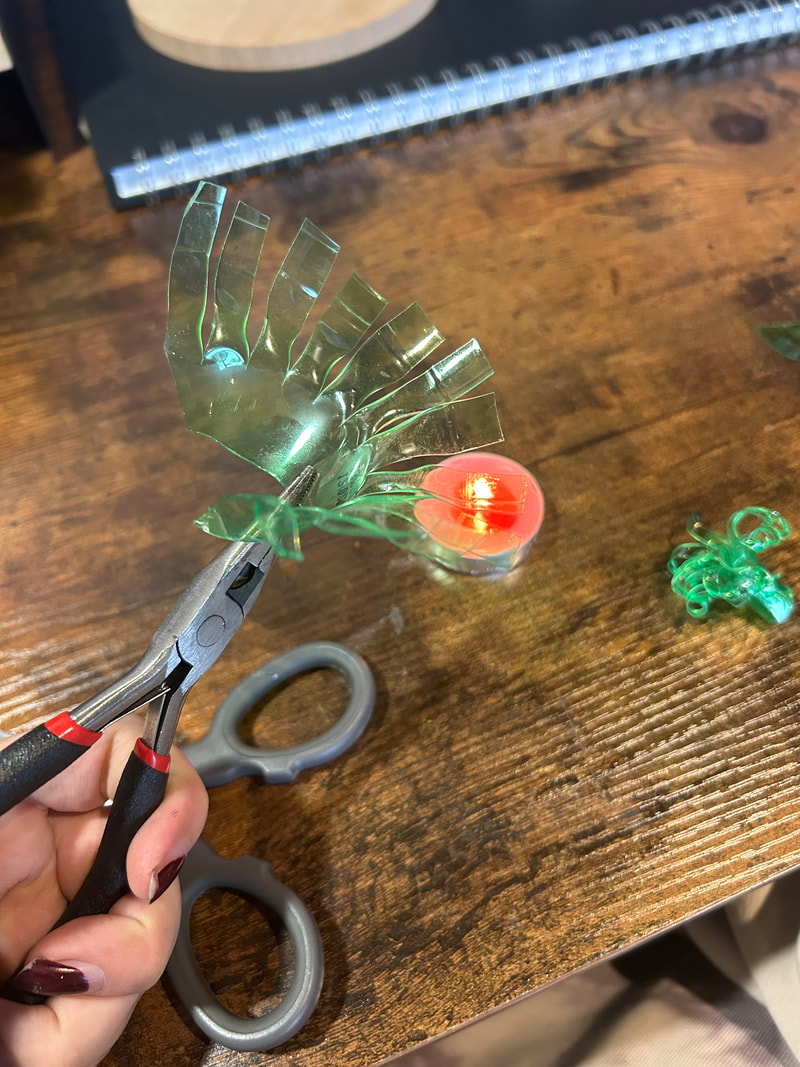
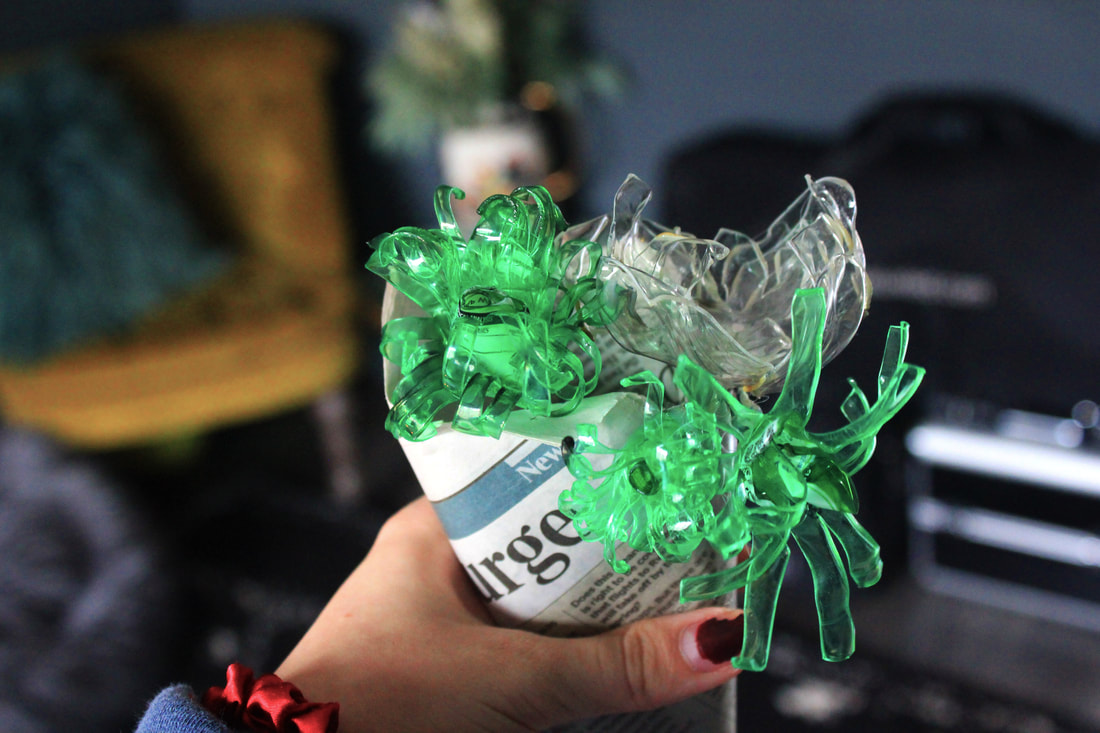
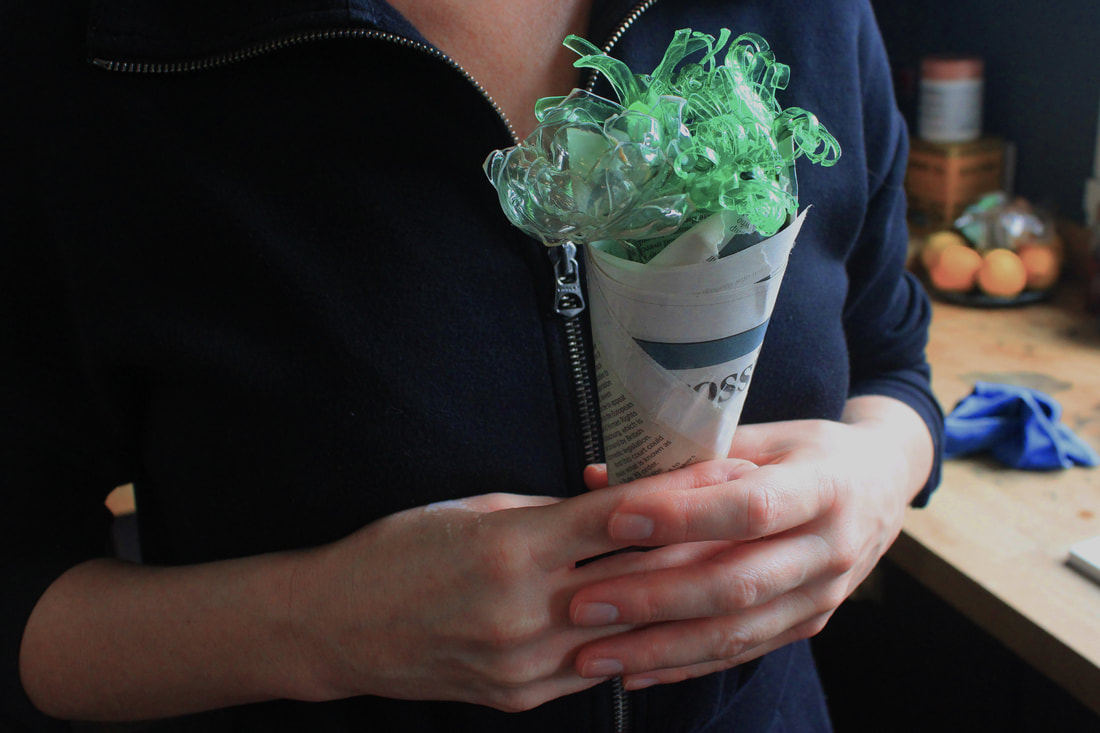
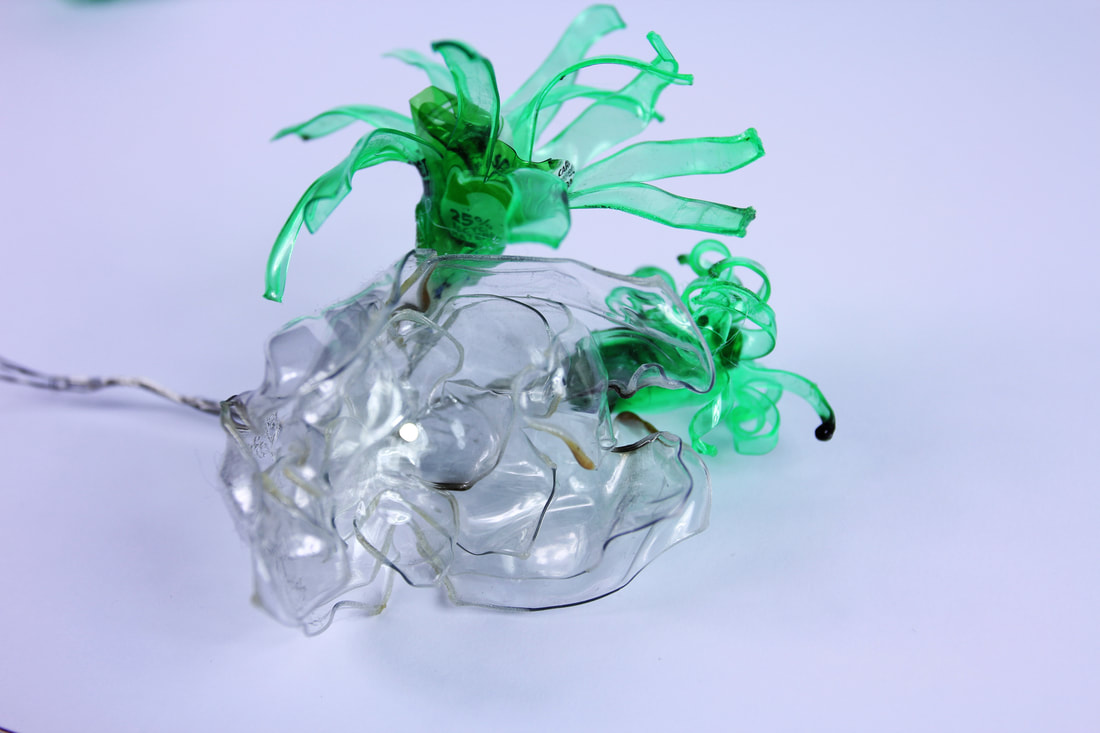
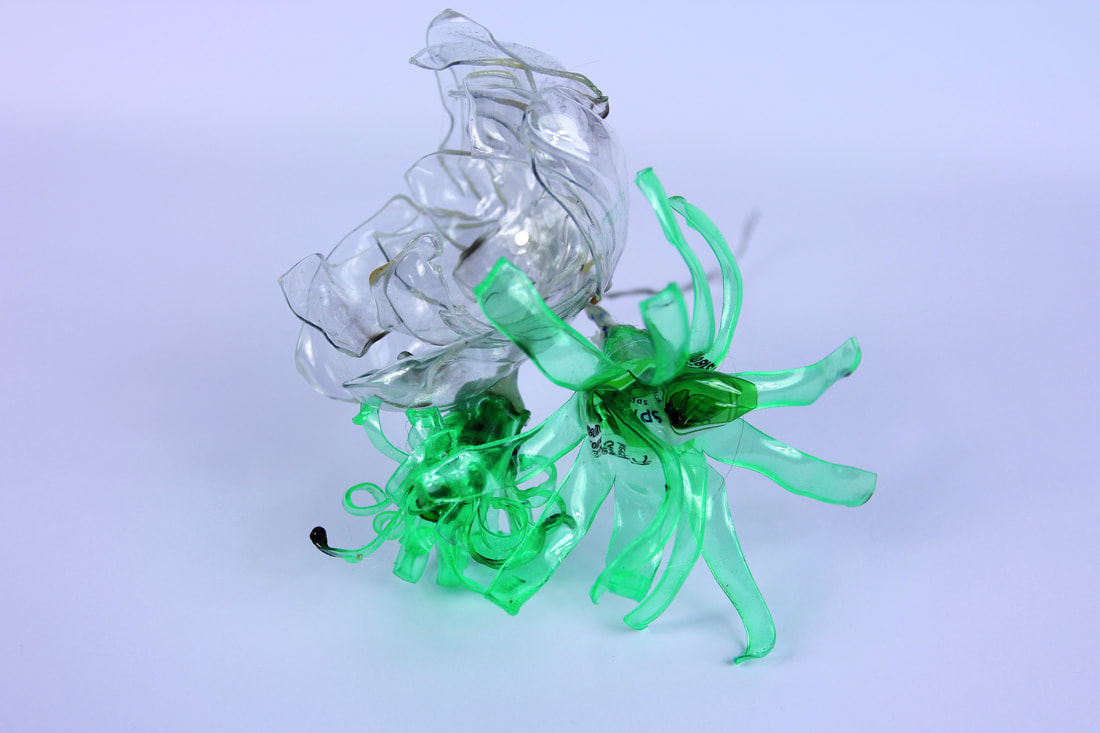
To make these plastic flowers I first had to collect littered plastic bottles from the street I tried to find uniquely coloured ones for more variety. To make these I had to use scissors, plastic, pliers, a lighter, wire and a glue gun, to make the flower shape I had to cut out sections of plastic and then use the scissors to cut different shapes for the petals.

|
|
|

|
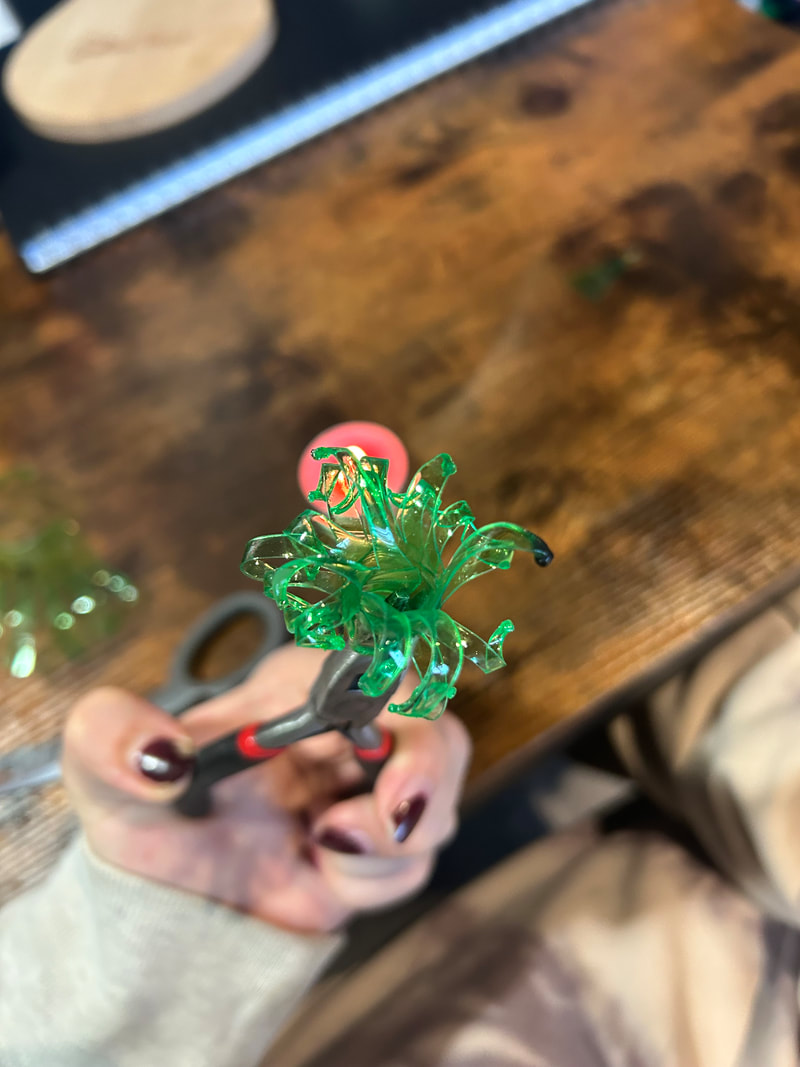
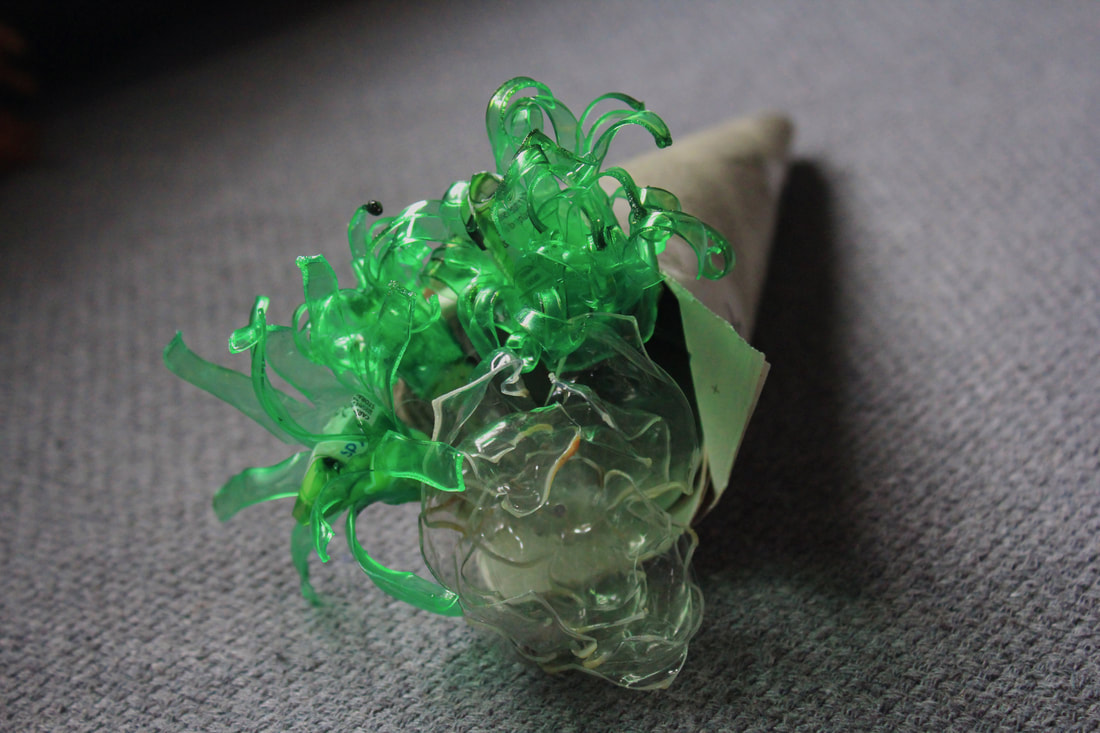
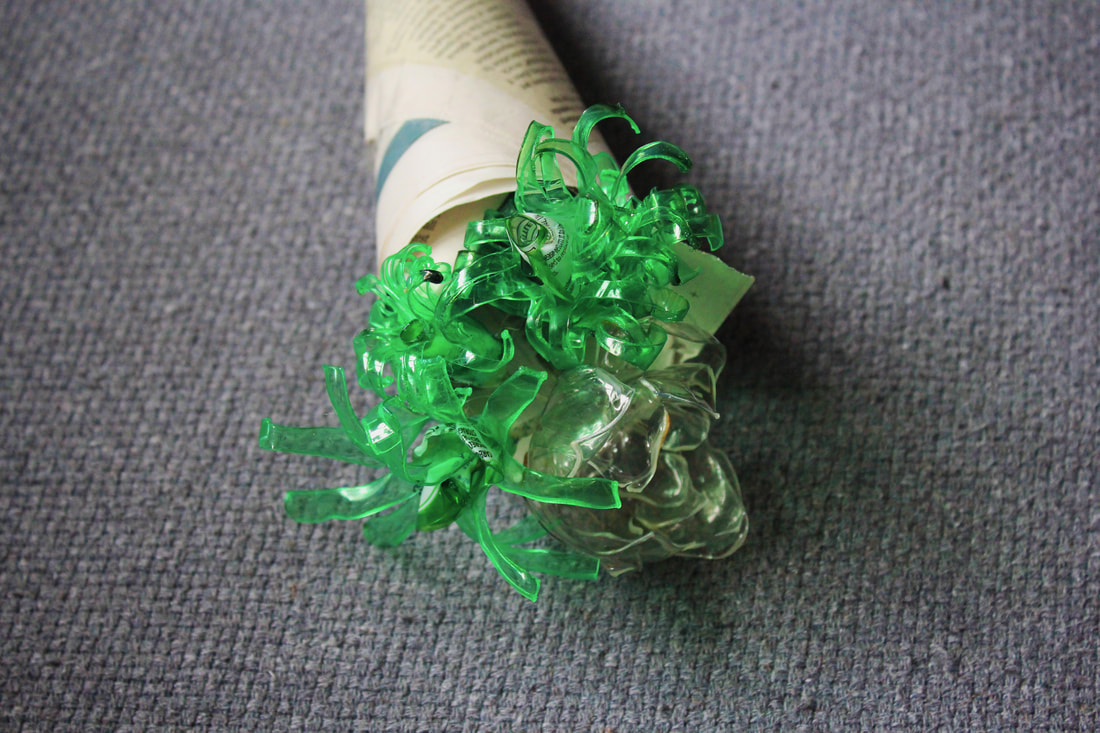
When the heat from the lighter is applied the plastic curls and shrinks to create different petal like shapes. Once I have the petals I can use my glue gun to join the ends to make the round shape and also attach the whole flower to a wire which acts as a stem allowing me to intertwine all of the different plastic flowers when I am finished creating them. I also later used old newspaper to make a makeshift flower bouquet to put them in.
My taken photographs
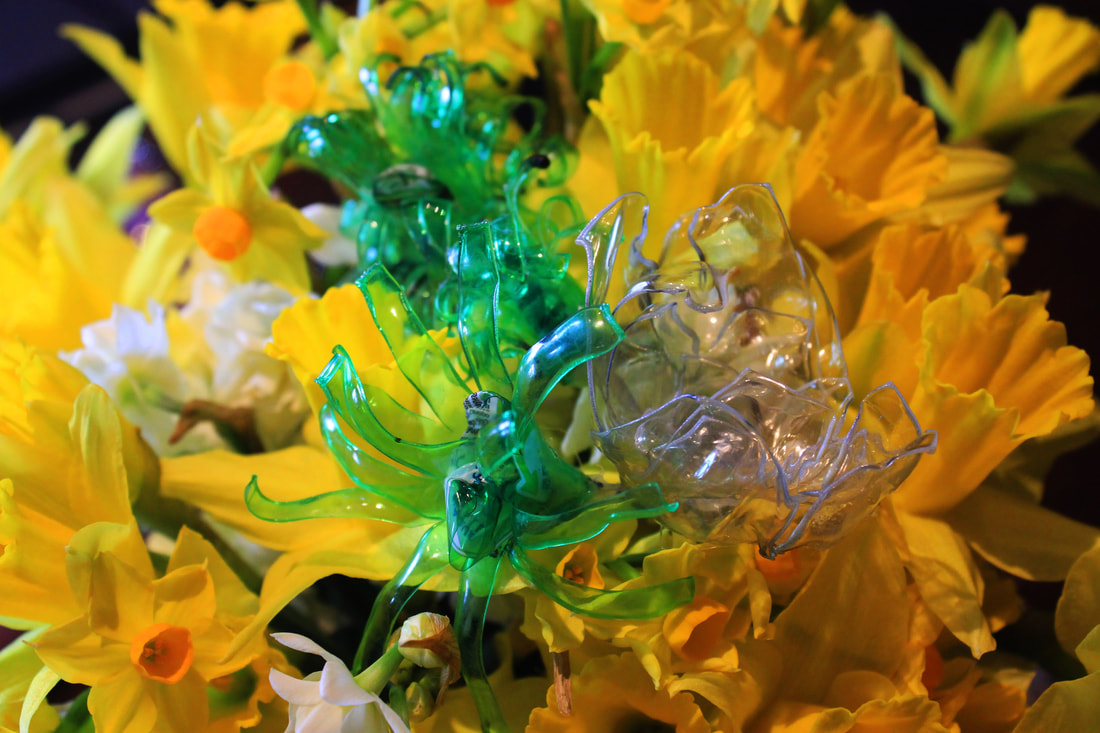
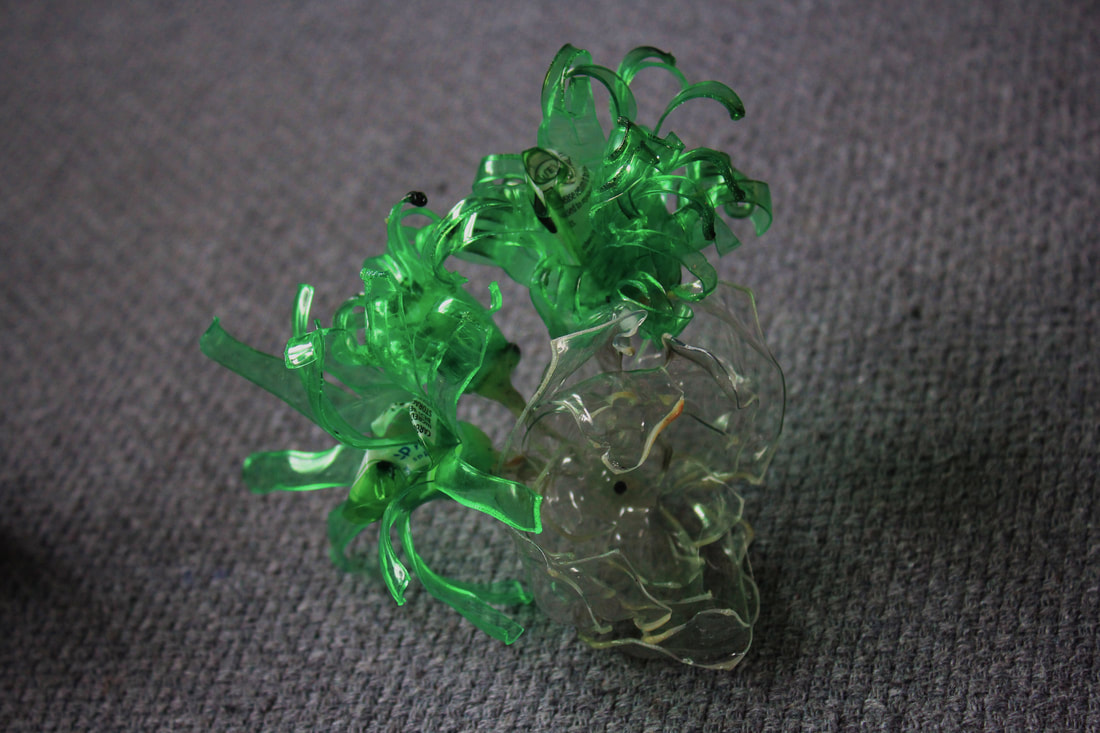
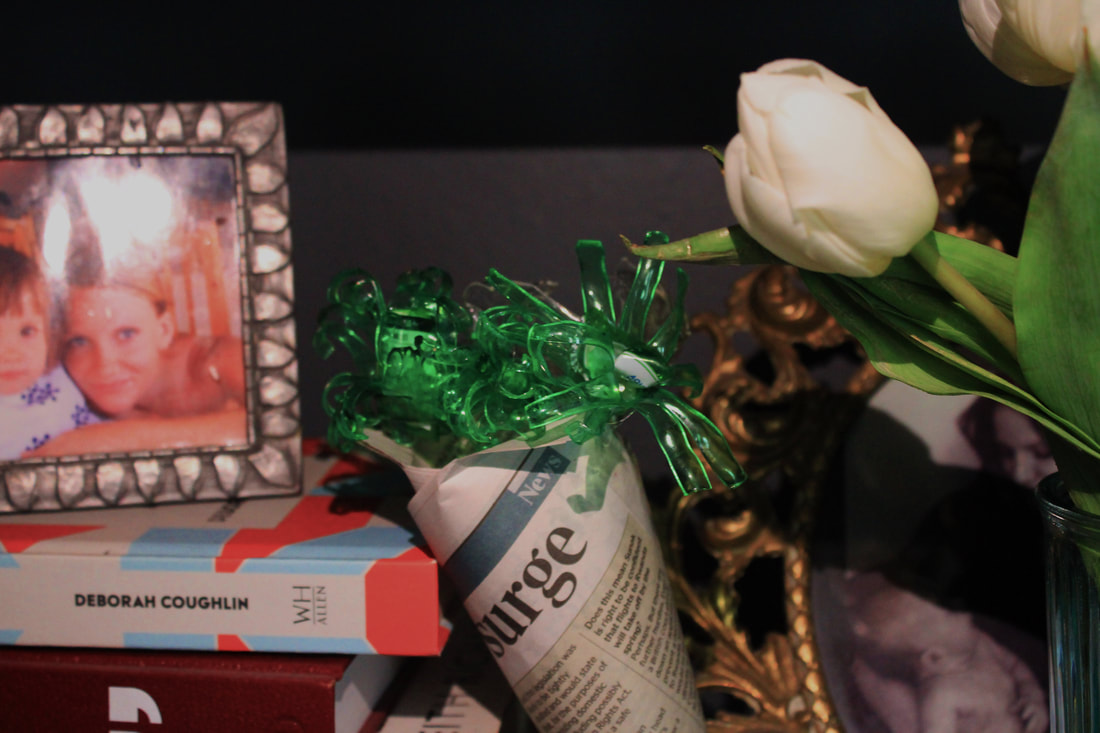
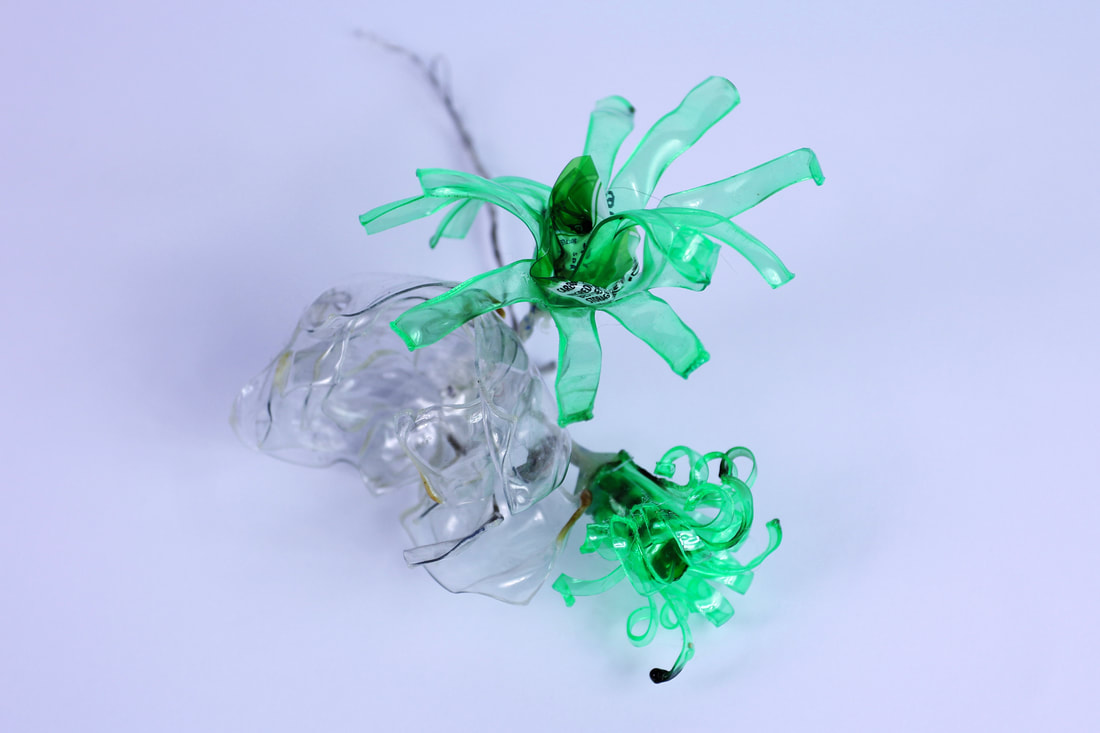
After I have created these plastic flowers I wanted to take photographs of them in a variety of different formats such as being up held like a bouquet by a person and an up close photos against blank a background or mixed in with a real bunch of vibrant flowers or on a shelf surrounded by objects and pictures all places to show the flowers in different locations
WWW
What went well with these photographs is that I have managed to capture these flower sculptures placed in a wide variety of
different locations to show how they contrast against different surfaces
EBI
These photographs could be even better if I could make more flowers to make a bigger bouquet or even make different plants
or objects out of the plastic bottles
Final photographs
When editing these final photographs I have selected out my favourite photographs from each of the different locations I have chosen to use as backgrounds and I have taken the to photoshop to edit them making the colours more vibrant and adjusting the brightness and contrast to make the shapes standout more.
|

|
WWW
What went well with these photographs is that I have managed to use photoshoot to enhance the vibrancy of the colours as well as the contrast which increases the details within the flower sculptures
EBI
These photographs could be even better if I could make more flowers to make a bigger bouquet or even make different plants
or objects out of the plastic bottles
First development
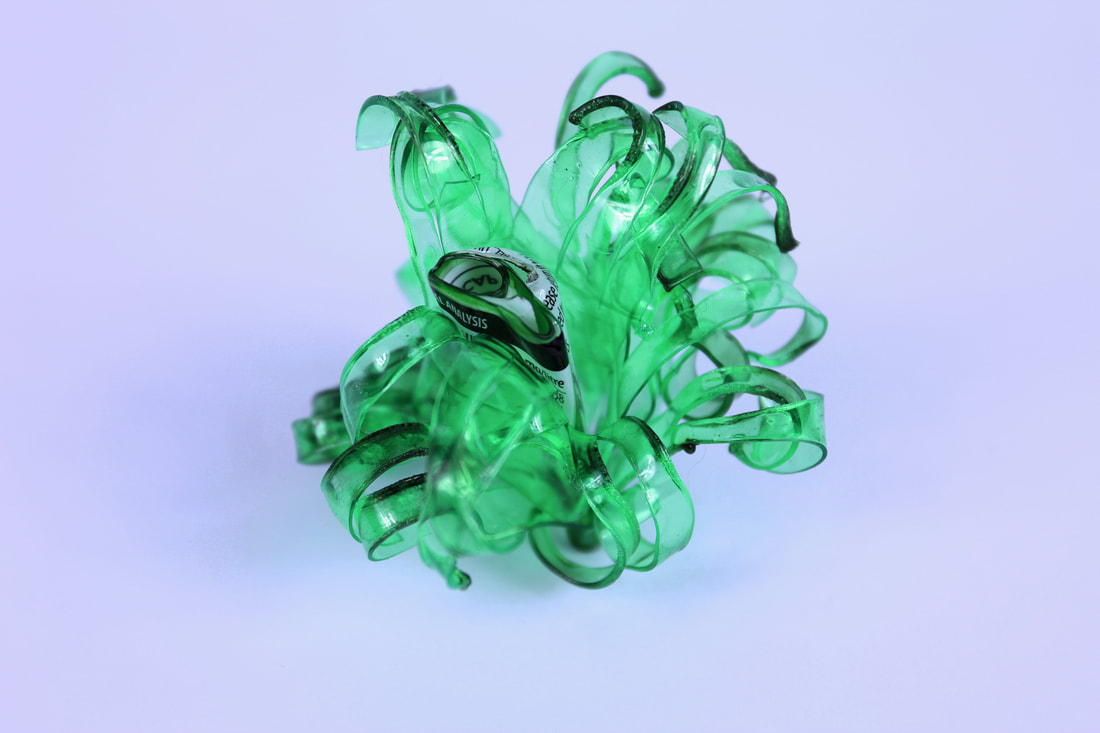
For my first development I wanted to continue to look at the recycled plastic flowers that I made and manipulated. I wanted to try taking another photoshoot of them but this time using bright lighting and a plain white background to enhance the effect and make them the soul focus of the photographs.
My taken photographs:
WWW
With these photographs I have taken the previous photoshoot with these plastic flowers into consideration and one of the most successful elements was when I was able to look better at the elements such as colours and details with in the sculptures
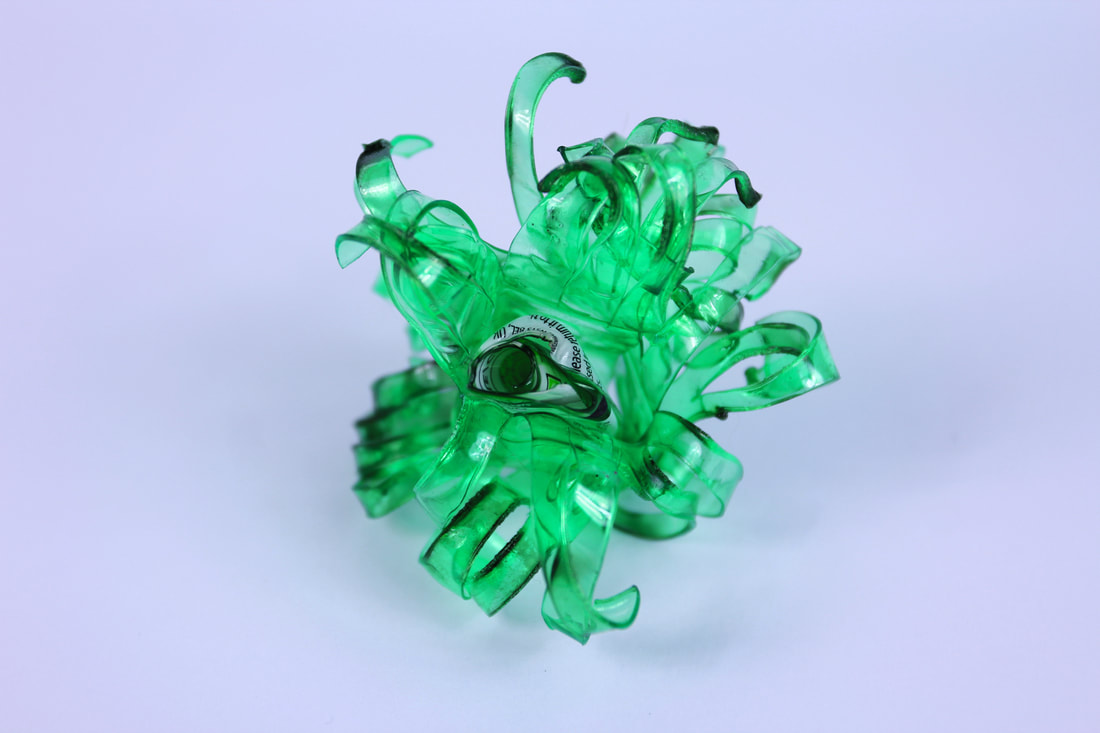
so using that I have rephotographed them but this time on a plain white background which successfully makes them the soul focus in the photographs
EBI
These photographs could be even better if I could incorporate more sculptures to have a whole bunch comprised with different colours and different types of flowers to increase the variety and contrast
With these photographs I have taken the previous photoshoot with these plastic flowers into consideration and one of the most successful elements was when I was able to look better at the elements such as colours and details with in the sculptures
so using that I have rephotographed them but this time on a plain white background which successfully makes them the soul focus in the photographs
EBI
These photographs could be even better if I could incorporate more sculptures to have a whole bunch comprised with different colours and different types of flowers to increase the variety and contrast
Final photographs
|
|
WWW
What went well with these photographs is that I have managed to use photoshoot to enhance the vibrancy of the colours as well as the contrast which increases the details within the flower sculptures making them standout even further against the white background
EBI
These photographs could be even better if I could incorporate more types of sculptures so that i have a whole bunch comprised of different colours and types of flowers to increase the variety and contrast
Second development
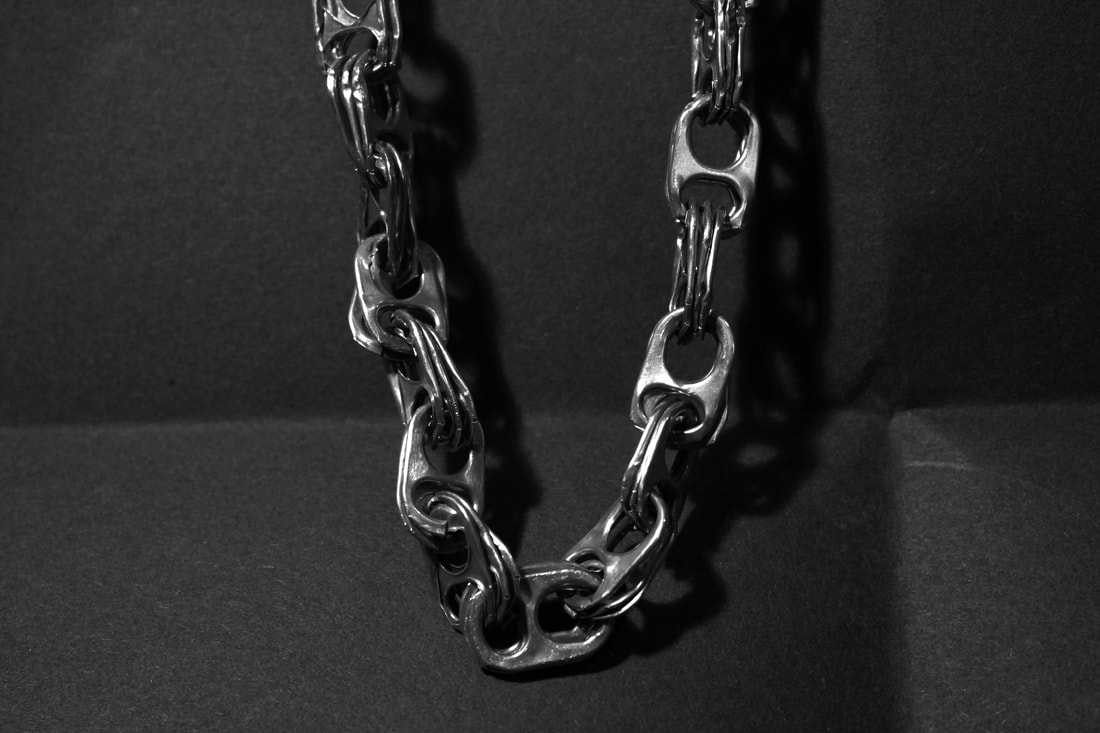
For my second development after exploring these three different artist I wanted to continue with the idea of using recycled objects and repurposing or regenerating them to make something new I thought it could be interesting to take the idea of manipulating discarded bottles but develop it further to making these sculptures into actual usable objects such as jewellery like earrings and necklaces.
Yoav Kotik
Yoav Kotik is a jewellery maker and artist, he didn't discover this repurposed line of art till after he retired and he was bored wanting to experiment with craft work. Kotik decided to give himself a rule that all his raw materials are found and not bought when he began searching for scrap pieces of metal he ended up collecting a lot of metal bottle caps which he decided were full of potential.
He began to turn these collected pieces of scrap it jewellery when he got given a jeweller's set that his sister in-law didn't want anymore, Kotik at first got inspiration from jewellery he saw on markets when travelling in Kenya and he polished and started to bend these bottle caps he was instantly overwhelmed by the results and began to collect more from local pubs and also started to experiment further.
Since Yoav Kotik had no background with jewellery or with jewellery making techniques and methods he's has ultimately ended up developing his own techniques and type of jewellery style.
Examples of his work:


My taken photographs
WWW
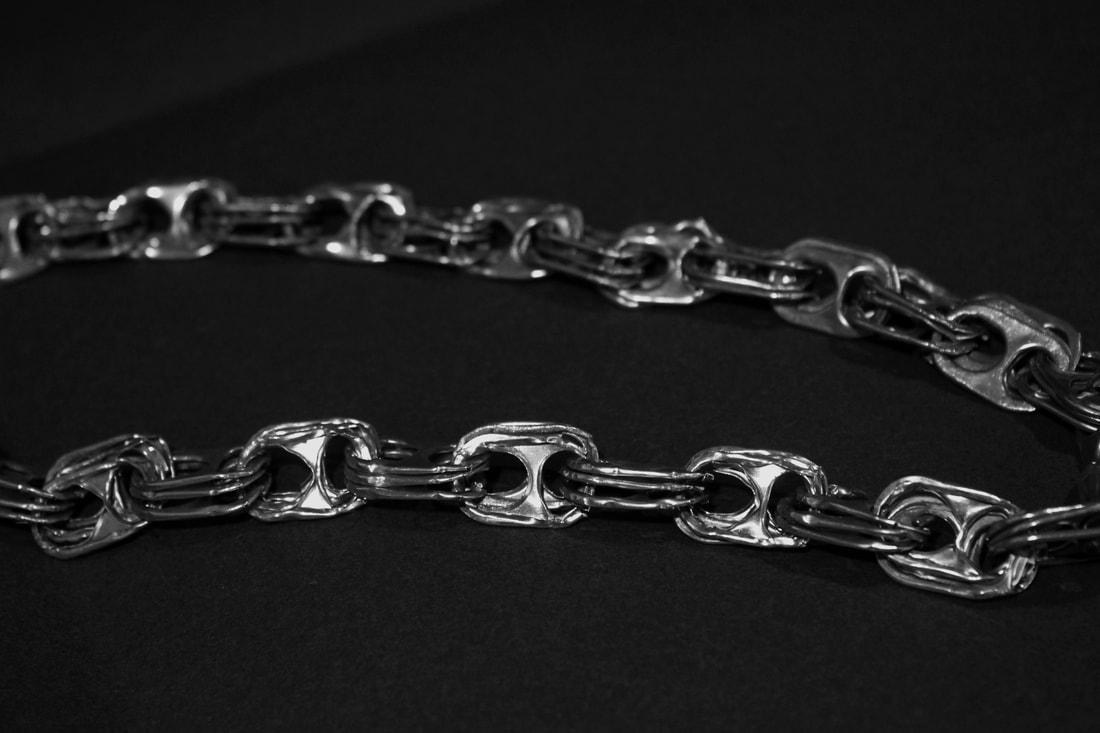
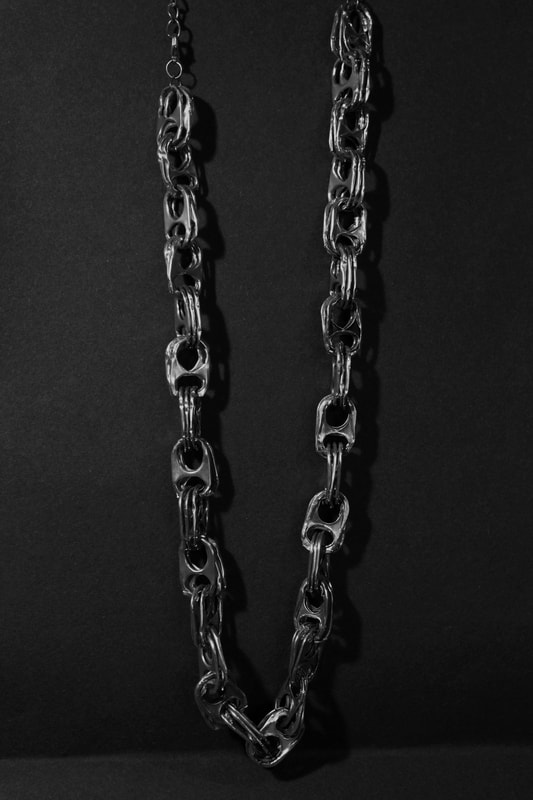
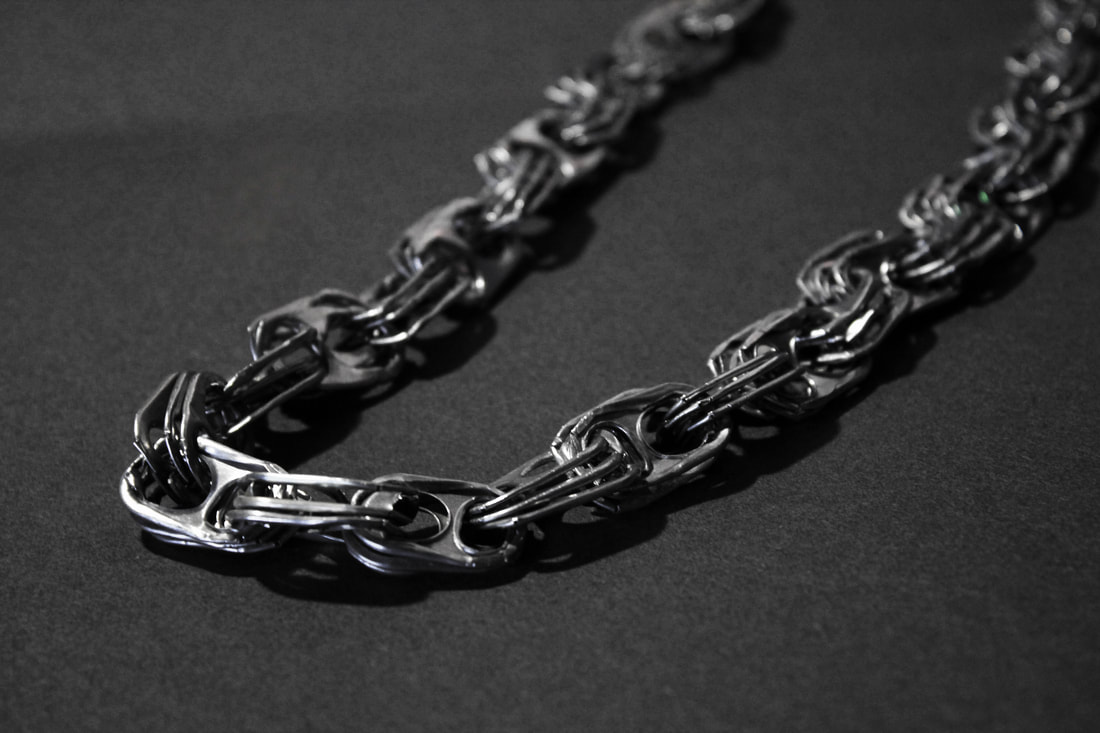
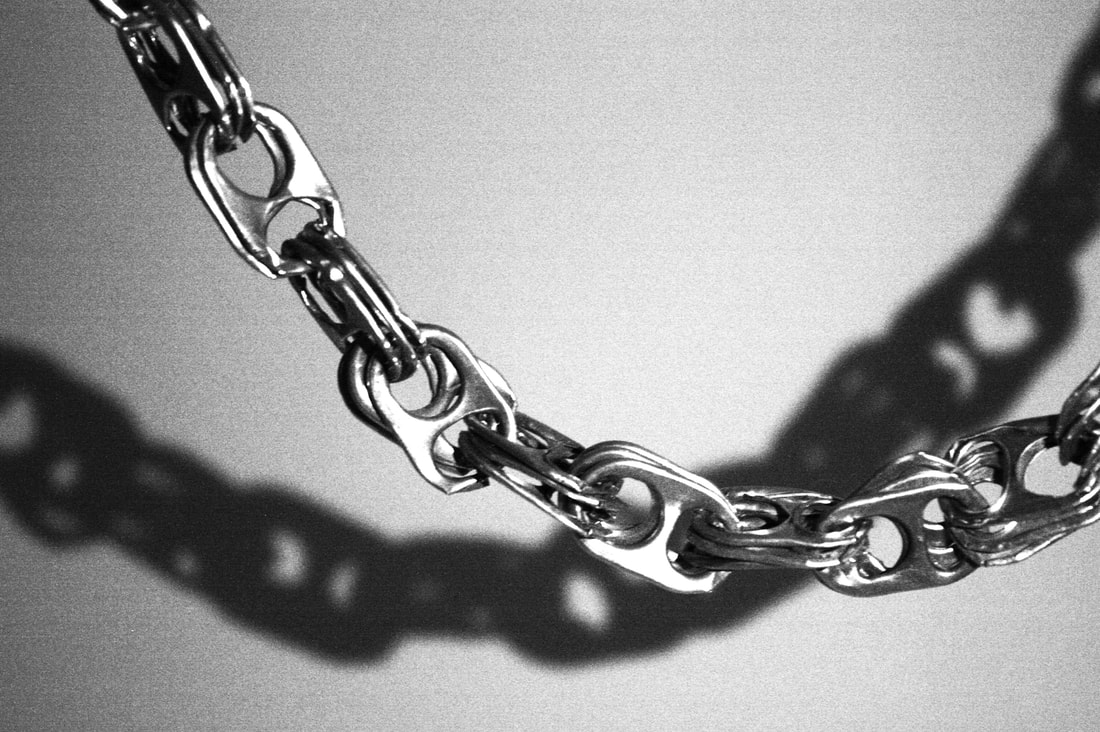
What went well with these photographs is that I been able to photograph this to show the intricate detailing that went into constructing and making this necklace, also putting it against a plainer background allows it to standout more showing what it used to be and what its comprised of
EBI
These photographs could be even better if I could could increase the darkness of the background to help the necklace stand out even more, I also think it would be interesting to explore further how the shadows look and form
Making process:
To make this necklace I had to collect lots of can tabs to collect these I looked on the street and I also asked family and friends to hold onto any that they used bringing all of these together I started to make this chain like necklace where I used three tabs to make each
link . To make each link I used pliers to cut an opening in the top of each tab meaning I could connect each tab and I continued this process using three on each until I had a whole length of chain which I then used the piers to attach a length of chain and a clasp so it was now a functioning necklace.
link . To make each link I used pliers to cut an opening in the top of each tab meaning I could connect each tab and I continued this process using three on each until I had a whole length of chain which I then used the piers to attach a length of chain and a clasp so it was now a functioning necklace.
Final edited photographs:
In this final edit I have used photoshop to edited some of the previous photographs in a way that highlights the necklace and darkens the background helping the necklace to standout more to do this I have focused on saturation, contrast and brightness in photoshop.
|

|
WWW
What went well with these photographs is that I been able to edit these photographs in photoshop to create a darker
background allowing it to standout more whilst increasing details on the necklace itself and enhancing the darkness of each shadow that the necklace has cast
EBI
These photographs could be even better if I could explore the different shapes of the shadows that this necklace has casts
onto the background, I could do this by doing a second photoshoot but this time instead of using a using a pain black background I could use white to help really make the shadow standout
Second Photoshoot
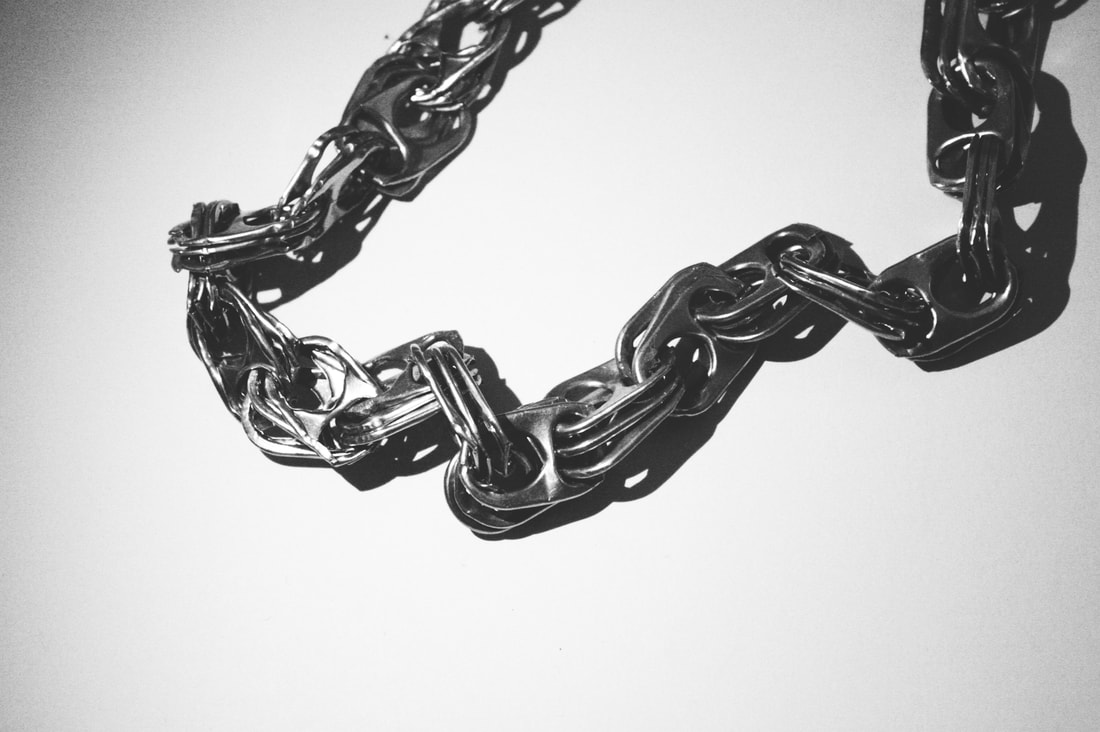
I decided to do a second photoshoot with the same necklace as my subject but in this shoot I have used a white background instead of a black one like I did previously I want to compare the final results and see which is more successful and which I prefer.
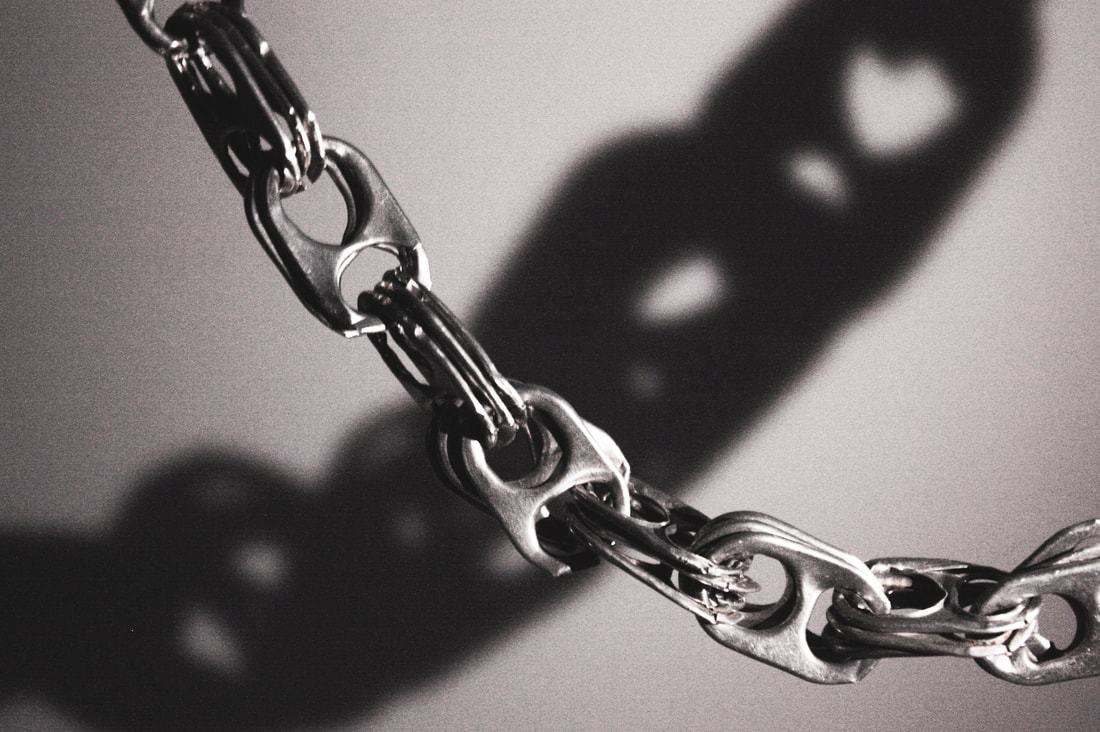
With this white background I have more freedom to experiment with the presentation and photos overall for instance using both overhead lights and a torch I can create different shadows and reflections making interesting shapes.
With this white background I have more freedom to experiment with the presentation and photos overall for instance using both overhead lights and a torch I can create different shadows and reflections making interesting shapes.
My taken photographs:
WWW
What went well with these photographs is that by using white I allow myself more freedom to use lighting and different angels
to create more interesting shapes for both the necklace and the shadow it creates
EBI
These photographs could be even better if I could alter the contrast in photoshop to make the background lighter and more white whilst darkening the shadow, as a result this would enhance the impact of the whole photograph
Final edited photographs:
In this final edit I have using photoshop edited some of the best photographs out of the previously taken selection, when editing I wanted to darken the shadow whilst lightening the white background making more of a contrast between the two whilst also keeping the necklace a clear part of the photograph, to do all of this I have focused on saturation, contrast and brightness in photoshop.


|

|
WWW
What went well with these photographs is that by photoshop to could alter the contrast, saturation and brightness I was
able to make the background lighter and more white whilst darkening the shadow and at the same time I have been able to emphasis
the highlights in the metal of these can tabs
EBI
These photographs could be even better if I could take more photographs that looked closer at the smaller details int each
individual can tab looking at how they are linked together and the way some are bent or distorted from being older
Next development:
For this next development moving on I wanted to try and move away from altering the objects I find and explore further with discarded object overall looking at all the different things that get thrown away and abandoned. I was also intrigued by the presentation element of my previous development I would like to collect objects from different areas the clean them up and present them in different ways.
Skip bins:
For this new development I want to collect all different types of objects from different places so for the first location I have decided to explore objects found within skips, because not only is a skips purpose to be used to hold discarded objects but as they are usually kept on the street outside of houses they often end up getting filled with things other people drop in when passing by.
Skip bins are described as large metal containers which are designed to be easily transported and to contain a certain amount of rubbish. Commonly used by homeowners and business owners and larger organisations such as schools, hospitals and factories, hiring a mobile skip bin allows for the easy disposal of waste of all kinds primarily when doing building and renovations.
skips are the most common type of waste disposal system used in the UK, with an estimated 2-3 million skips being used annually. Skips are available in a range of sizes, from small 'mini' skips, to large 'maxi' skips. The size of skip you need will depend on the amount and type of waste you are disposing of. Within the 1920s, tradespeople in the Southport area of England started using containers that closely resembled the ones used in the coal mines. From functioning as construction skips to collecting general waste, this is where they began to be used for rubbish removal.
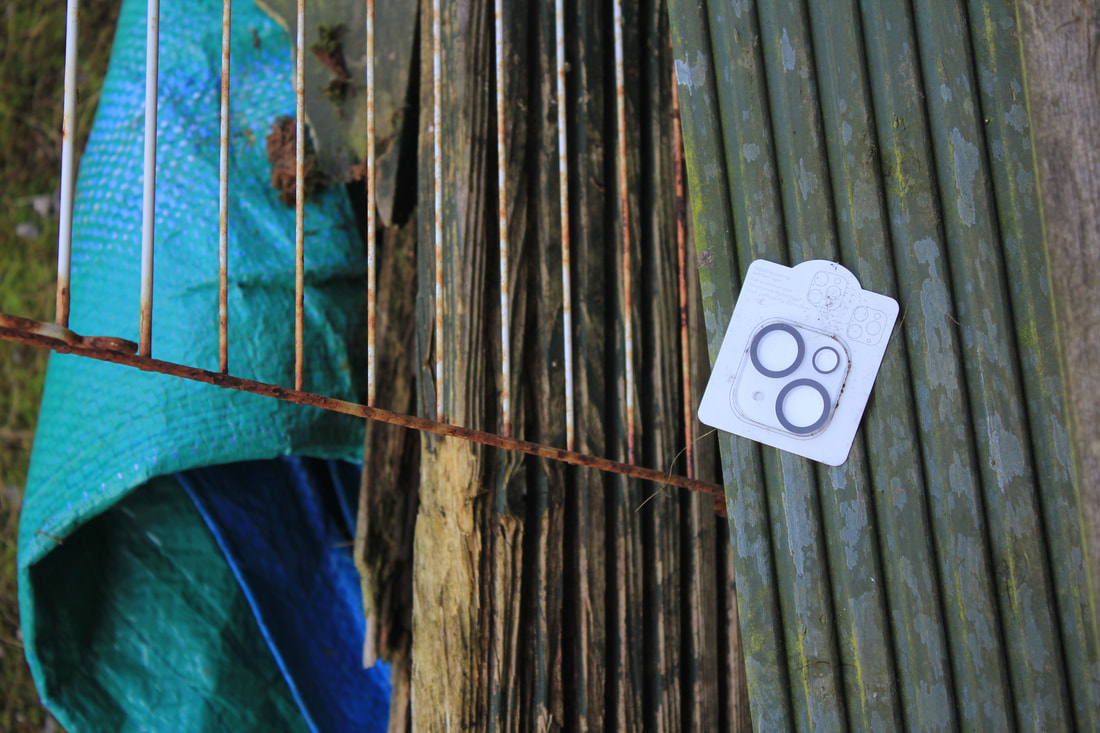
My taken photographs:
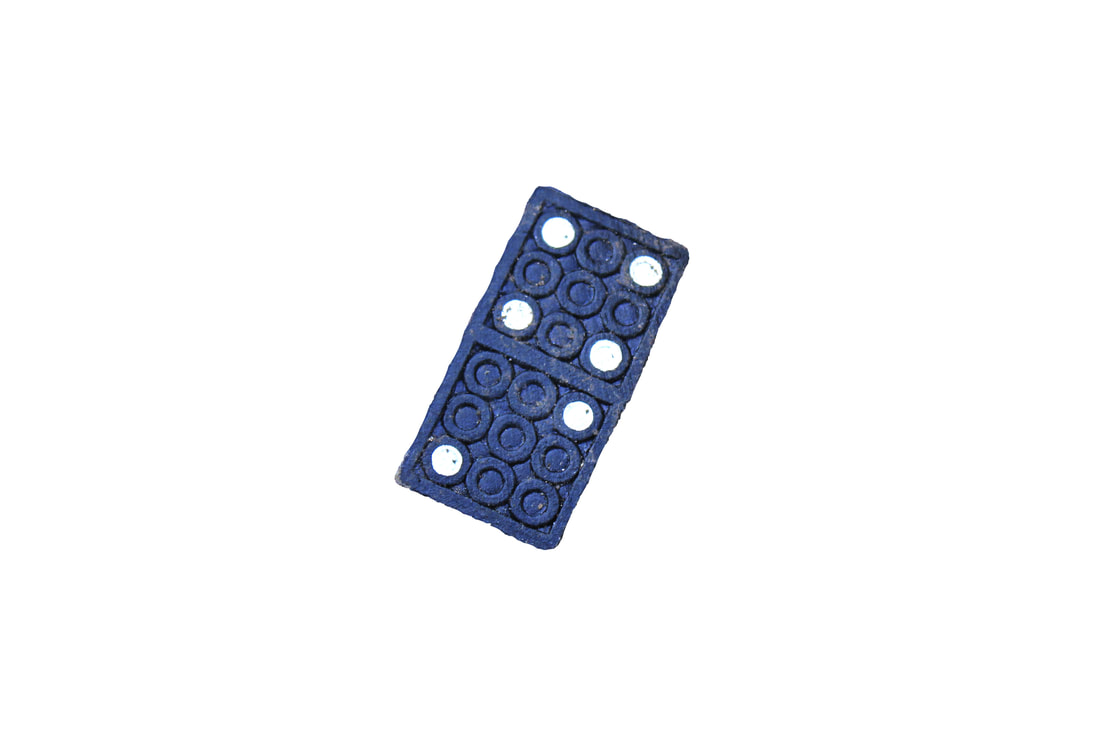
These are my taken photographs of different objects I have found, photographed and then collected from different skips around the streets close to where I live, my aim is to take these home and clean them up and re-photograph them with a white background to see the difference in presentation.
WWW
What went well with these photographs is that I not only been able to find a wide variety of different discarded objects but I was
also able to photograph them in the places I found them in clear quality which allows me to look back on these original photographs to look at the state that I found them in compared to the state they are currently in
EBI
These photographs could be even better if I could also get photographs of these objects against a white background so I
can get a clear image of what specifically I have found
Step by step editing process:
In an attempt to aid my comparison I have taken some of the photographs of the objects taken from the skip and
edited out the cluttered background so that I can better compare them later on.
To do this I first select the clearest photograph for each object to end up with the best result.
edited out the cluttered background so that I can better compare them later on.
To do this I first select the clearest photograph for each object to end up with the best result.

|

|

|
when I have this photo up in photoshop I use the selection tool to outline the object I then inverse this effect so that everything but my object is selected meaning now when I use the eraser tool it will get rid of everything but the object once this is done I crop the photograph to get a closer picture and then save and upload this finished edit.
Edited photographs:
I have edited these photographs of the objects from the original pictures that I took this way I can see the differences between the original photographs and the second photoshoot where I have cleaned up the items more clearly because of the white background.
Edited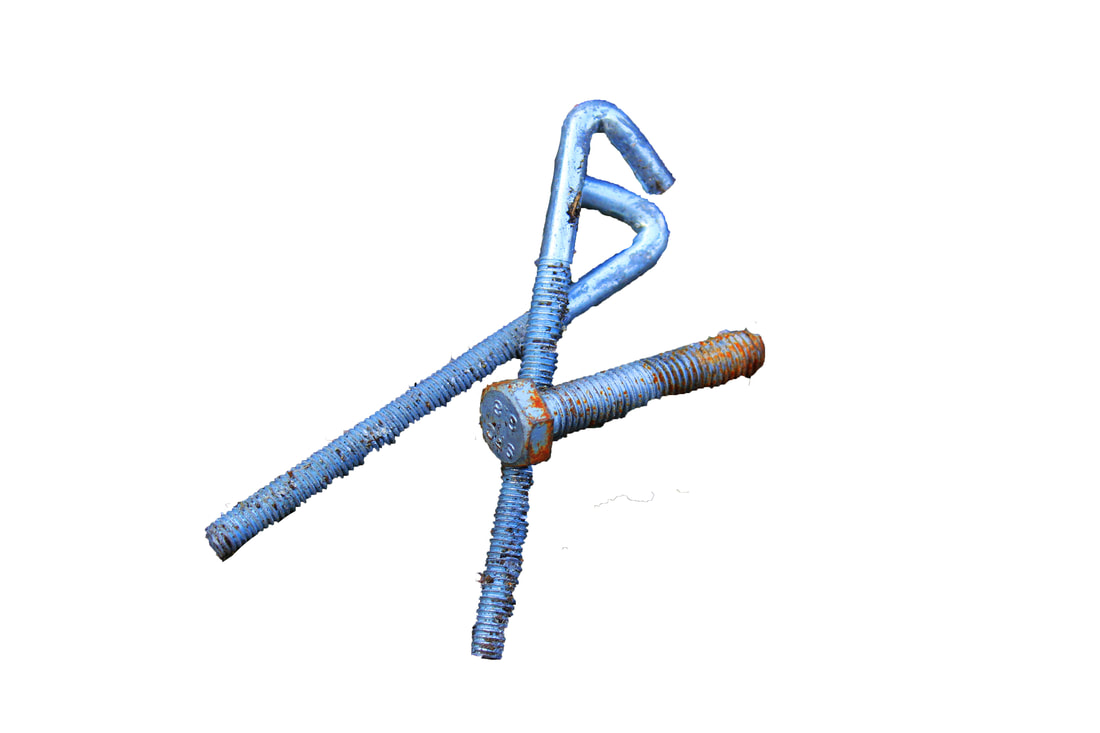


|
Original
|
|
|
WWW
What went well with these photographs is that I have used photoshop to edit in this white background from the
original photographs this allows me to get a closer look at each object I have collect whilst not disturbing or moving it to disturb the quality and condition each item I found was originally in
EBI
These photographs could be even better if I could get cleaner and smoother lines on the edges of each object to solve this
I want to try re-doing this photoshoot with the same objects against a white background instead of editing in the white background
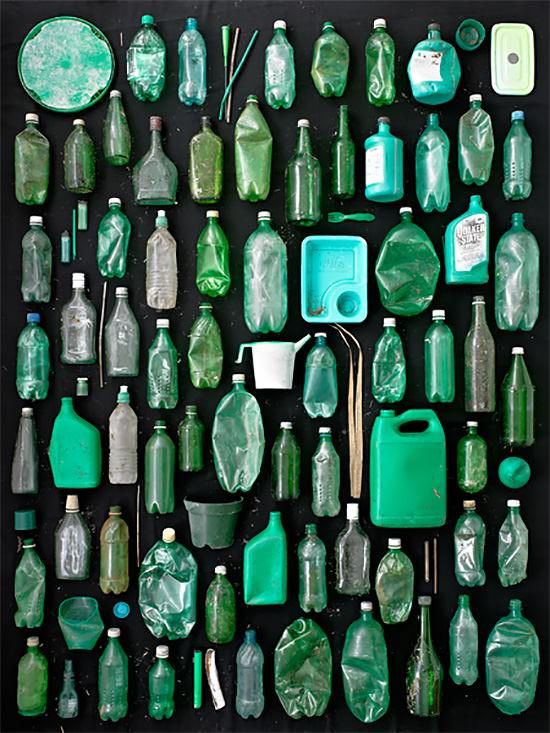
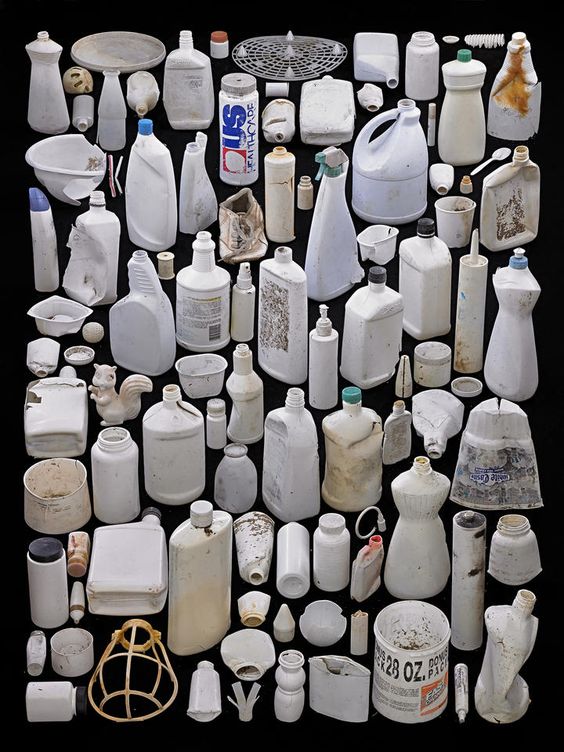
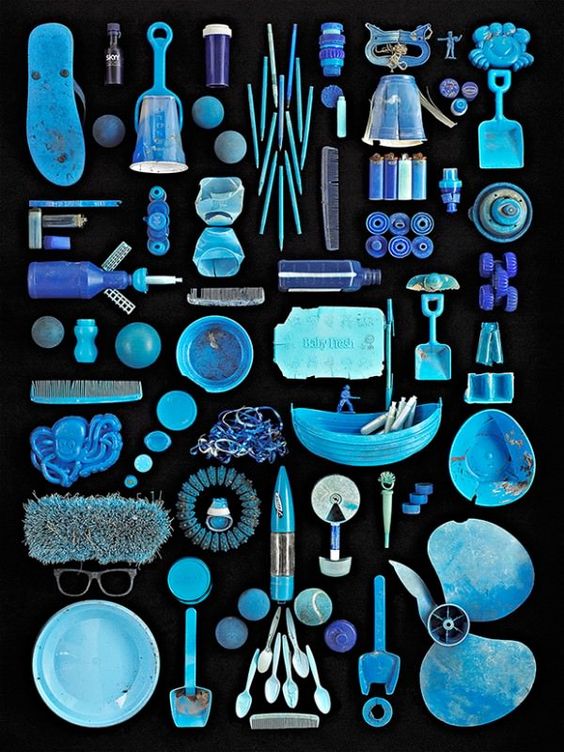
Barry Rosenthal
Barry Rosenthal is an award winning photographer and artist. He works out of his studio at the Brooklyn Army Terminal, Brooklyn, New York. He creates his collections 'Found in Nature' and 'Photobotanicus' from found objects. His work is in the permanent collection of the Museum of Modern Art, New York, New York.
Rosenthal, uses sculpture and photography to express his distress about plastic pollution in the oceans. His project, “Found in Nature” graphically displays collections of found objects pulled from the shores of New York Harbor has been seen around the world and was recently featured in National Geographic in September 2019. His work is part of the permanent collection of the Museum of Modern Art in New York City.
After finishing college, Rosenthal moved to New York City and apprenticed himself to several commercial and advertising photographers and learned the business of a studio practice. He opened his own studio and began his career shooting fashion, corporate and advertising assignments while developing his keen lighting techniques.
Wanting to spend more time in nature, Rosenthal began experimenting with shooting weeds that grew in marginal areas that were overlooked by most people. Trial and error led him to a process where he collected, arraigned and photographed his subjects in situ. The work became know as the “PhotoBotanicus” Project.
|
|
|
While scouting for plants at the shore, Rosenthal came across ocean borne trash which rode in on the waves. He cleaned the beach of trash and liked what he had picked up. The objects were changed by the elements of sun, sand and sea. He was compelled to bring the issue of plastic pollution in our oceans to the forefront of climate issues. Titled, “Found in Nature” his seminal series of photographs highlights how plastic is with us forever.
While creating “Found in Nature, Rosenthal his work crossed over into the genres of urban archeology and a sculpture. As an influencer, Rosenthal, has built trust and authority from his accomplishments. He is a frequently requested speaker, acts as a guest artist and collaborates as an expert with NGO’s, festivals, conferences and schools around the world. He was one of seven guest artists presenting at Habitat III/Next City, a conference hosted by the United Nations in Quito, Ecuador in 2016 and a guest artist at the 2017 Our Task Conference in Washington, DC. In January 2020 in Abu Dhabi, UAE, he was the guest artist at the inaugural LiveHeathy 2020 festival.
While creating “Found in Nature, Rosenthal his work crossed over into the genres of urban archeology and a sculpture. As an influencer, Rosenthal, has built trust and authority from his accomplishments. He is a frequently requested speaker, acts as a guest artist and collaborates as an expert with NGO’s, festivals, conferences and schools around the world. He was one of seven guest artists presenting at Habitat III/Next City, a conference hosted by the United Nations in Quito, Ecuador in 2016 and a guest artist at the 2017 Our Task Conference in Washington, DC. In January 2020 in Abu Dhabi, UAE, he was the guest artist at the inaugural LiveHeathy 2020 festival.
My Respons
In these photographs I wanted to fully show all of the items I have collected for this development from skips around London,
I have taken these pictures against a light box to get the best photograph because this helps to highlight details and create a white background at the same time
I have taken these pictures against a light box to get the best photograph because this helps to highlight details and create a white background at the same time


|

|


|
Taken photographs:
With this second response I have decided to use a light box as a background for the objects to help get more of a clear shot
with a white background, which also means I am not going to use photoshop so I will hopefully I will have cleaner edges around the items sides opposed to when I am using photoshop to get the blank background
with a white background, which also means I am not going to use photoshop so I will hopefully I will have cleaner edges around the items sides opposed to when I am using photoshop to get the blank background
WWW
What went well with these photographs is that because I didn't use photoshop to create my background I was able to get cleaner edges instead of the rough ones that came from using photoshop, I also cleaned to objects so I could observe the differences between the original pictures compared to these newer ones seeing how they are regenerated
EBI
These photographs could be even better if I could sharper photographs with better focus allowing me to see all the details
in each picture on each object
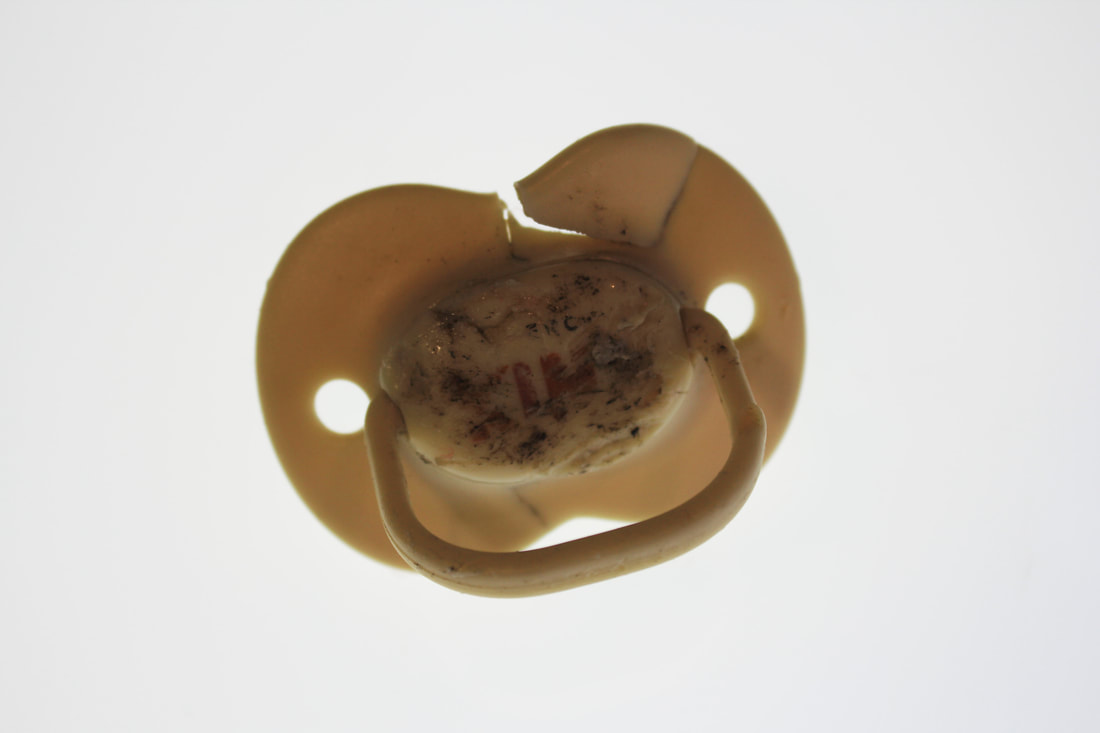
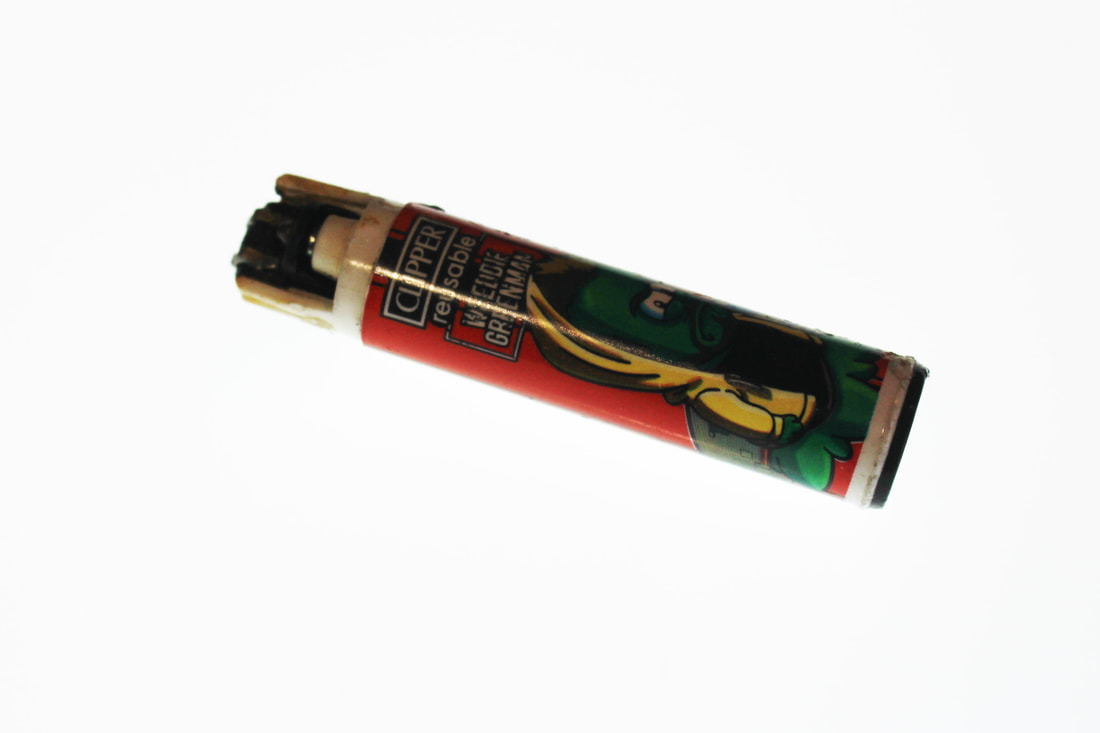
Final edited photographs:
Broken Glass Bottle:
|


|


|
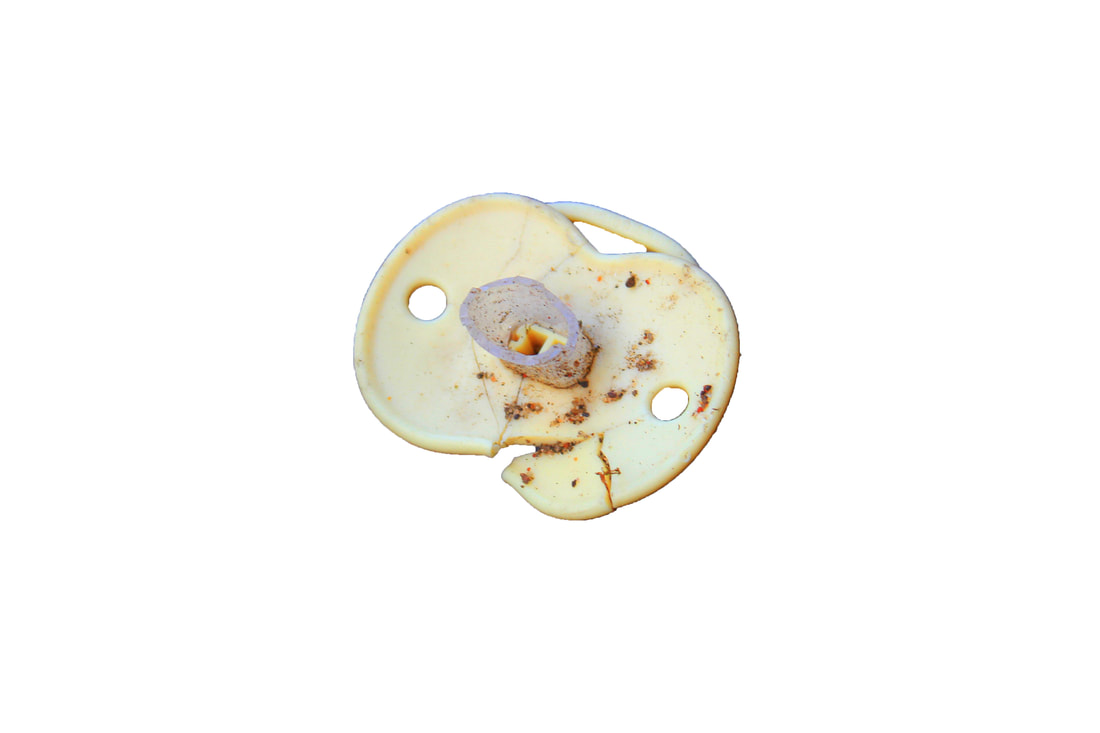
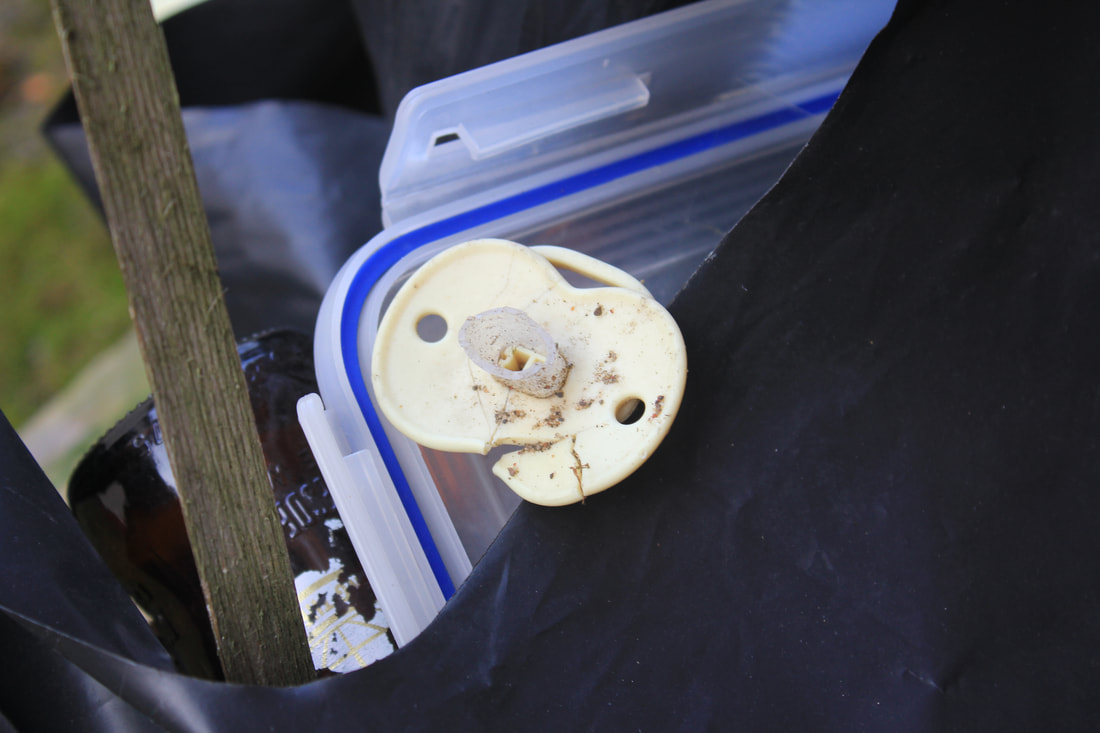
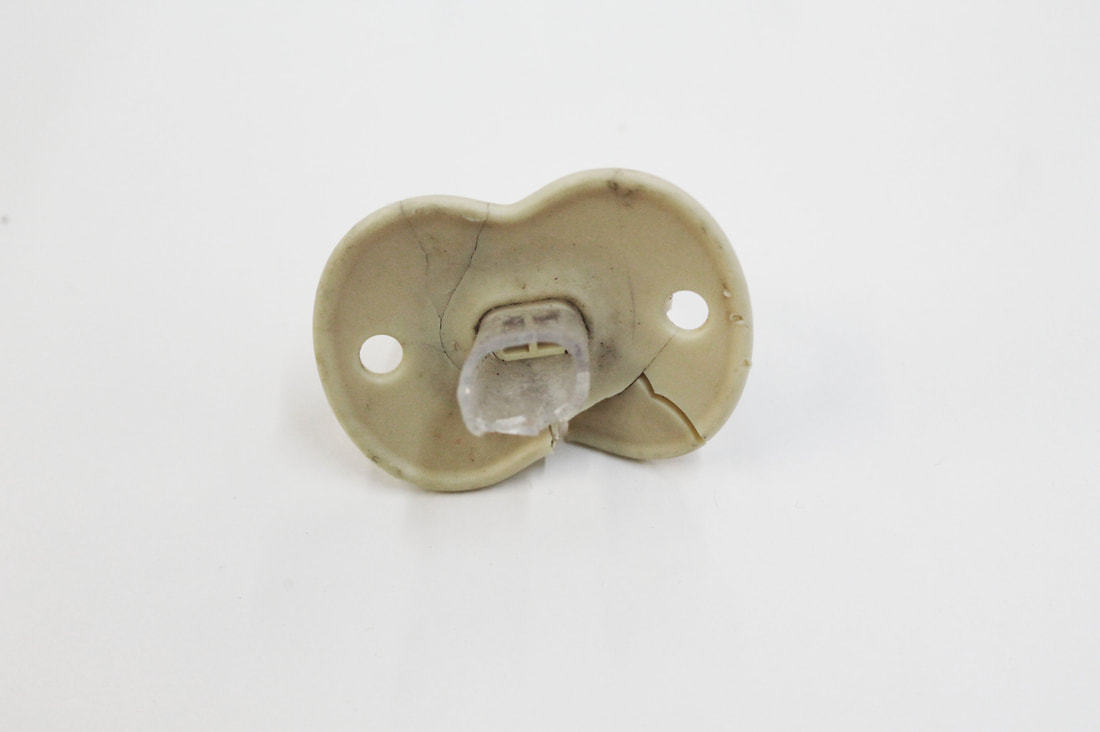
Broken Pacifier:
|
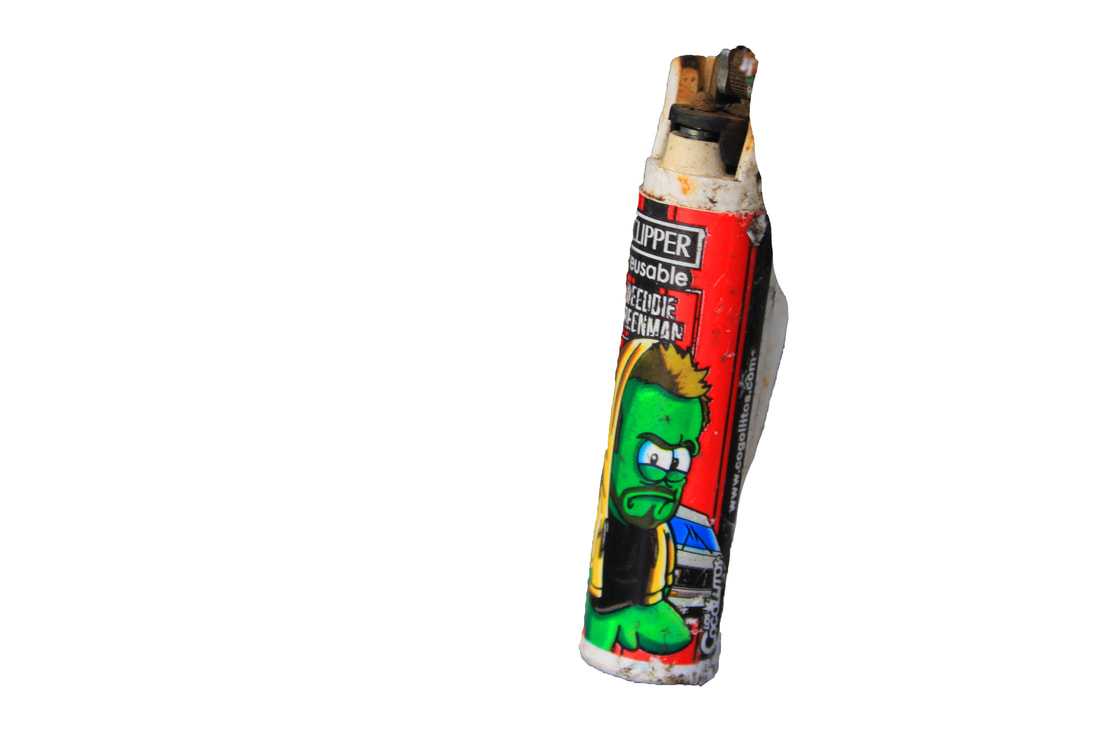
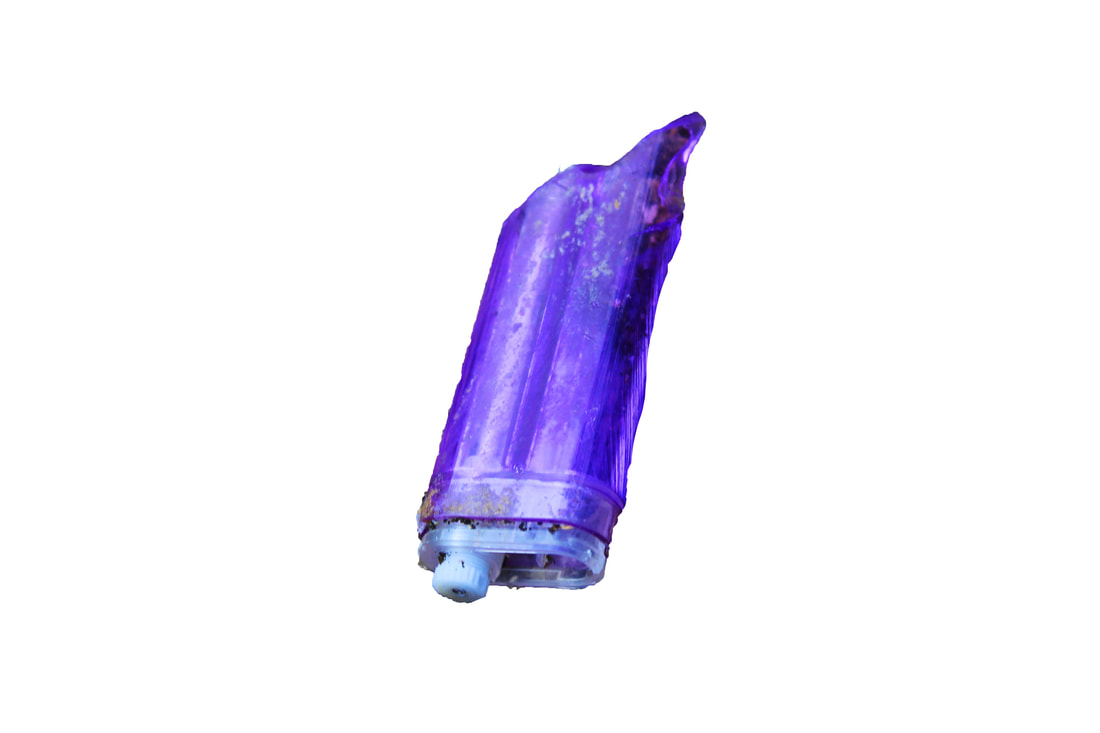
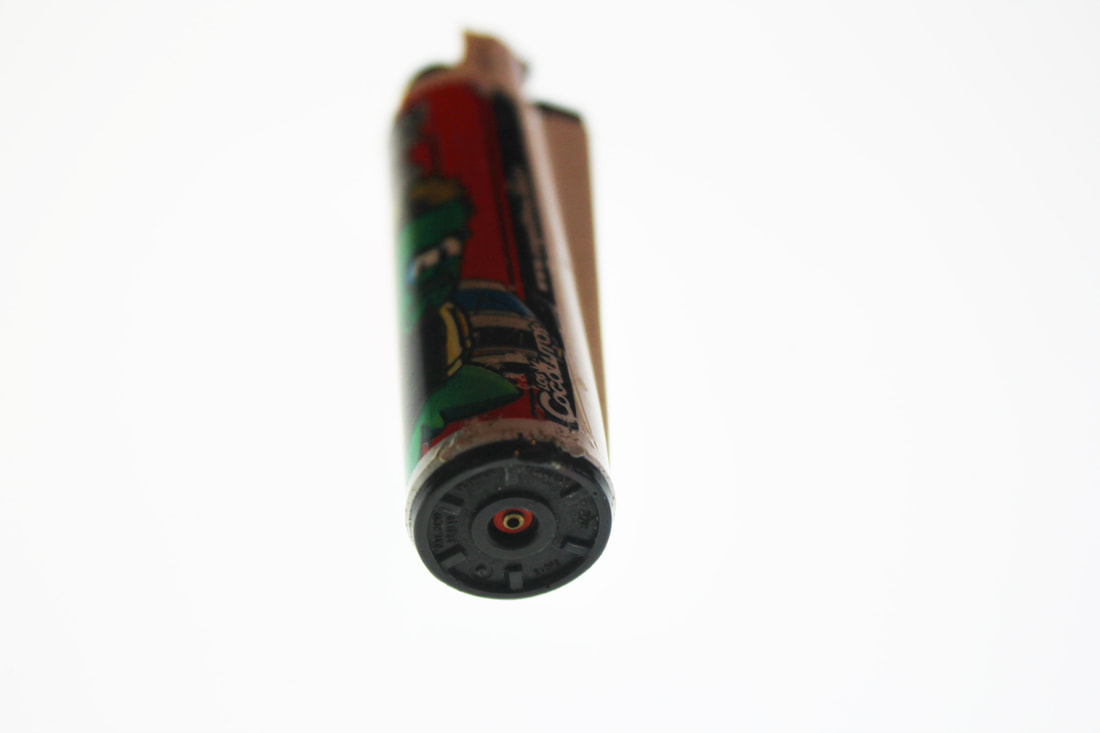
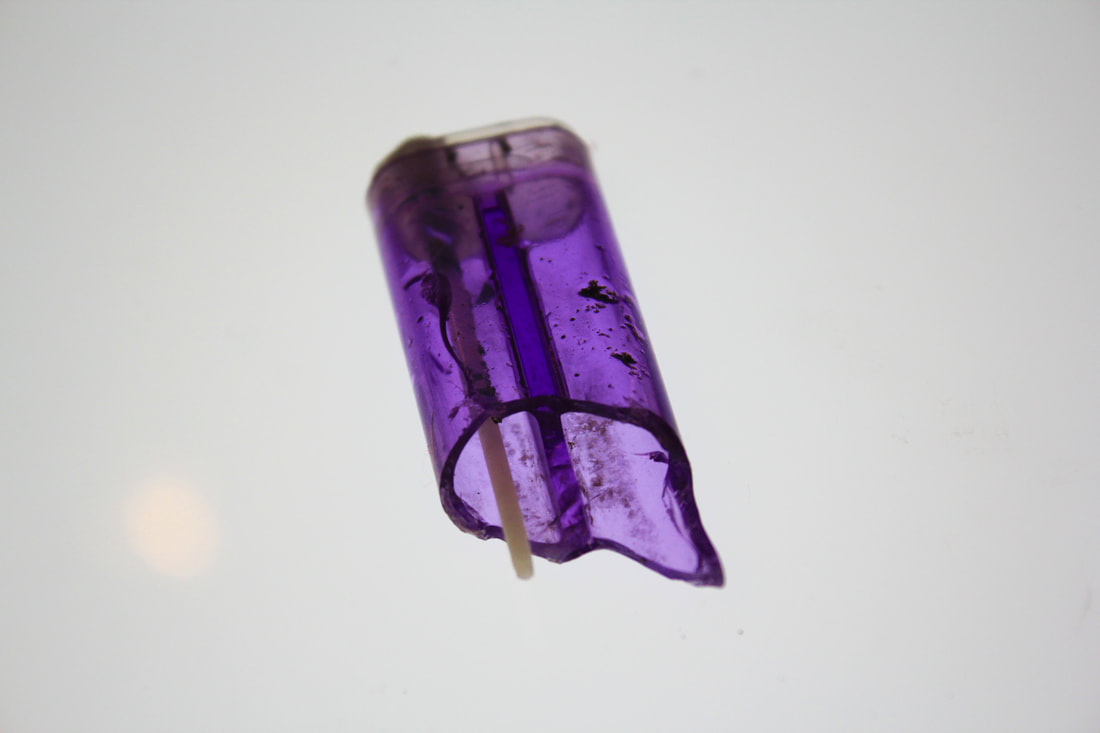
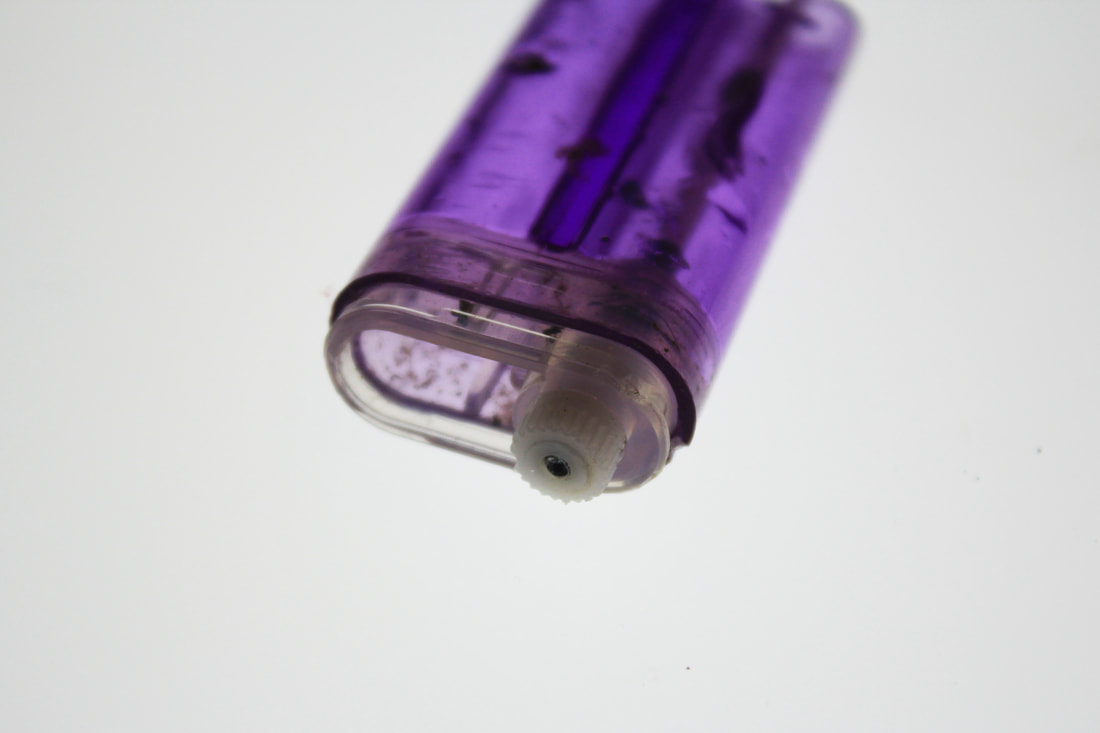
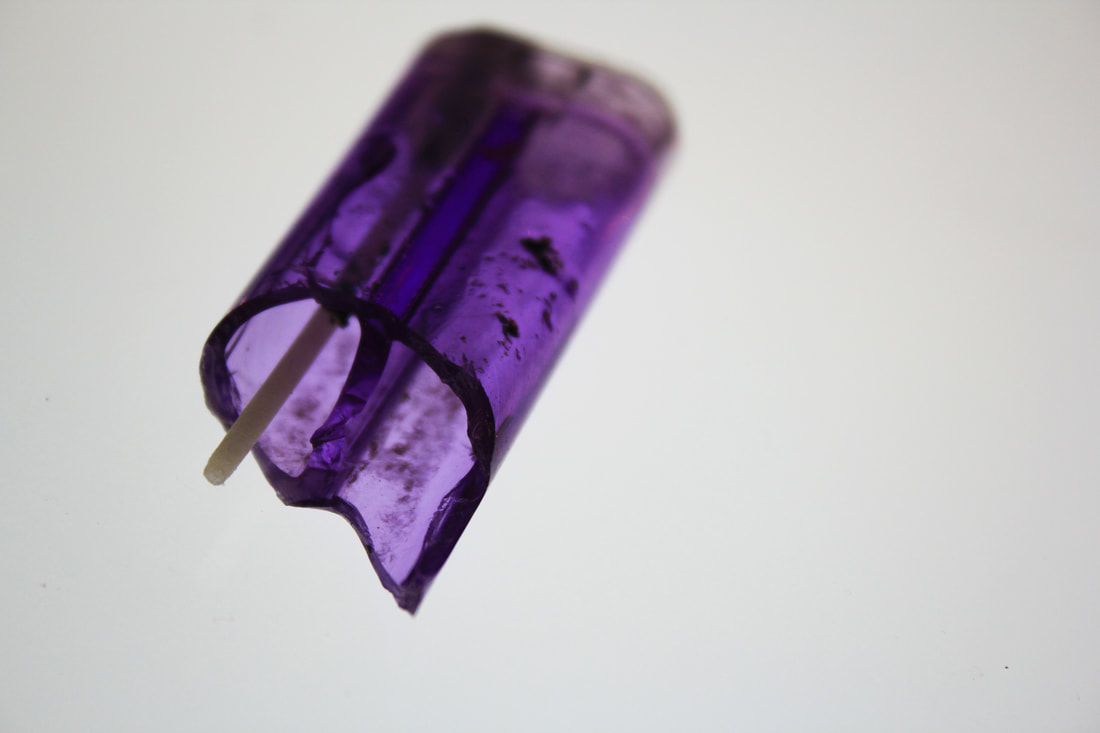
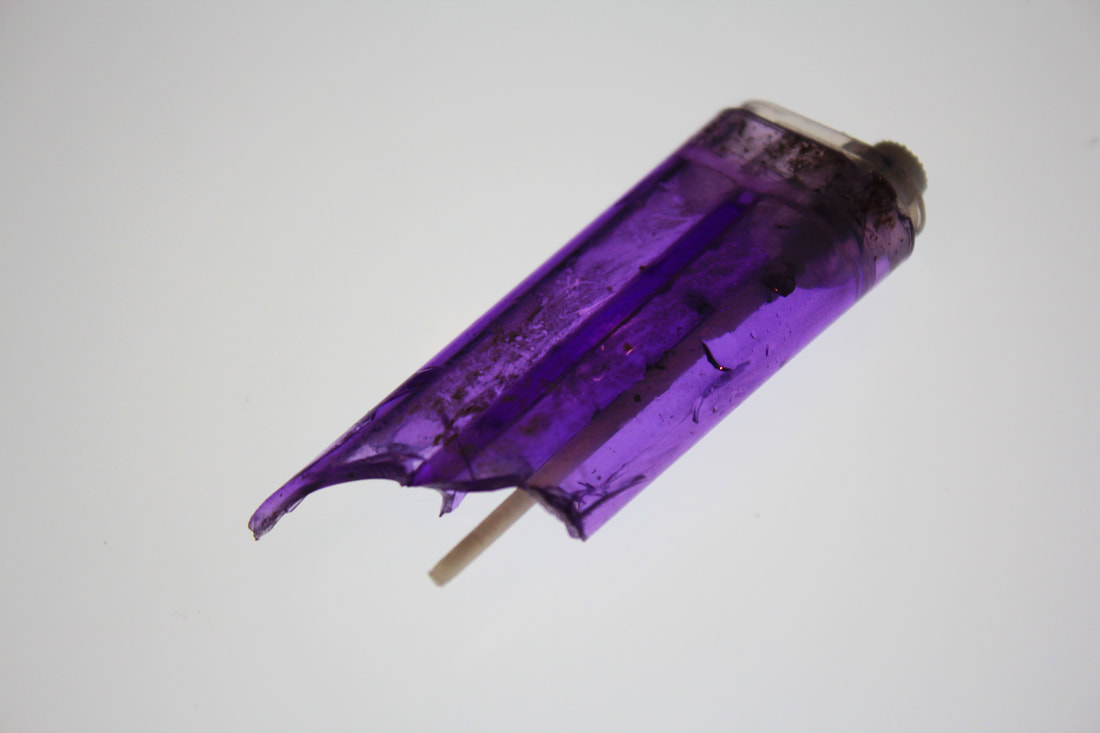
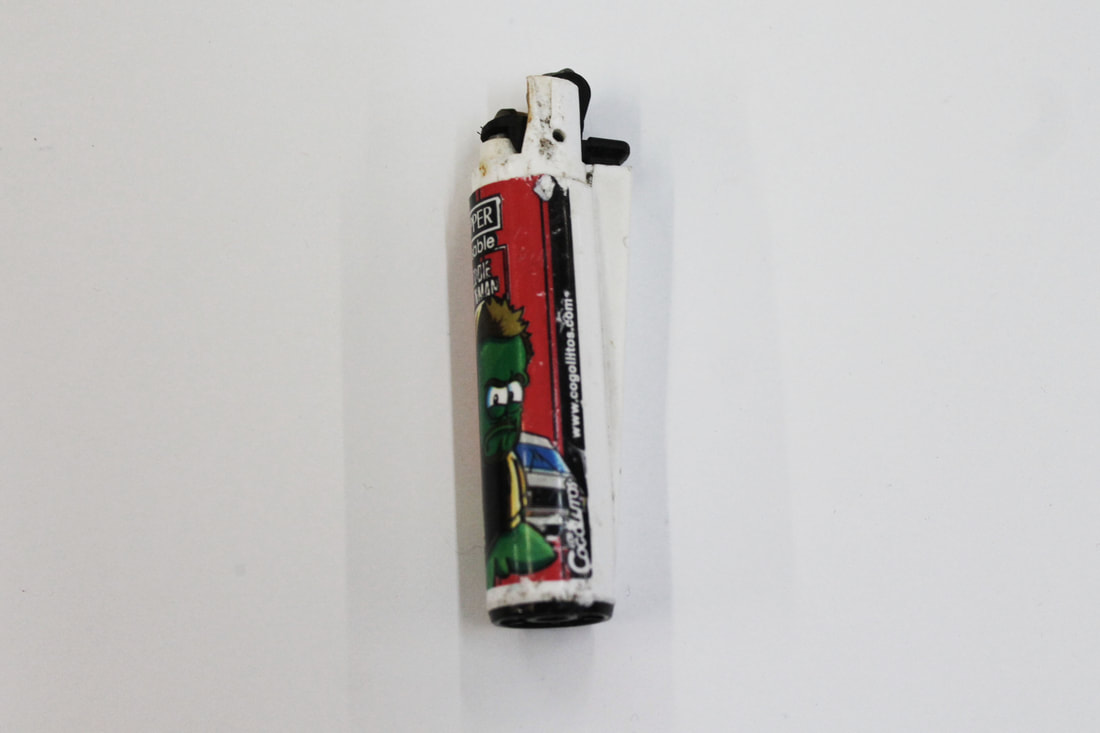
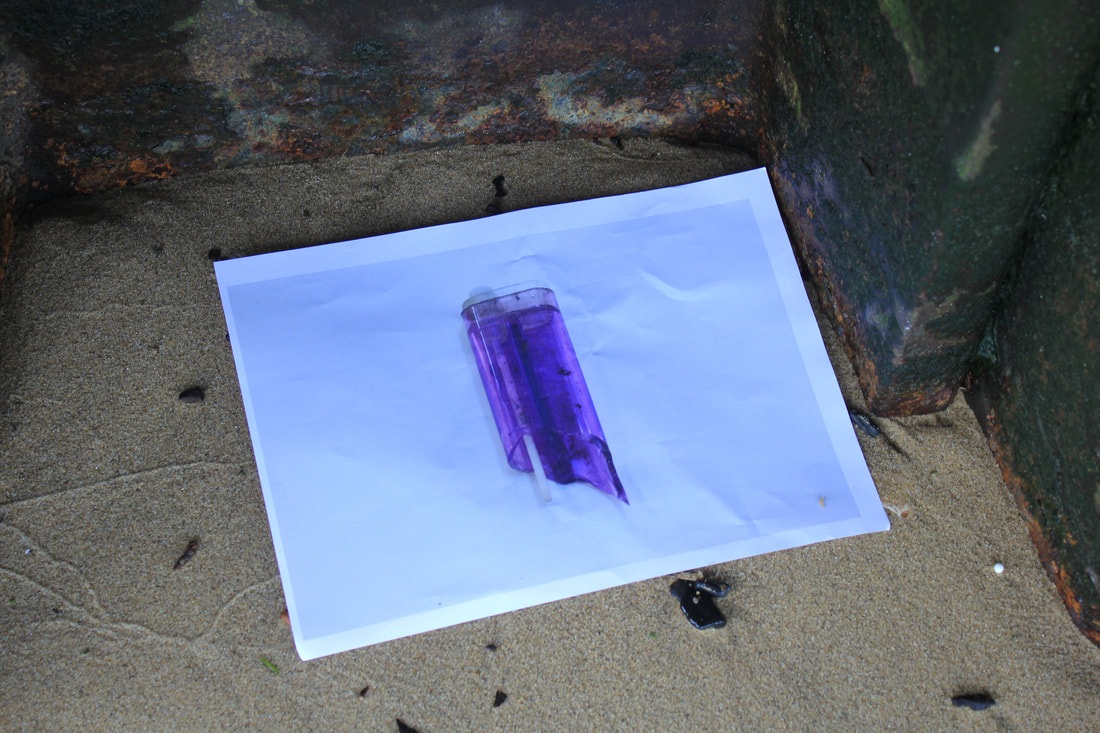
Old Lighter:
|
|


|
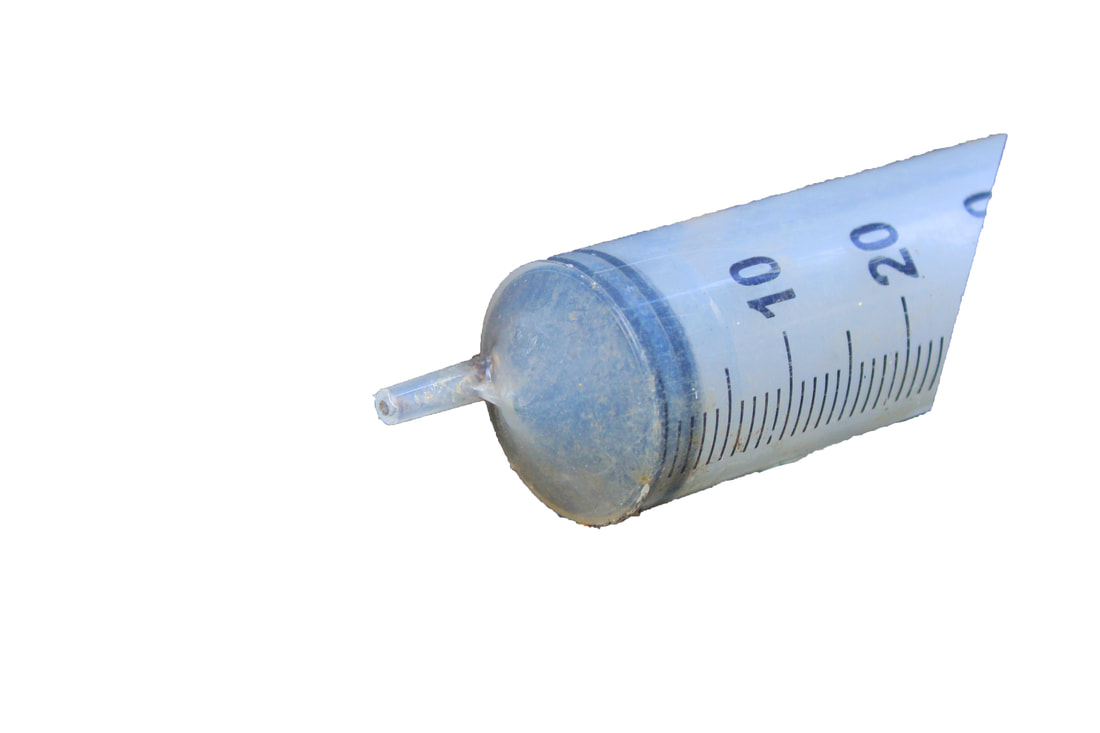
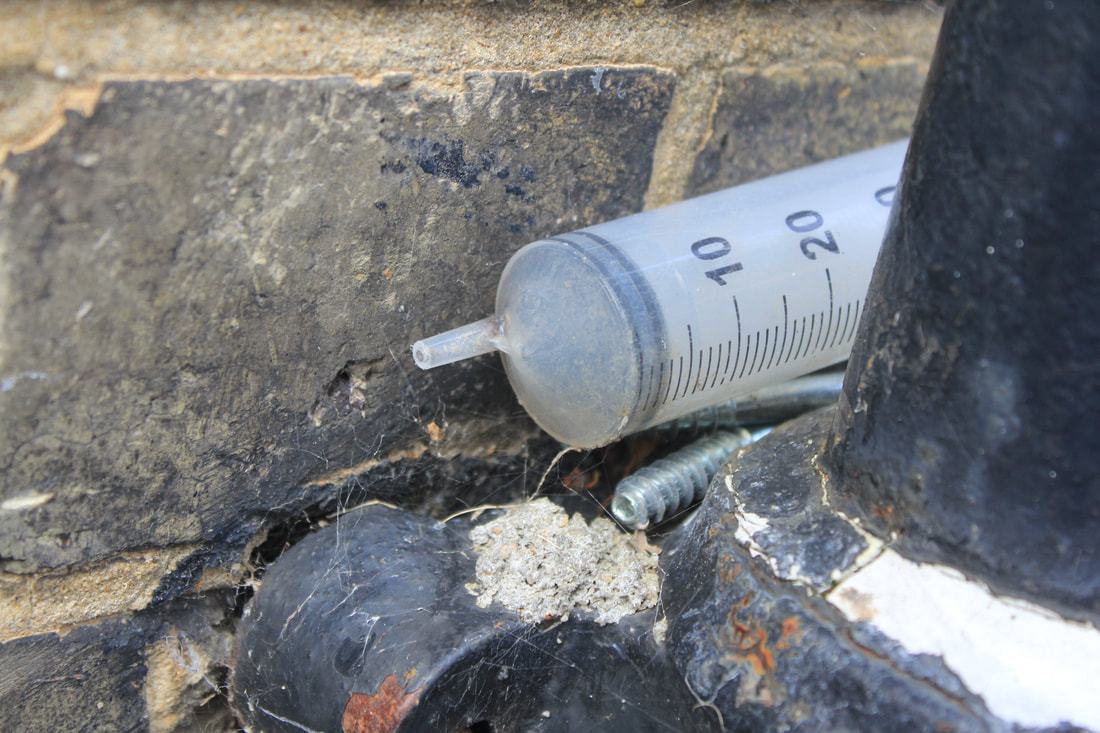
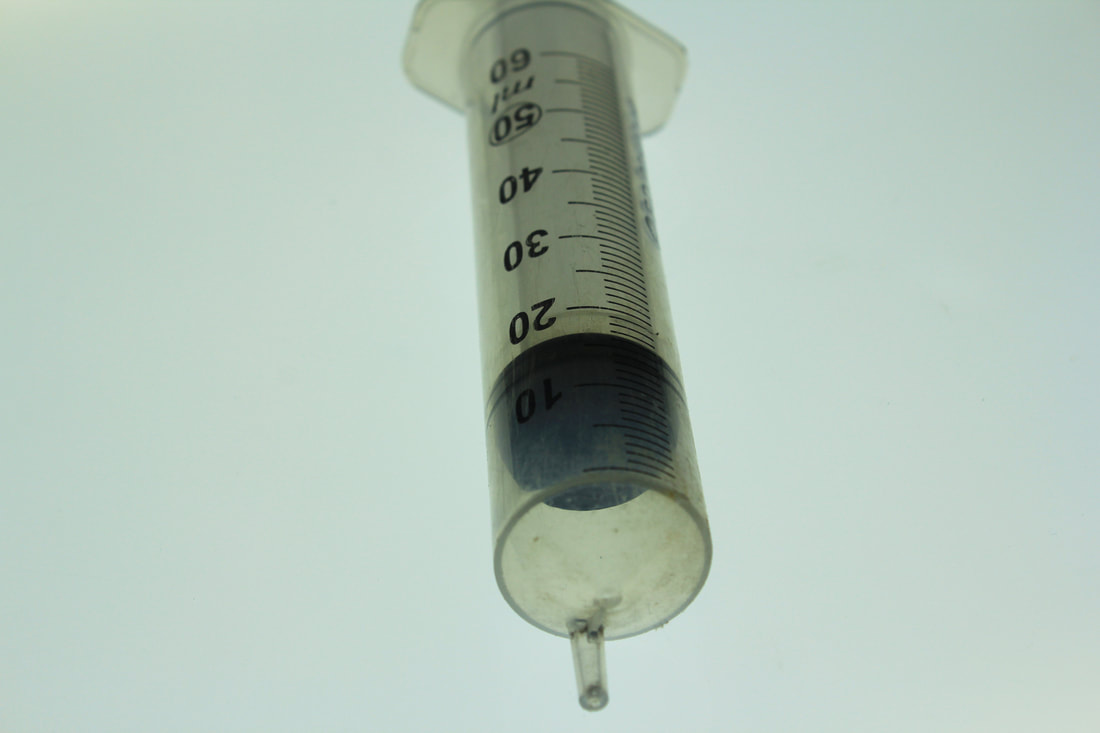
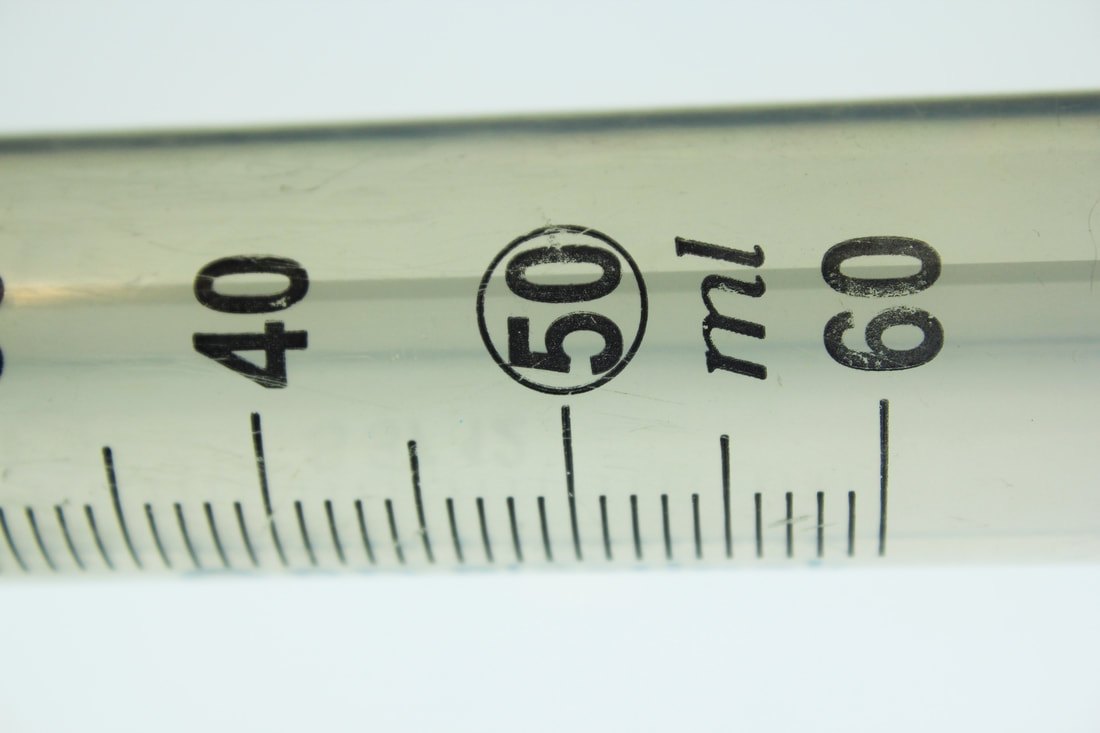
Old Syringe:
|
Crushed Can:
|
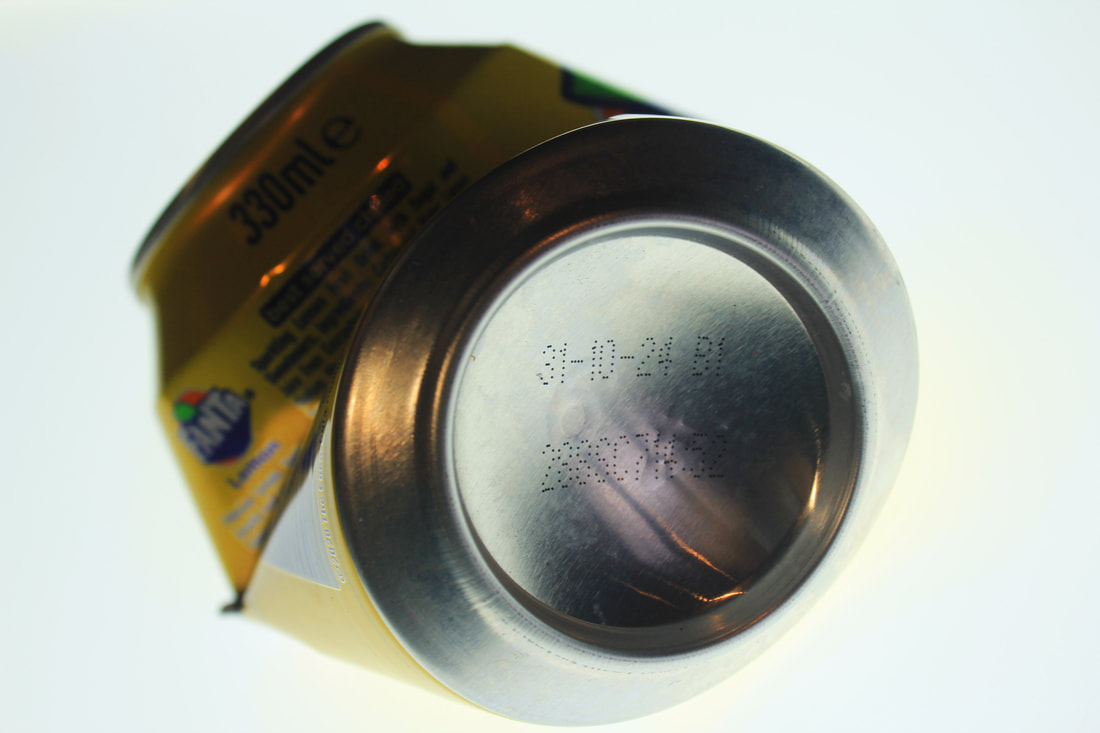
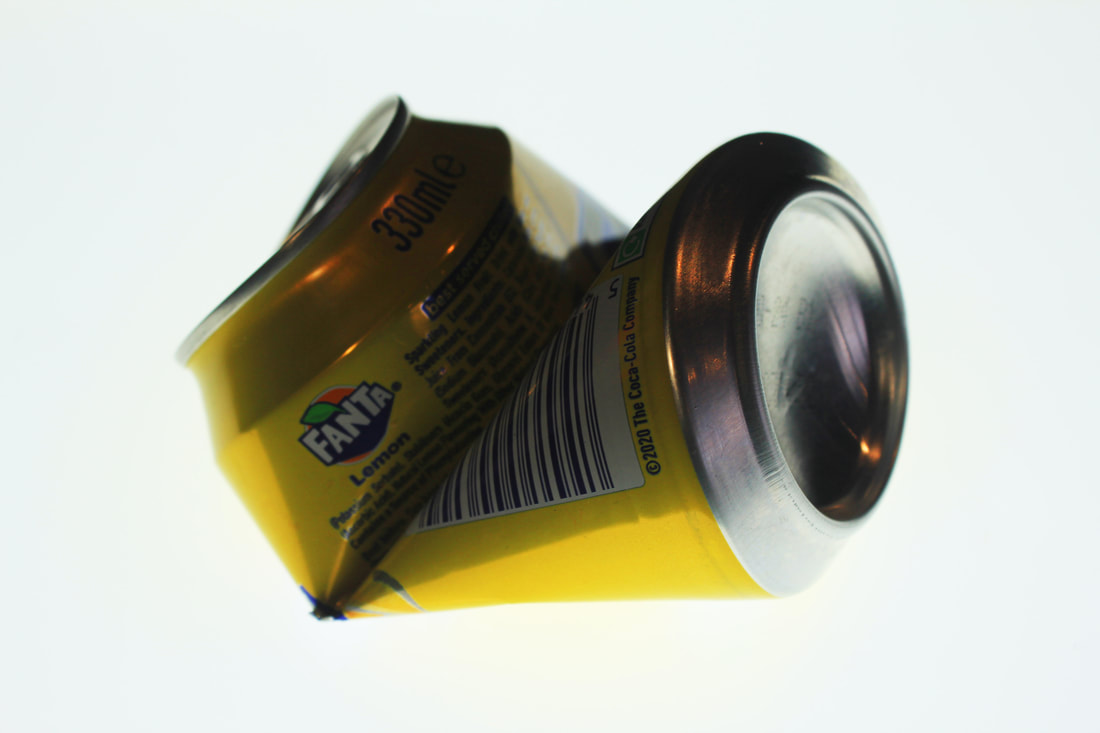
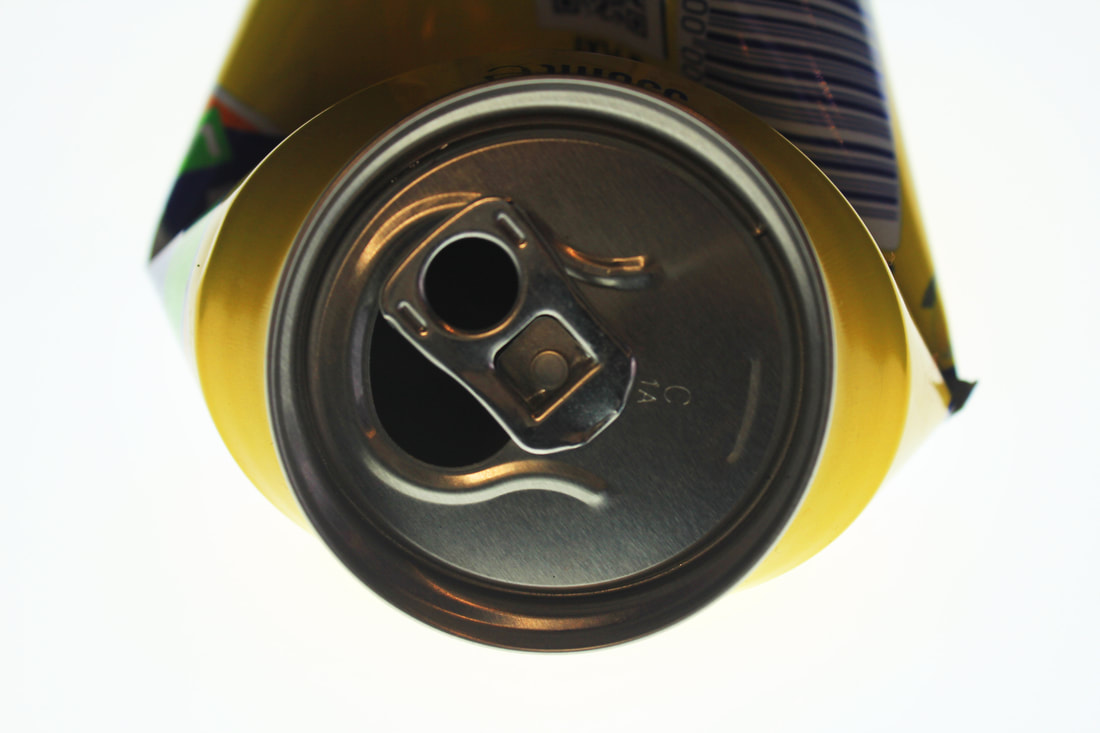

|
|
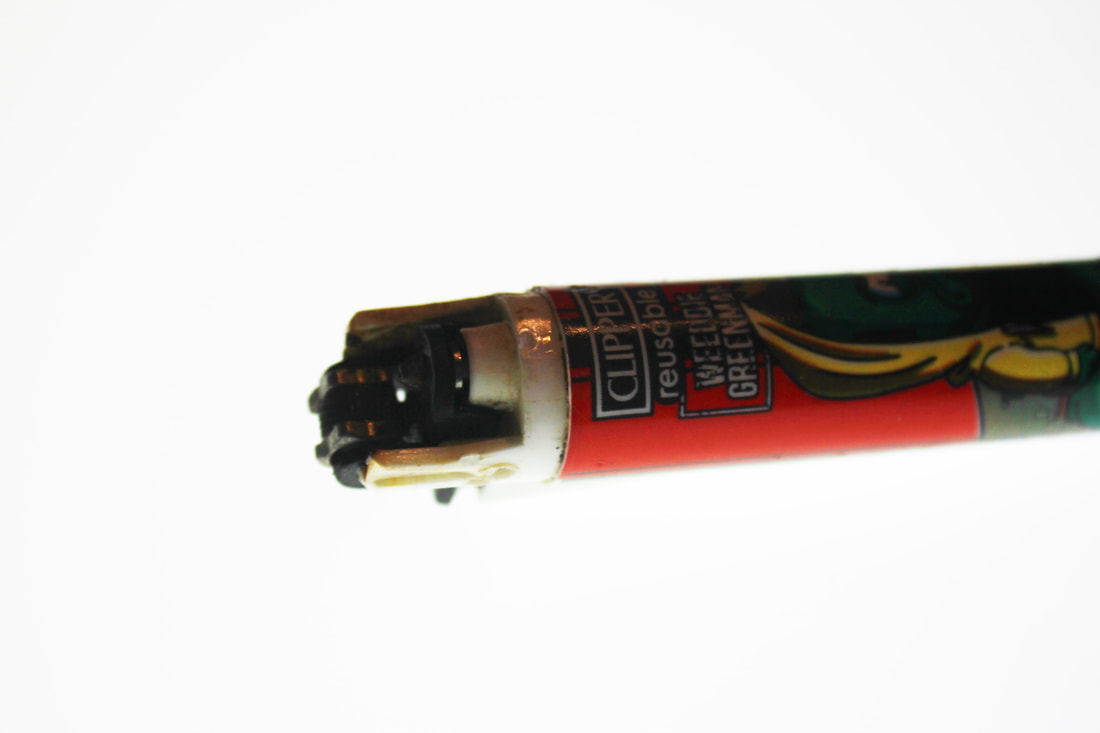
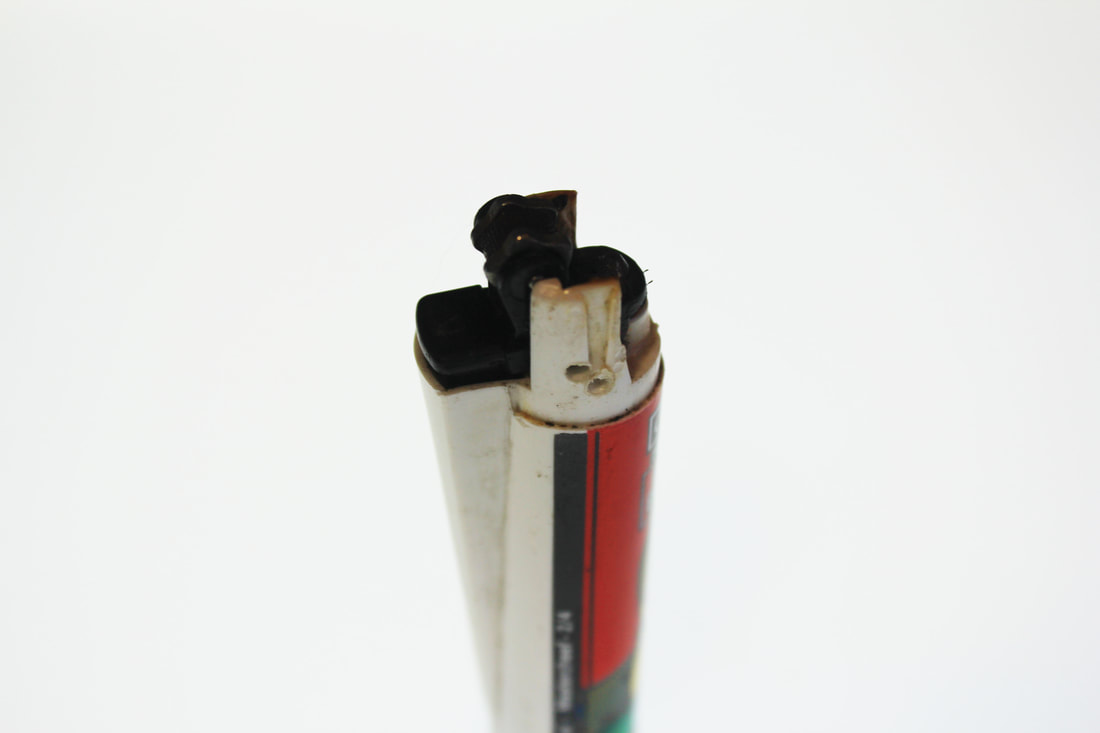
Broken Lighter: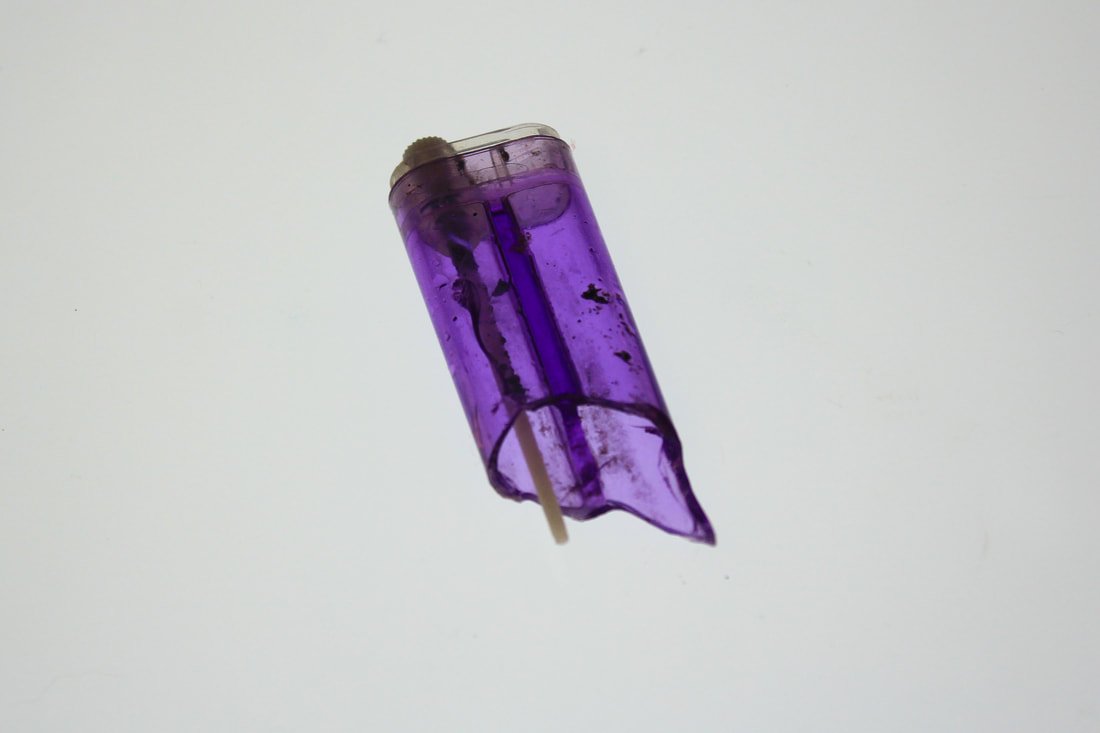
|
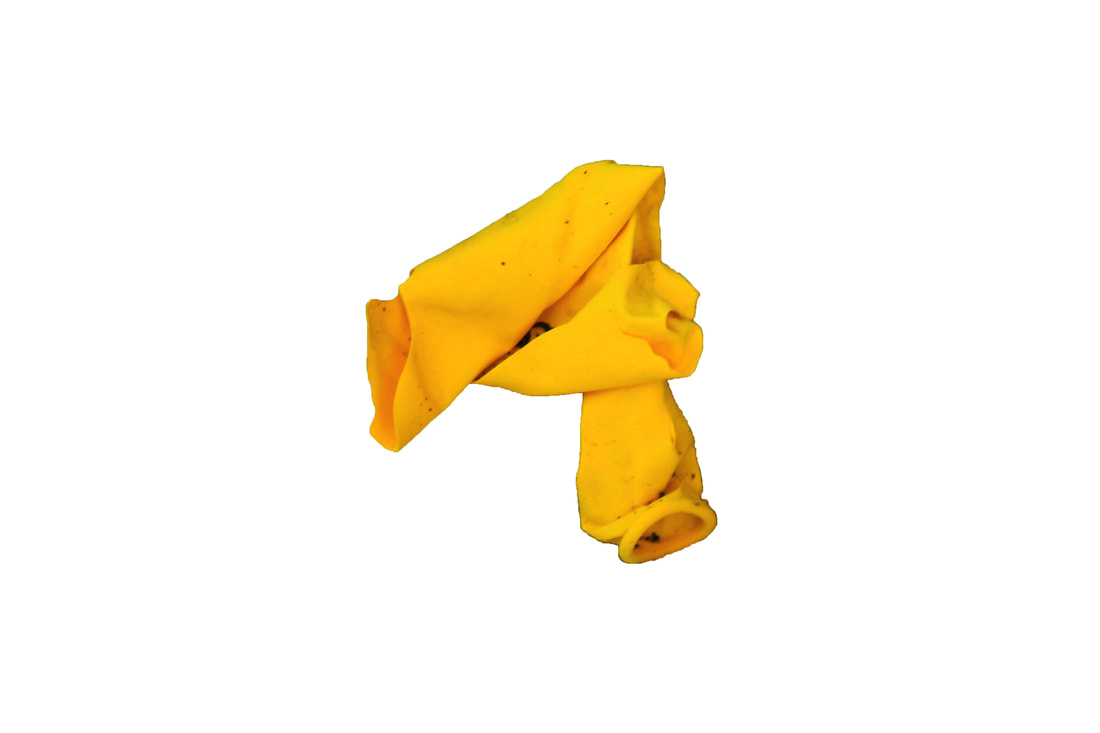
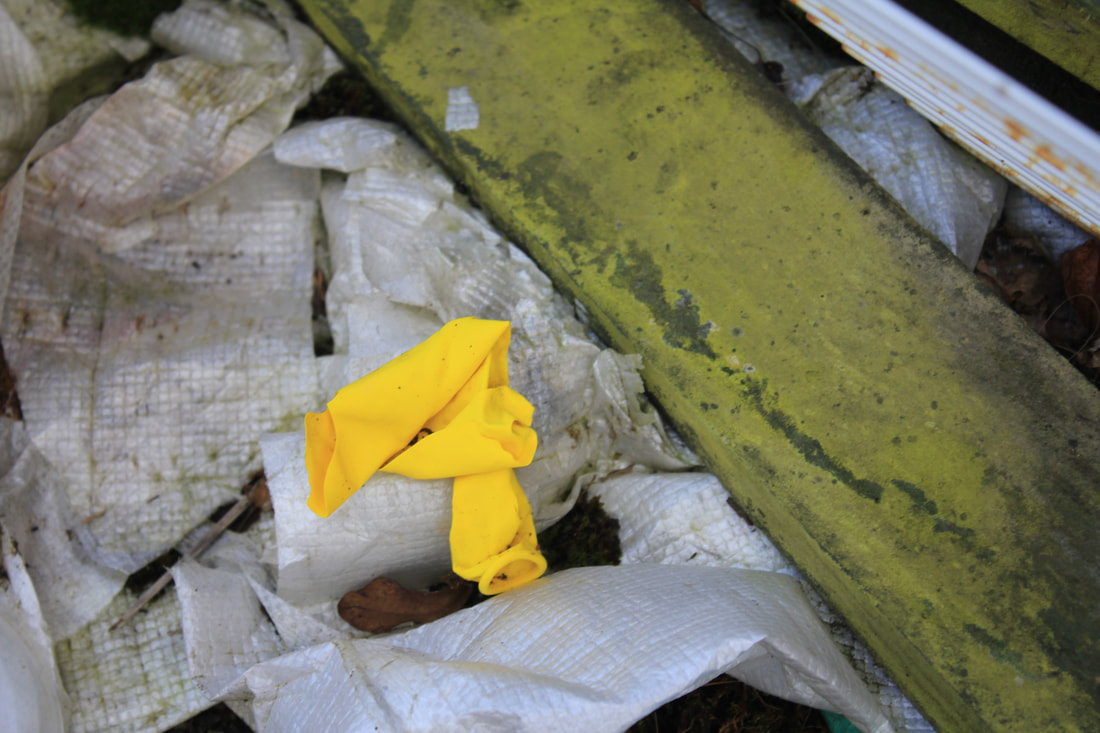
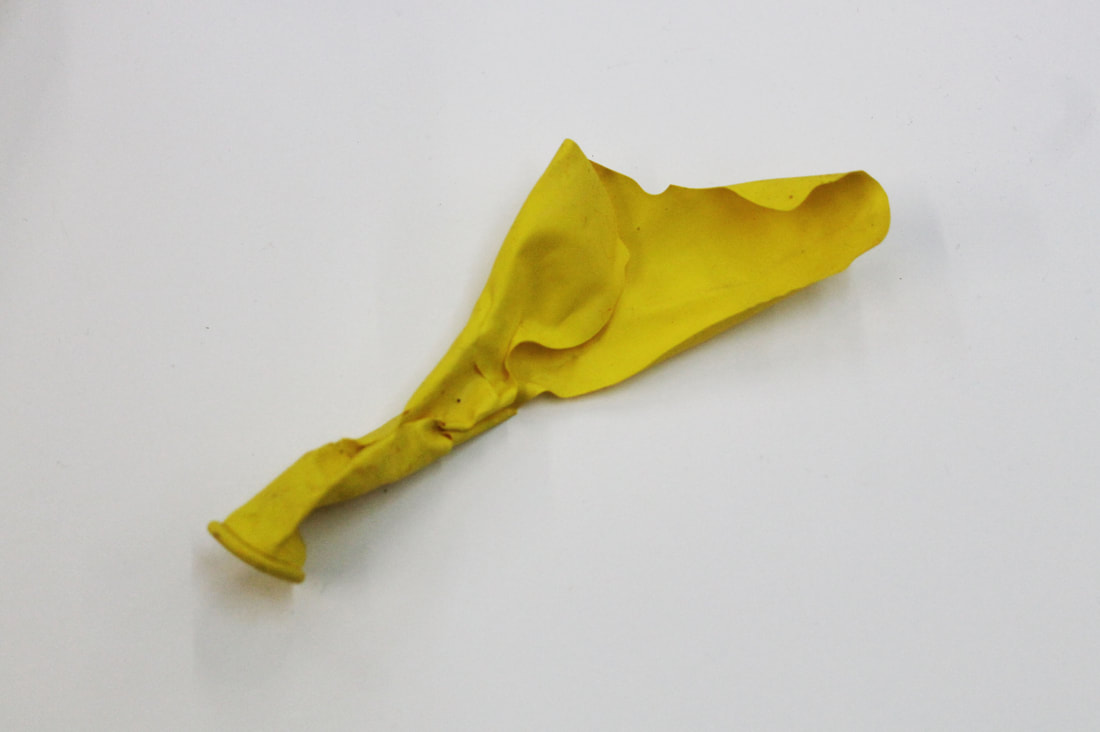
Broken Balloon:
|
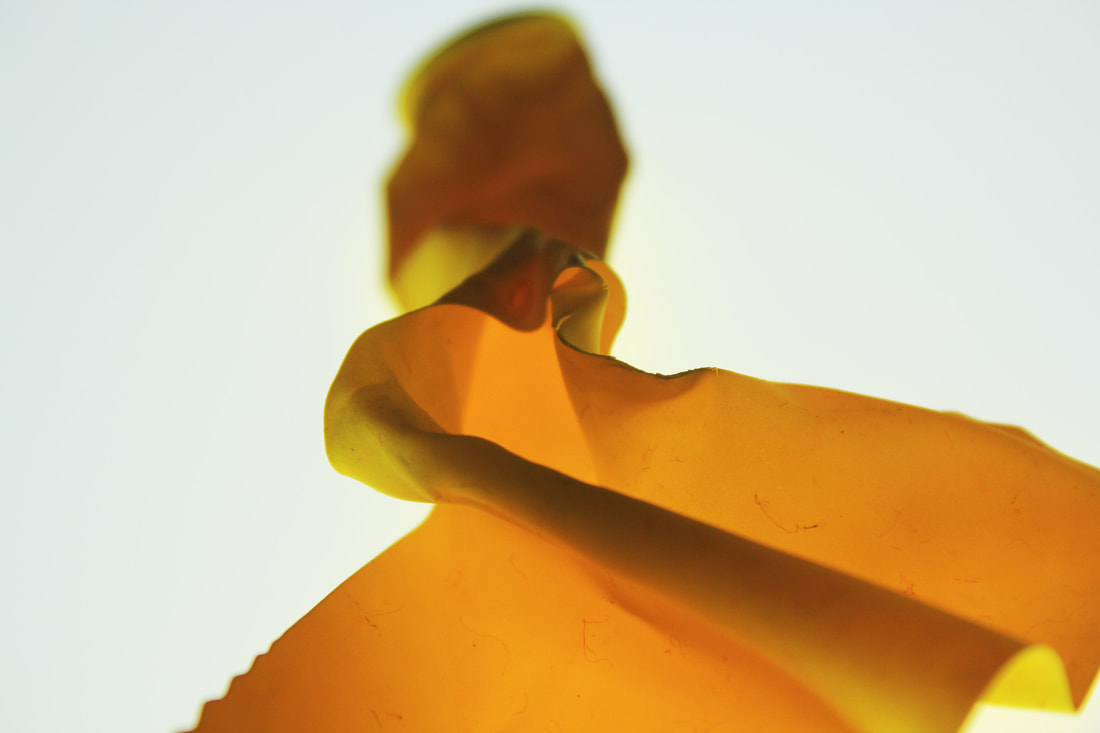
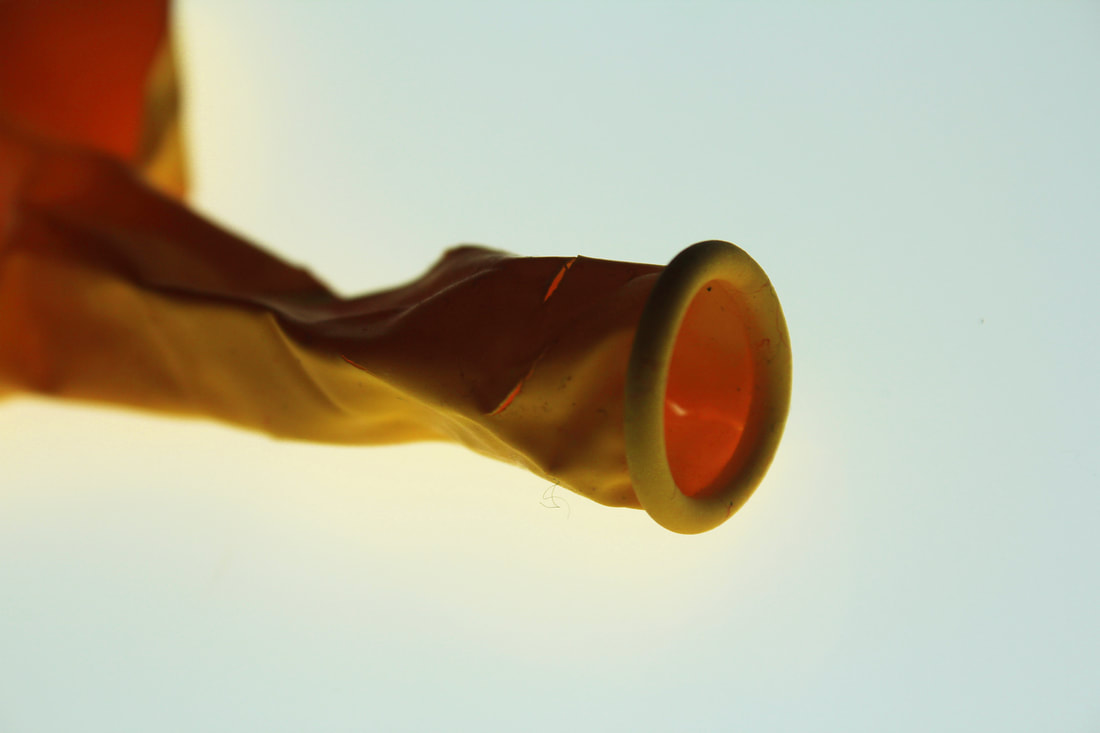
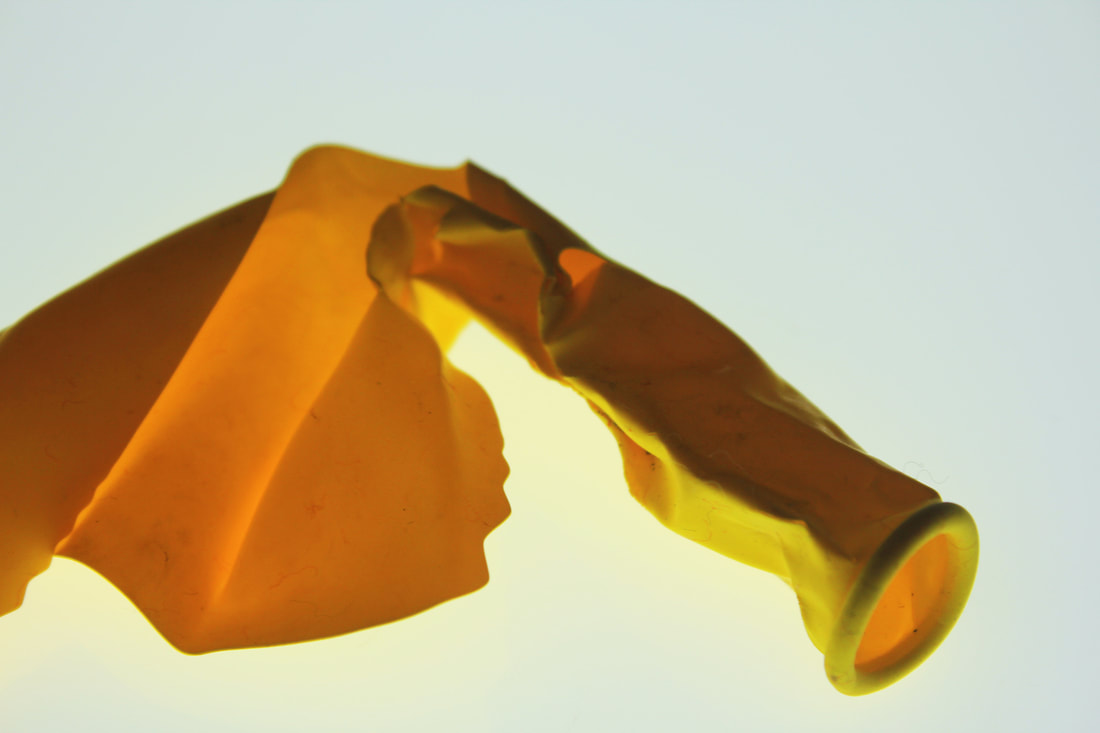
|
WWW
What went well with these edited photographs is that I was able to create more detailed images by focusing
on adjusting elements such as contrast, saturation, highlighting and the brightness each go towards helping each object standout
more against the plain white background, I was also able to capture and present lots of different angles which contribute to
creating a fuller image all together
EBI
These photographs could be even better if I could for my next development find new items from a different source i
would like to explore the idea of discarded items decaying and breaking down from both time and the elements of the environment so I want focus on that idea for my next development
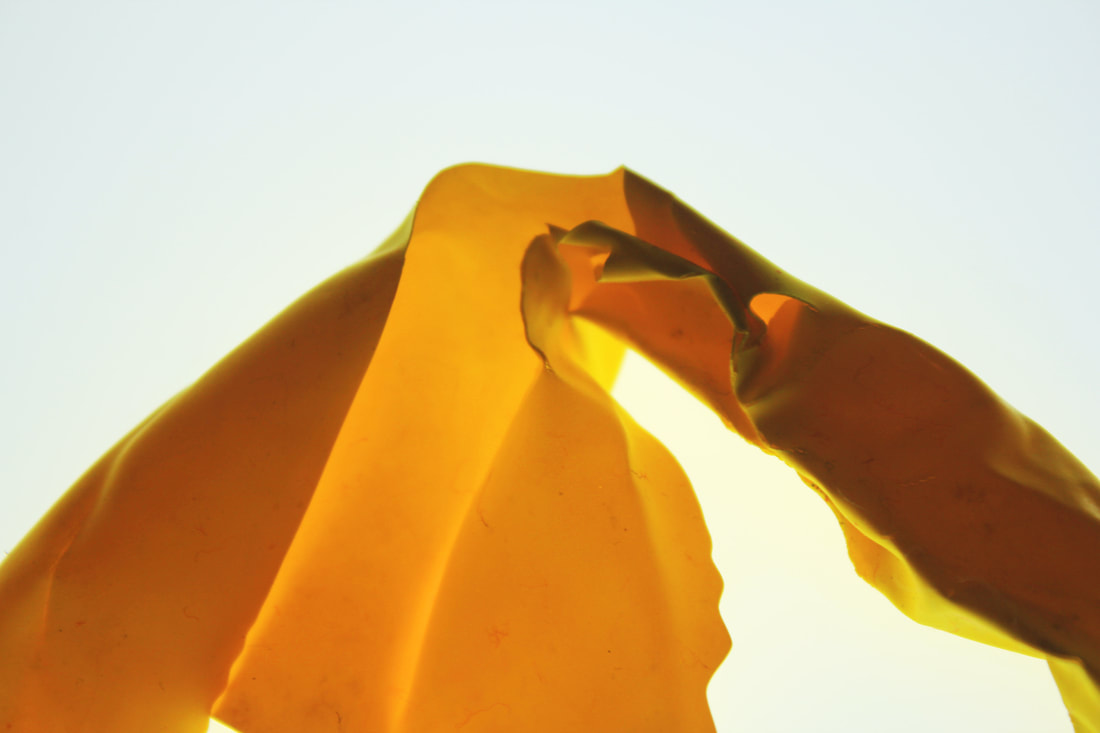
Thames water edge
For this next development moving on I wanted to try and explore further with discarded object overall looking at all the different things that get thrown away and abandoned at the rivers edge, I also want to look at the effect that time and the environment has on these different things degrading them and wearing them down at the surface.
With my previous necklace piece I went through the process of collecting lots of bottle tabs, I wanted to look further at this idea of collecting the discarded items.
With my previous necklace piece I went through the process of collecting lots of bottle tabs, I wanted to look further at this idea of collecting the discarded items.

SOURCE: GETTY IMAGES
I want to explore this idea in an area where there is lots of waste and people get rid of all there unwanted objects that have also been worn down over time by the rough water and tides so I decided to look at the Thame banks an area. which has a long history of people throwing stuff into it off of bridges to either get rid of it or for even making wishes. Looking at the washed up degraded items at the thames bank helps me to look closer at the relationship between the relationship between man and nature and the effects they have or each other especially since the thames river is made from More than 50 million years of erosion and climate change which has shaped the Thames to create the river which flowing from Gloucestershire into the English Channel.
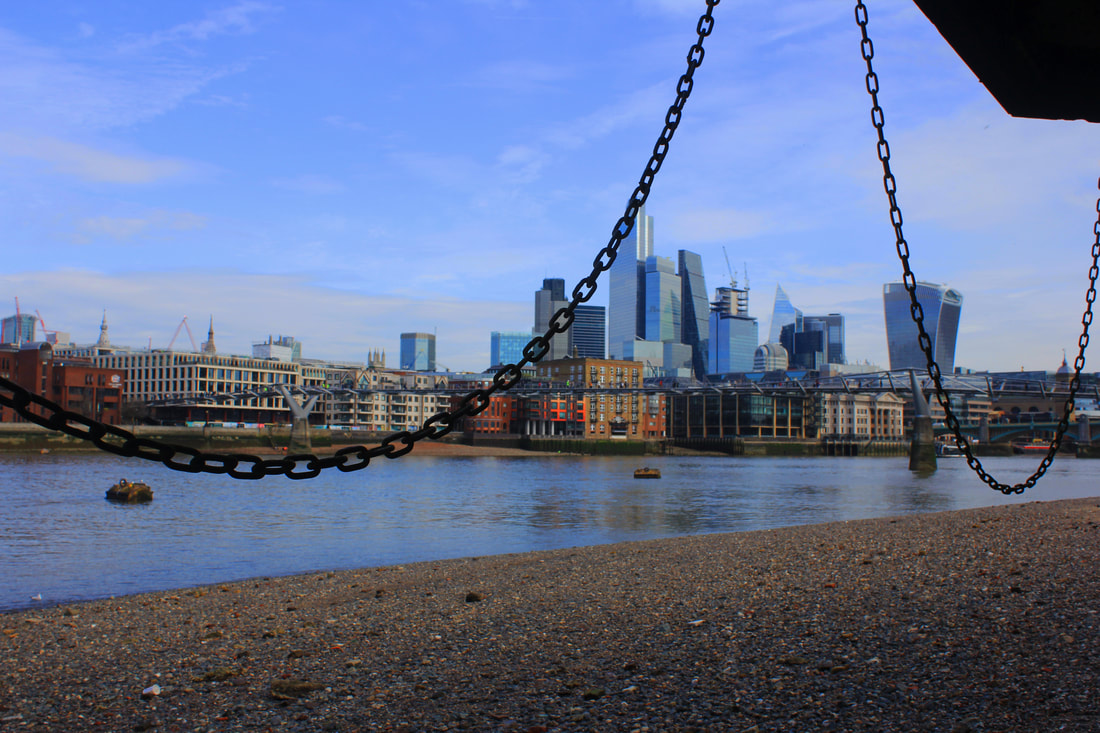
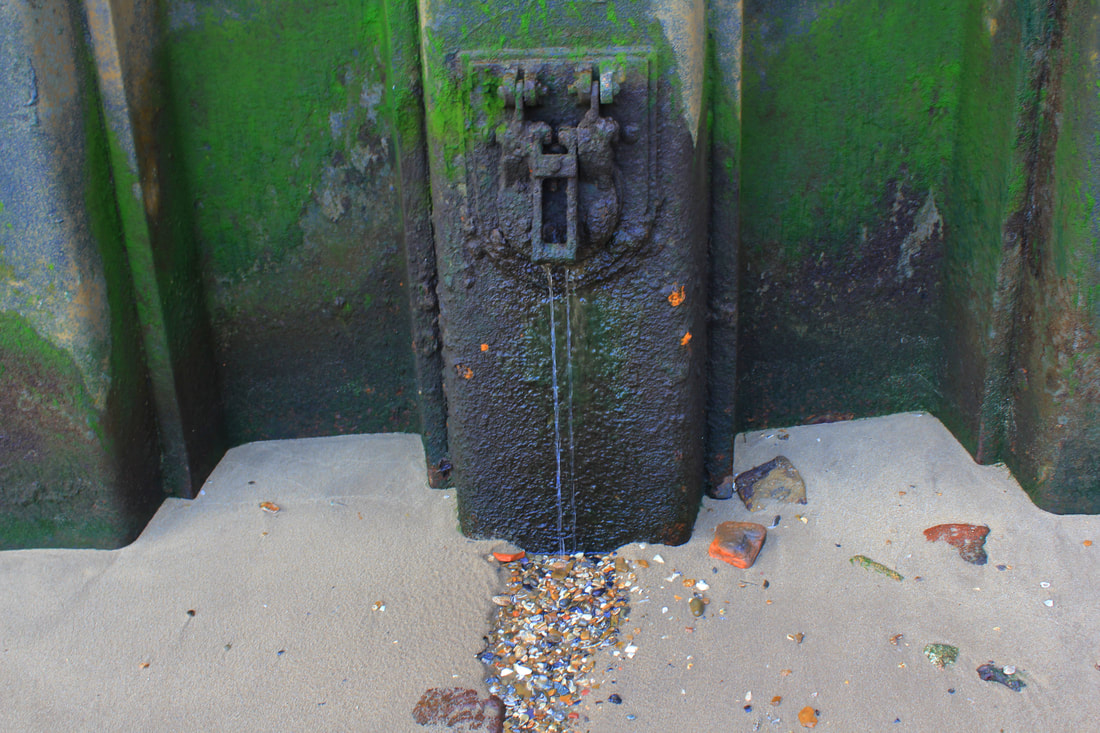
My taken photographs:
These are my own photographs that I have taken on the banks of the thames river, I wanted to show different areas and elements along the banks of the river.
WWW
What went well with these photographs is that I was able to capture the washed up ruble along the shore of the river banks accurately portraying the different elements of the thames edges
EBI
These photographs could be even better if I could experiment more with the colours and start to take photographs of specific items found along the thames banks
Edited photographs:
In colour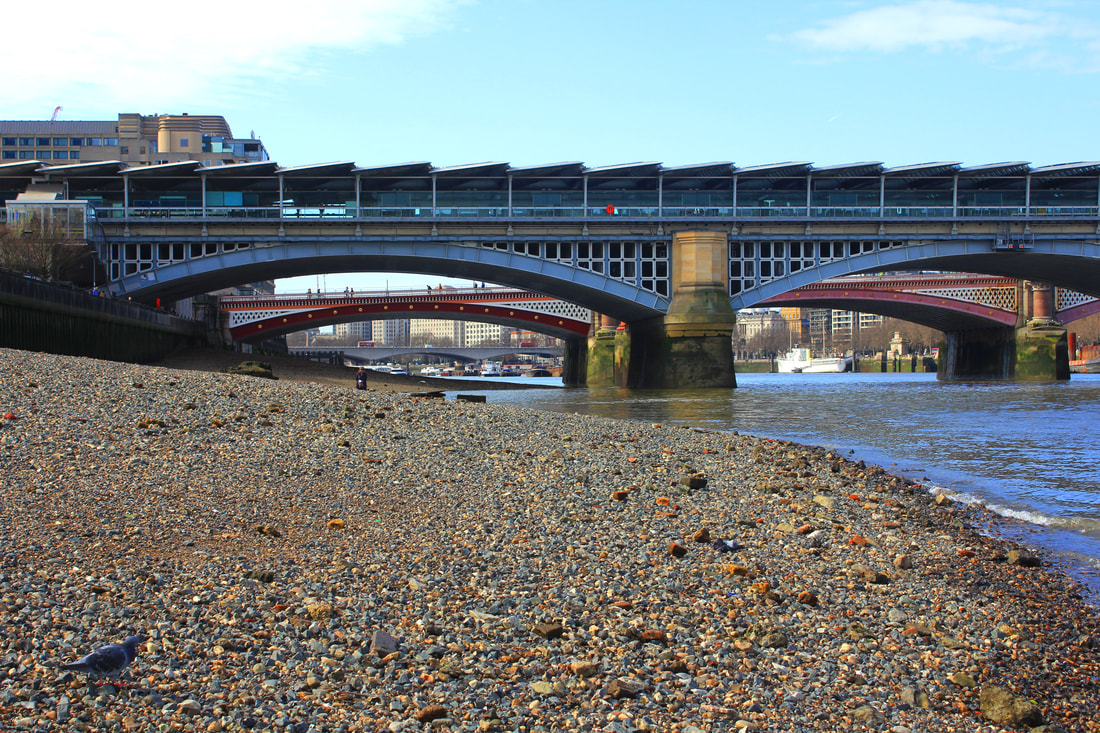

|
Black and White


|
|


|
WWW
What went well with these photographs is that I using photoshop making me able to experiment with the colours or the lack of colours, I wanted to compare these different versions and see what I prefer overall which was eventually black and white
EBI
These photographs could be even better if I could present these as bigger final photographs to see more details, this would also be better if I could edit all new pictures of the location on the thames river
Final edited photographs:


WWW
What went well with these photographs is that I the black and white edited version help to give these pictures more of a past tense sense of time period which adds to my overall them of regeneration and taking something old and reviving it to have a new life.
EBI
These photographs could be even better if I could I could increase the quality and the detail and also gif I could include close up photographs of items washed up on the thames.
Mudlarking (in the Thames)

Over the last 30 years, the mudlarks have made a really important contribution to the study of London’s history through the sheer volume and variety of finds that they have recovered from the Thames foreshore.
Flowing through the heart of Central London towards the sea, the River Thames was once the largest port in the world and vital transportation link between London, the British Empire and the rest of the world. The busy, congested port was filled with ships and boats of all sizes, from large ocean-going vessels, importing and exporting cargo around the globe, to small row boats with watermen transporting passengers from one side of the river to the other.
For eleven continuous miles in London, both sides of the river were packed with docks, wharfs, warehouses, shipbuilding yards, ship-breaking yards, fish markets, factories, breweries, slaughterhouses, municipal buildings, offices, pubs and houses. The vibrant riverfront was home to thriving communities of watermen, lightermen, stevedores, dockworkers, sailors, merchants, fishermen, fishmongers, oyster wives, shipbuilders, ship-breakers and local mudlarks.
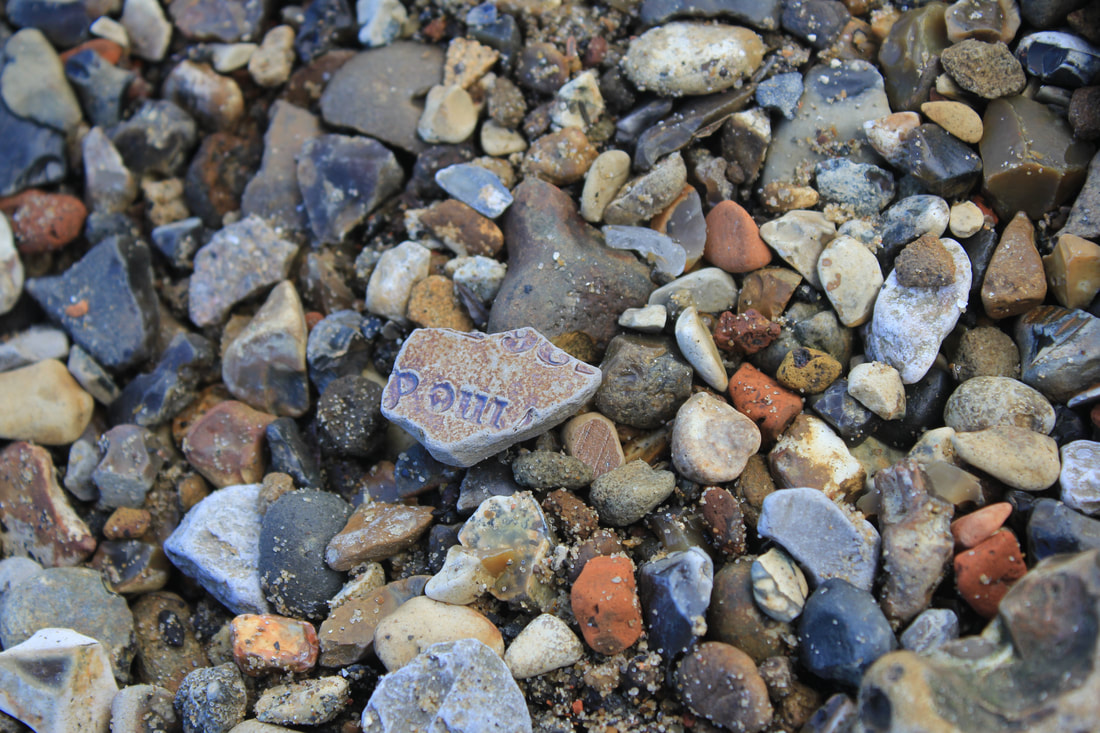
Over the past 2,000 years of human activity along the River Thames, countless objects have been intentionally discarded or accidentally dropped in its waters. For millennia, the Thames has been an extraordinary repository of these lost objects, protected and preserved in the dense, anaerobic mud.
Because of its close proximity to the sea, the water level of the River Thames in London fluctuates by 7 – 10 metres with the incoming and outgoing tides, twice a day. As the murky waters of the river slowly recede at low tide, the exposed riverbed in London becomes the longest archaeological site in Britain. The surface of the intertidal zone is an eclectic mixture of rocks, oyster shells, broken glass, bricks, terracotta tiles, animal bones, sand, gravel and mud. Hidden within this unusual terrain are lost and discarded objects, exposed by the waves of passing boats and erosion.
‘Mudlarking’ is the act of searching the riverbed for these historical treasures. Mudlarks comb the Thames foreshore, which is only accessible for a few hours a day at low tide, in their hunt for objects, untouched since they were lost hundreds or even thousands of years ago. Each artefact, whether ordinary or extraordinary, tells us something unique about London’s history.
Flowing through the heart of Central London towards the sea, the River Thames was once the largest port in the world and vital transportation link between London, the British Empire and the rest of the world. The busy, congested port was filled with ships and boats of all sizes, from large ocean-going vessels, importing and exporting cargo around the globe, to small row boats with watermen transporting passengers from one side of the river to the other.
For eleven continuous miles in London, both sides of the river were packed with docks, wharfs, warehouses, shipbuilding yards, ship-breaking yards, fish markets, factories, breweries, slaughterhouses, municipal buildings, offices, pubs and houses. The vibrant riverfront was home to thriving communities of watermen, lightermen, stevedores, dockworkers, sailors, merchants, fishermen, fishmongers, oyster wives, shipbuilders, ship-breakers and local mudlarks.
Over the past 2,000 years of human activity along the River Thames, countless objects have been intentionally discarded or accidentally dropped in its waters. For millennia, the Thames has been an extraordinary repository of these lost objects, protected and preserved in the dense, anaerobic mud.
Because of its close proximity to the sea, the water level of the River Thames in London fluctuates by 7 – 10 metres with the incoming and outgoing tides, twice a day. As the murky waters of the river slowly recede at low tide, the exposed riverbed in London becomes the longest archaeological site in Britain. The surface of the intertidal zone is an eclectic mixture of rocks, oyster shells, broken glass, bricks, terracotta tiles, animal bones, sand, gravel and mud. Hidden within this unusual terrain are lost and discarded objects, exposed by the waves of passing boats and erosion.
‘Mudlarking’ is the act of searching the riverbed for these historical treasures. Mudlarks comb the Thames foreshore, which is only accessible for a few hours a day at low tide, in their hunt for objects, untouched since they were lost hundreds or even thousands of years ago. Each artefact, whether ordinary or extraordinary, tells us something unique about London’s history.
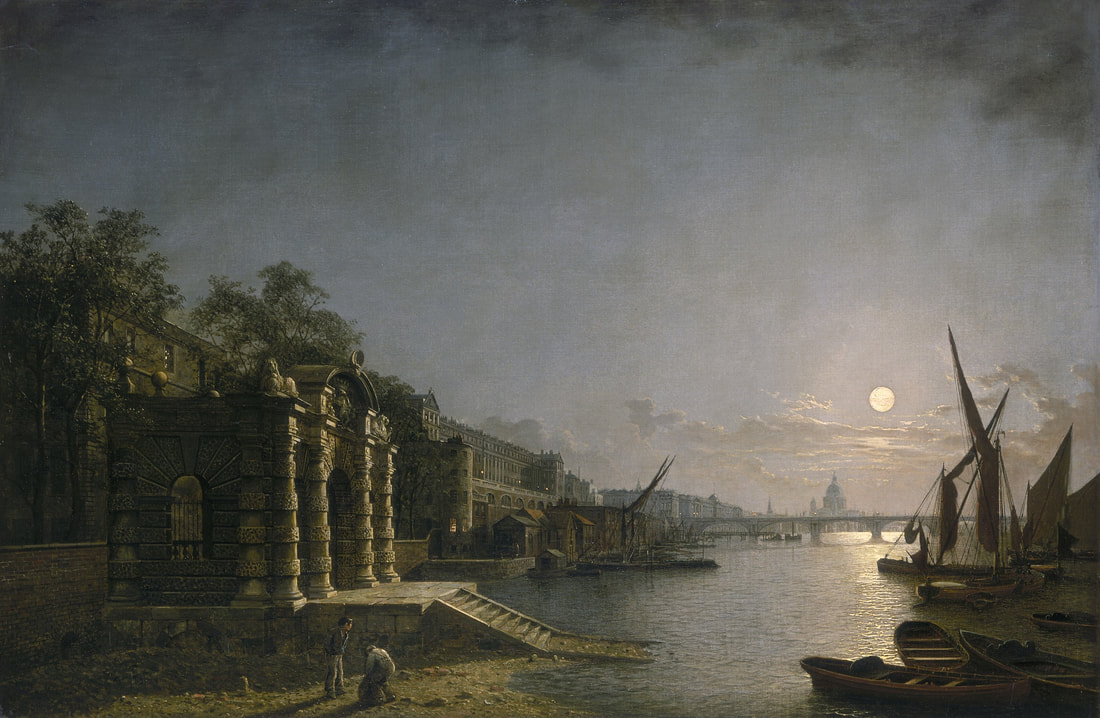
PAINTED BY HENRY PETHER (C) MUSEUM OF LONDON
Victorian Mudlarks
In the 19th century, Victorian mudlarks were the original ‘Foragers of the Foreshore,’ scavenging for anything on the exposed riverbed which they could sell in order to survive. They were often children, mostly boys, who braved dangerous conditions to find practical items like coal, iron, copper nails and ropes which they could sell in order to buy food and essentials for themselves and their families. Their income was very meagre, and they were renowned for their tattered clothes, filth and terrible stench. Out of desperation, these young children went mudlarking to survive. In the 19th century, they were considered among the lowest members of society in London.
In contrast to the young Victorian scavengers of the Thames, mudlarks today have a passionate interest in London’s rich archaeology and history, and it has become a popular hobby which gives both adults and children
a unique ‘hands on history’ experience and deepens our understanding of London’s past. Modern mudlarks have discovered and recovered an incredibly wide range of artefacts from all periods of British history, from prehistoric to modern times. They search the foreshore using a variety of methods. Some search ‘by eye’ while others use a trowel, sieve or metal detectors.
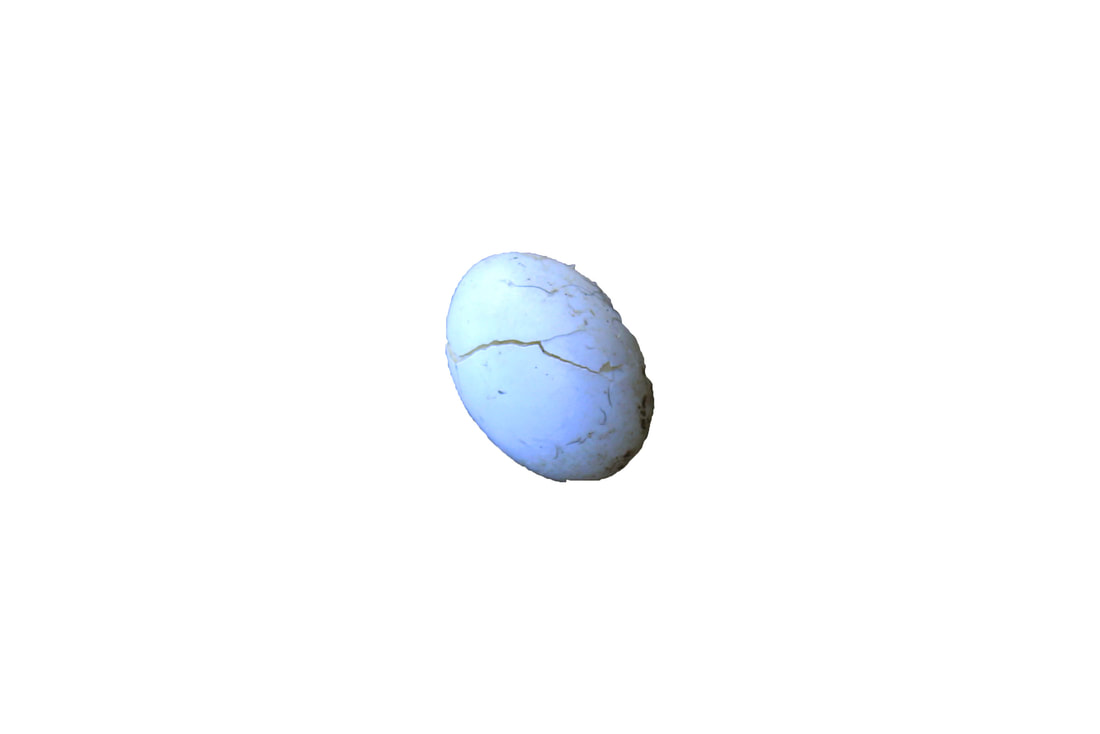
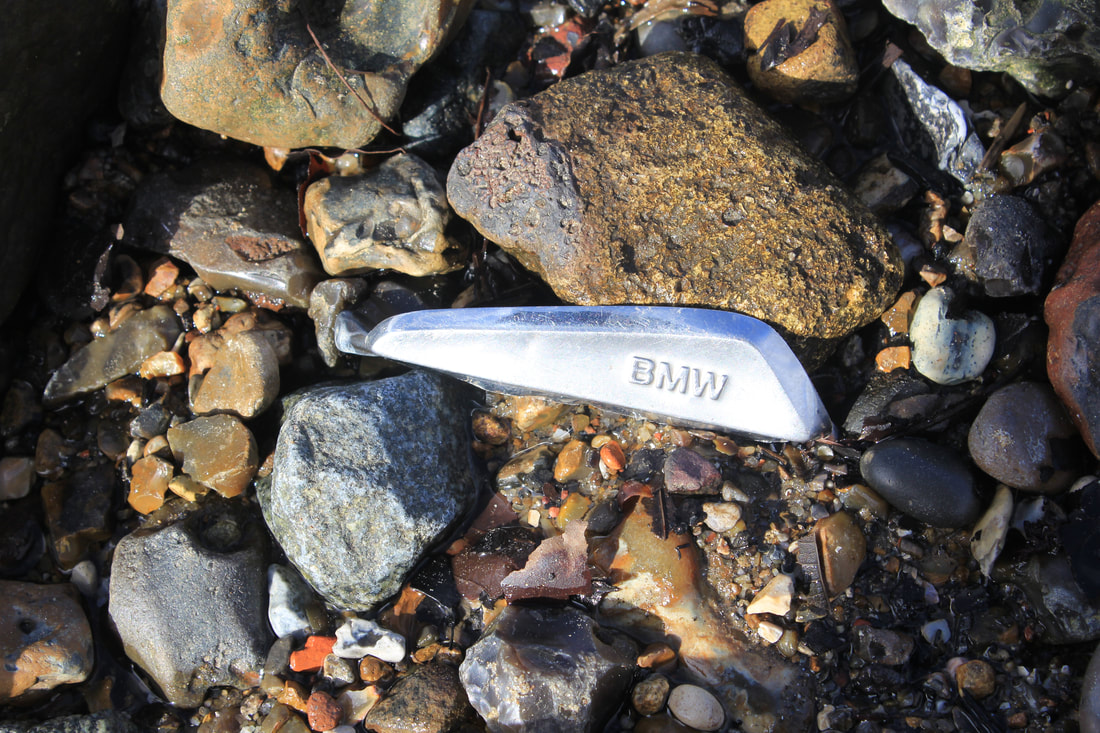
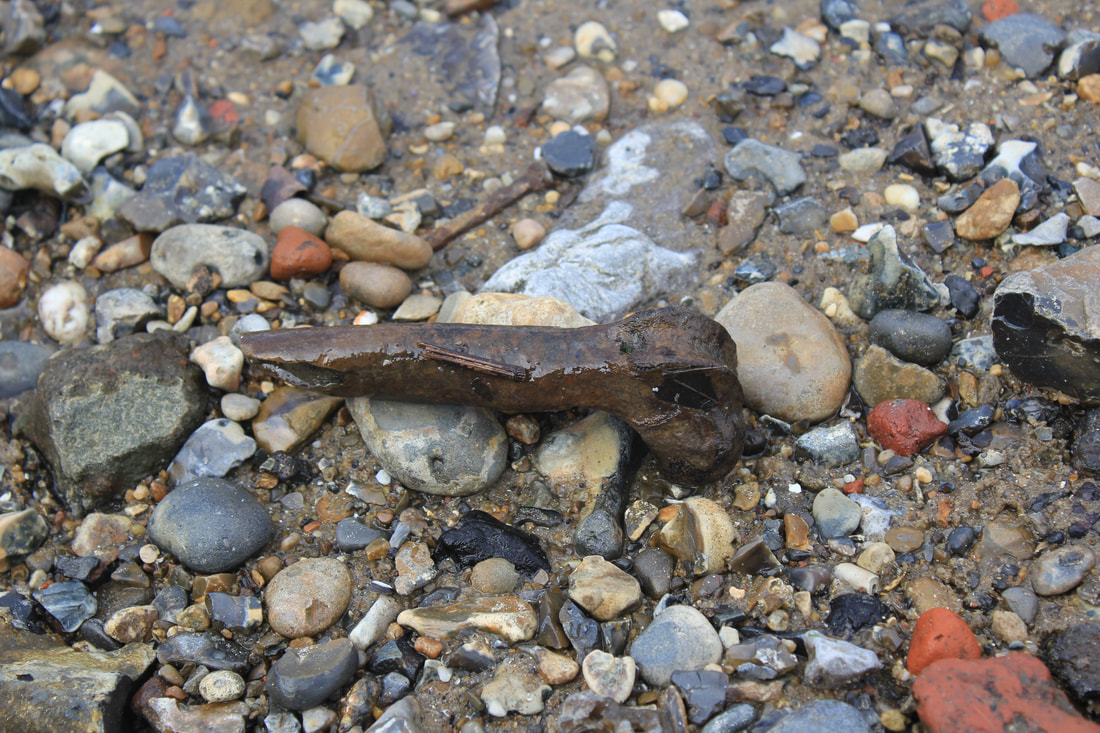
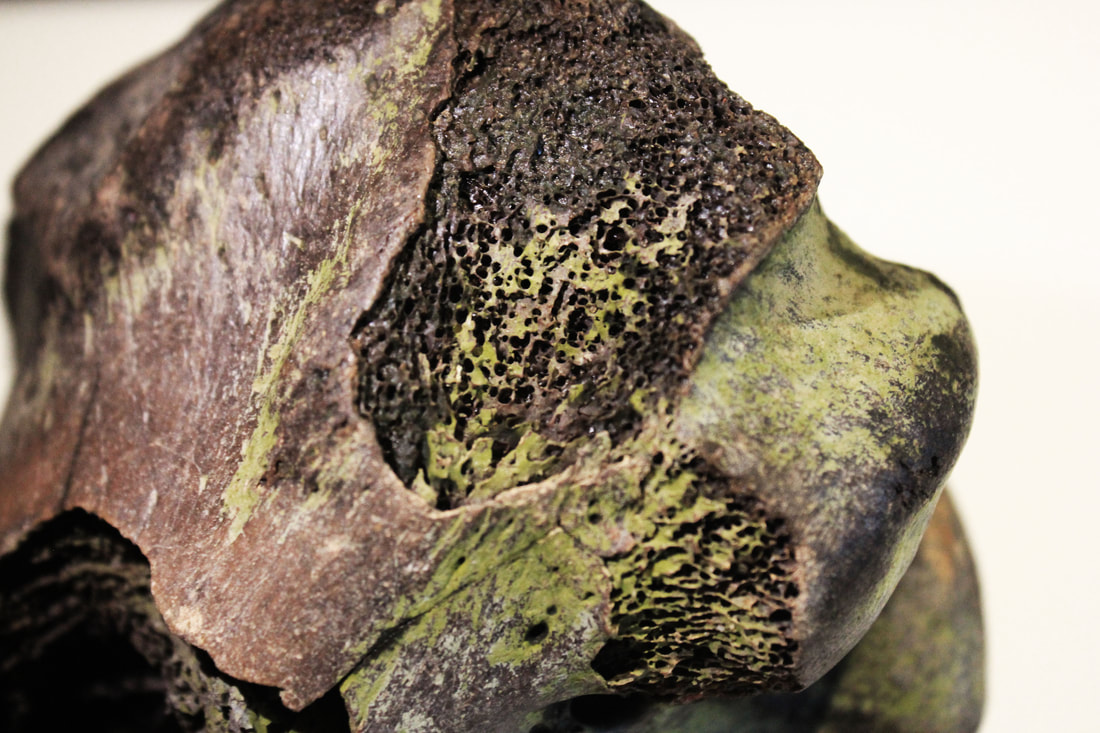
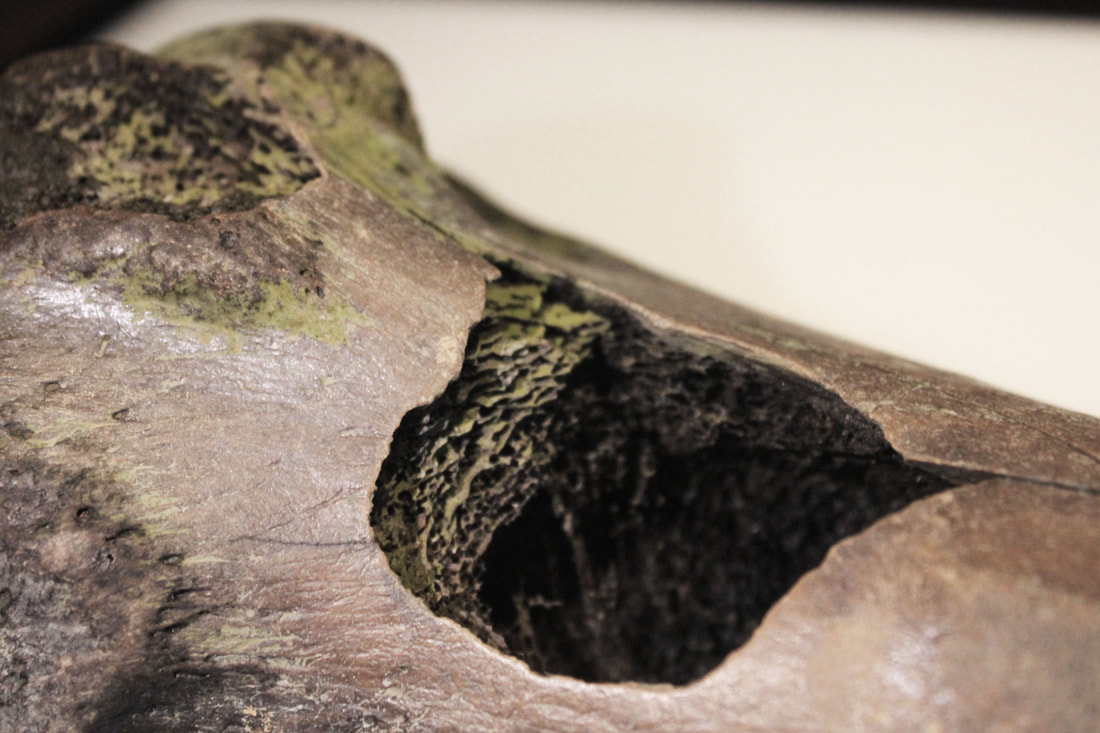
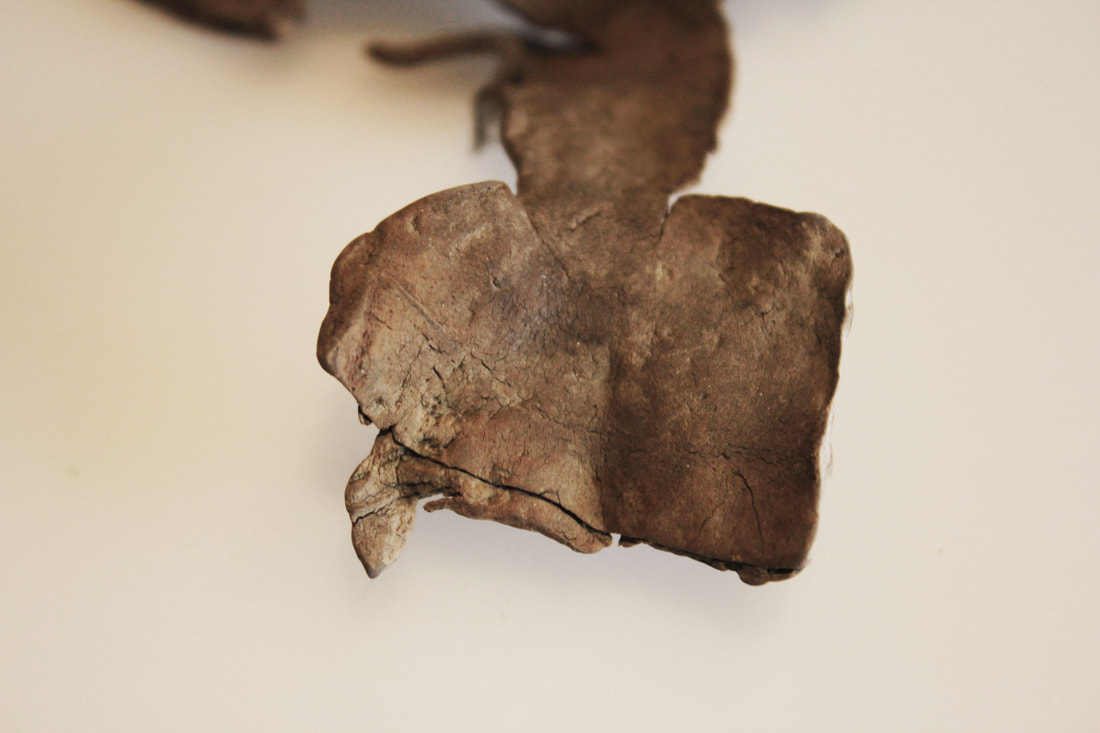
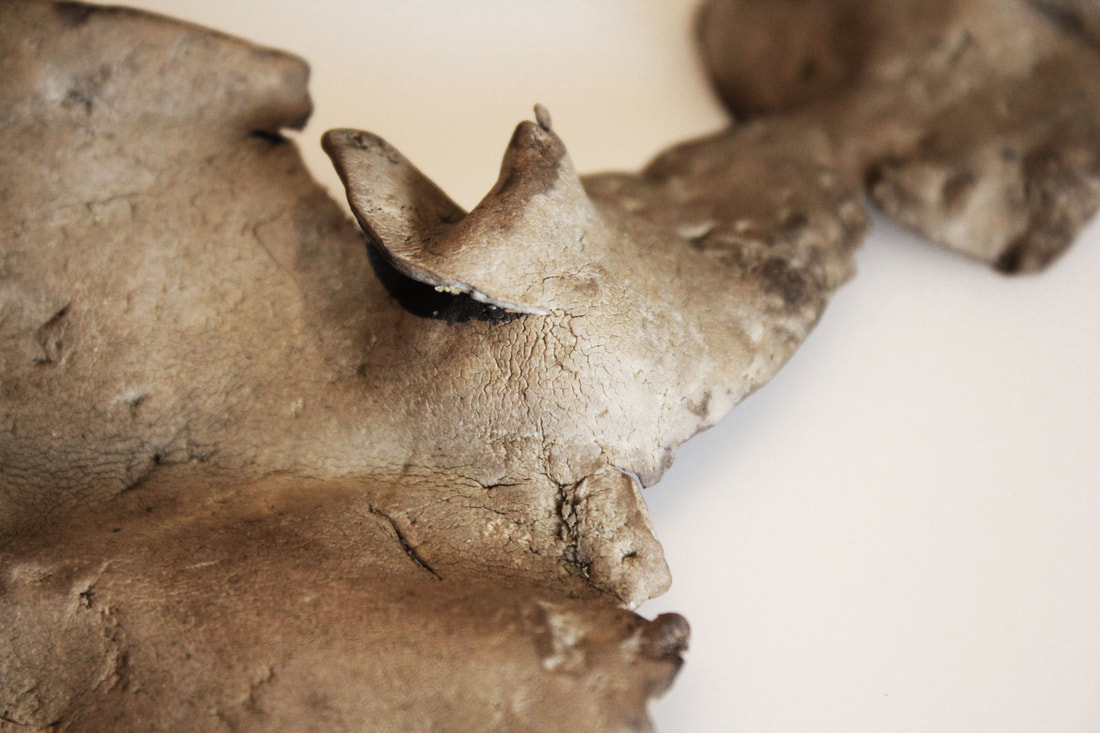
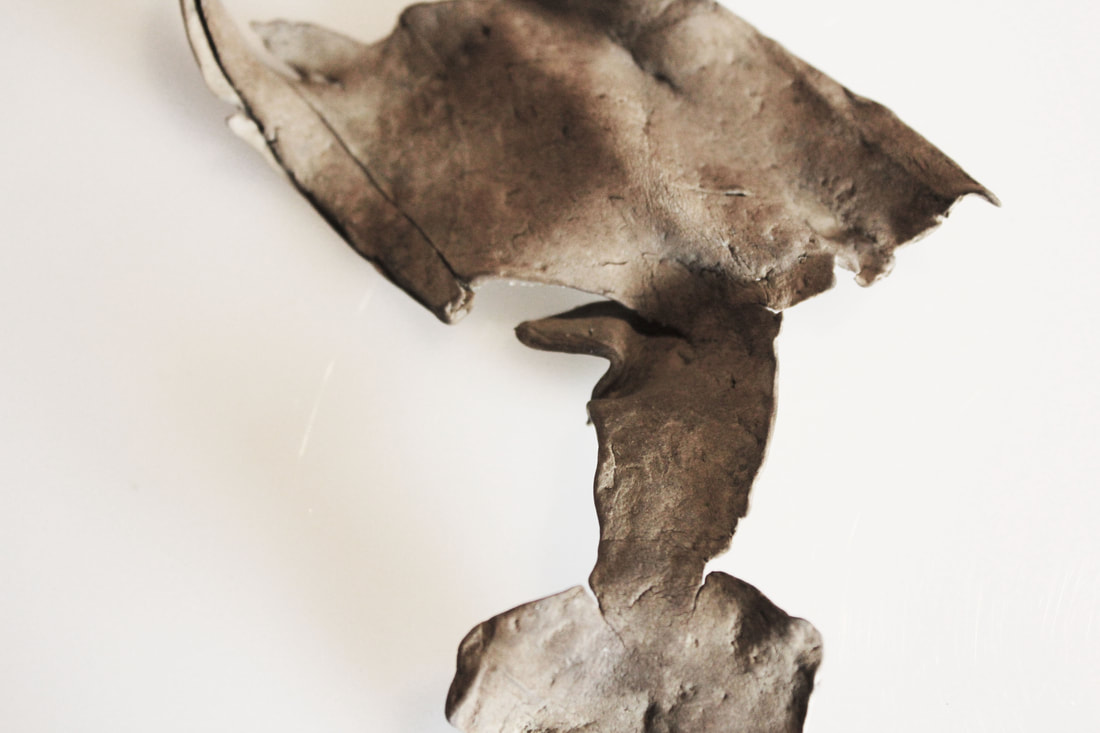
My taken photographs:
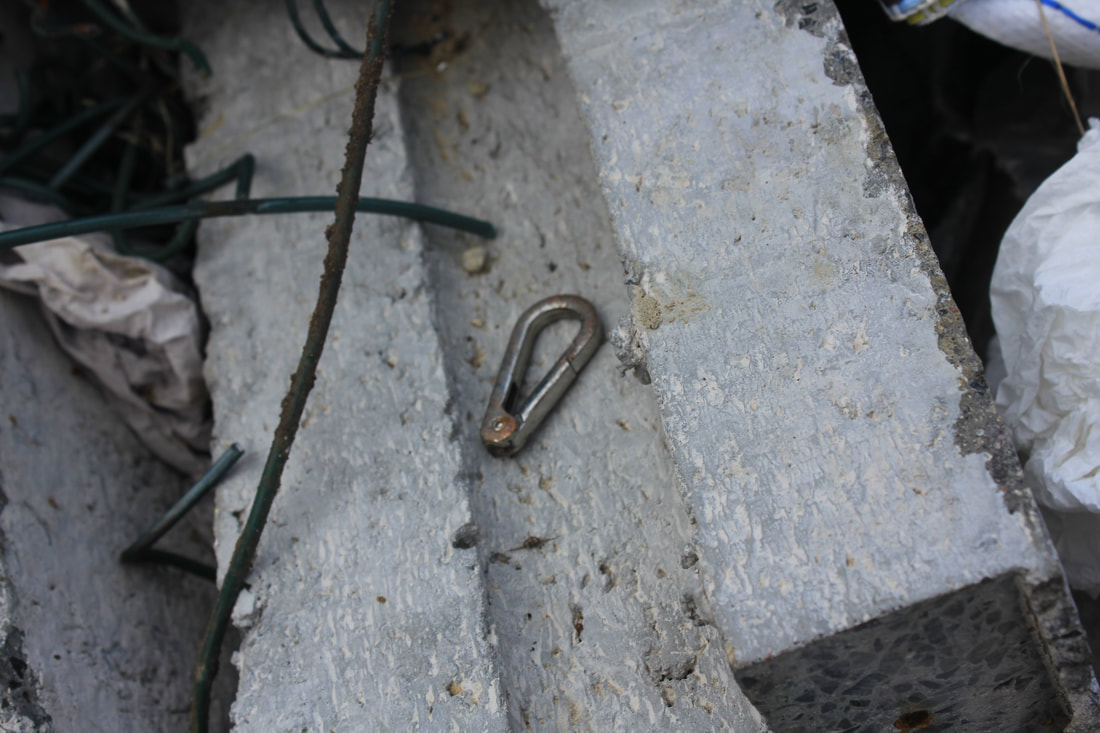
These are photographs of items and objects the I have discovered along the thames bank washed up by the river in different states of decay and degradation.
WWW
What went well with these photographs is that I have managed to photograph a wide verity of the unique collected objects but I have also managed to photograph them in their original locations.
EBI
These photographs could be even better if I could take new photographs with each of these objects against a neutral or white background to help make them the centre focus of each photograph.
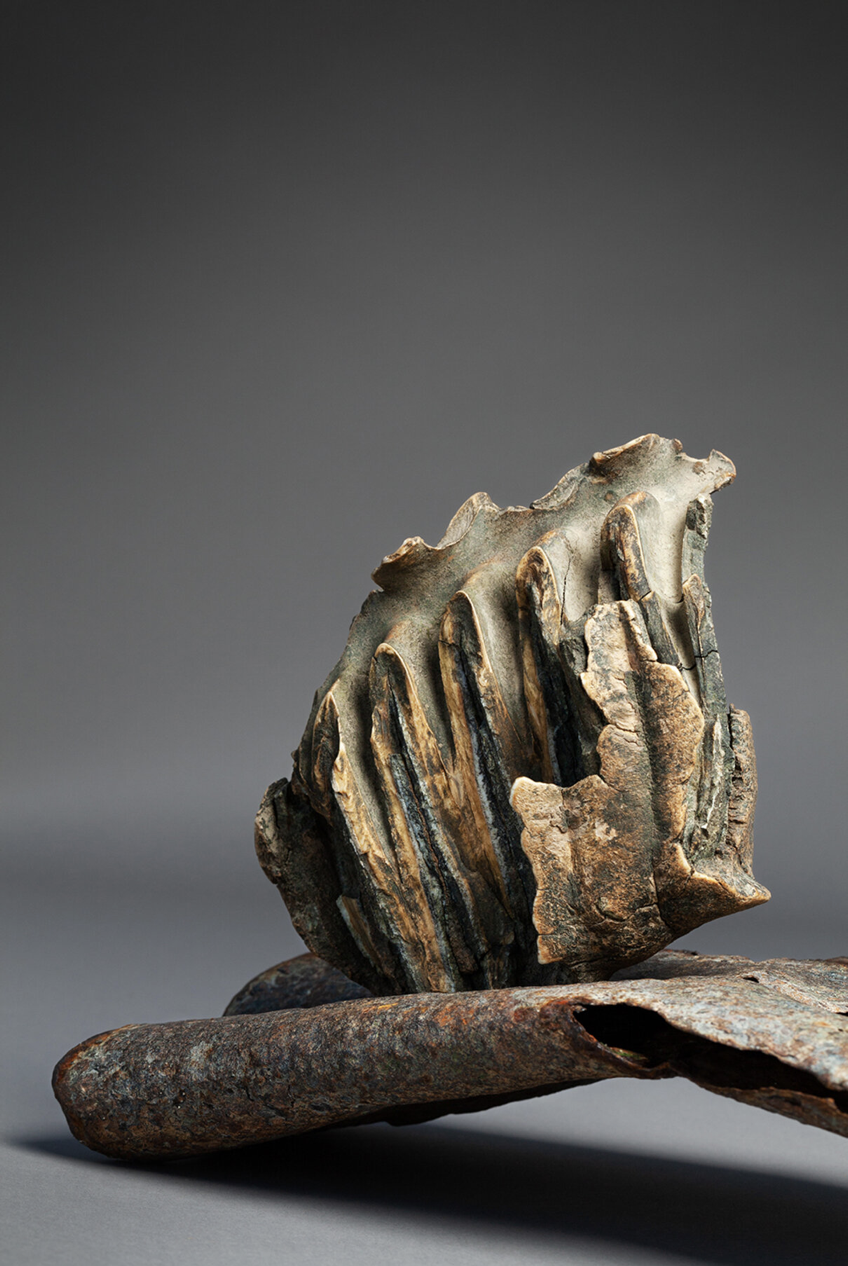
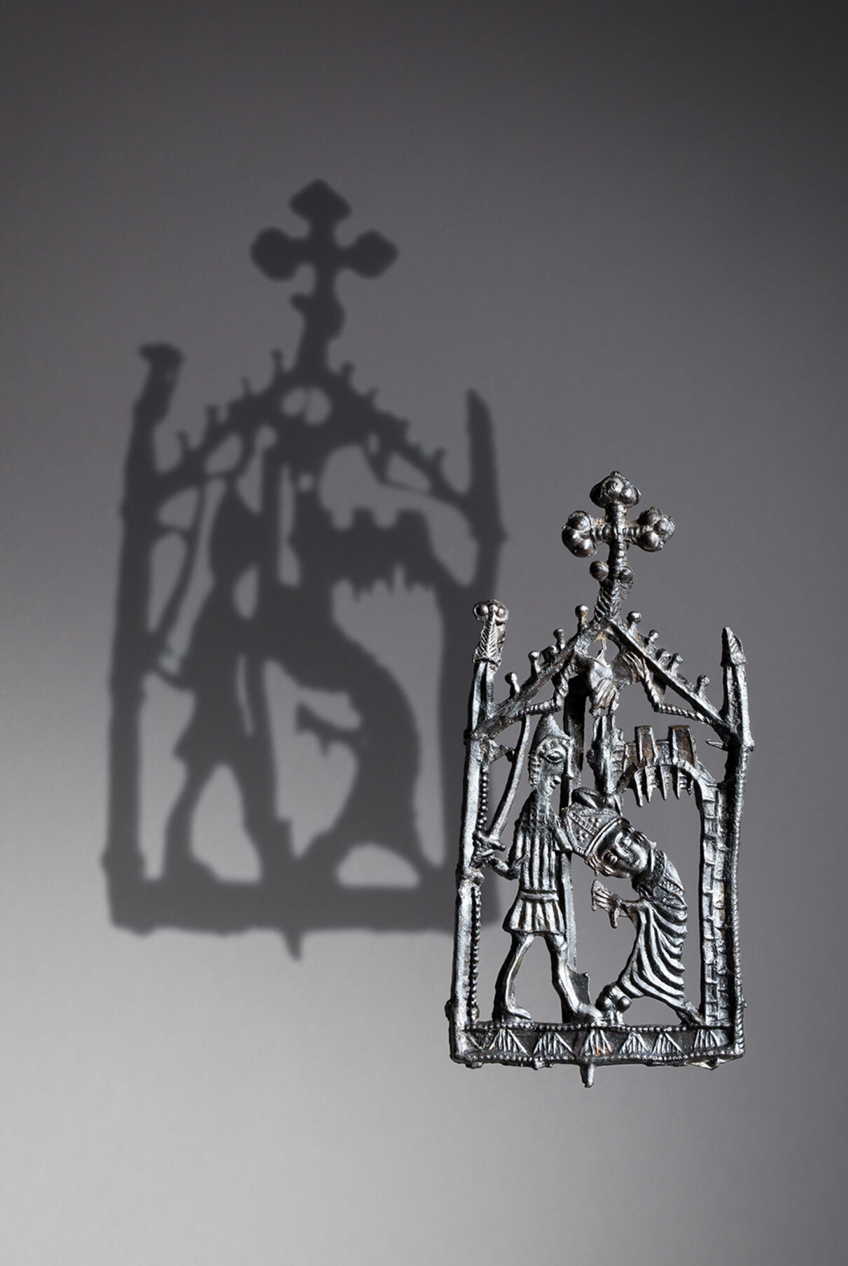
Hannah Smiles - Thames series
These still-life photographs were created by Hannah Smiles and are from her 2018 still-life project, Mudlark. Hannah spent a year photographing objects and artefacts that were found along the banks of the River Thames by some of London’s most prolific mudlarks. Her interest in mudlarking was piqued after a Sunday afternoon stumble along the tideline of animal bones that stretch the length of the Greenwich foreshore. She was catapulted into the extraordinary micro-world of the Thames, its rich historic and often personal resonances.
|
|
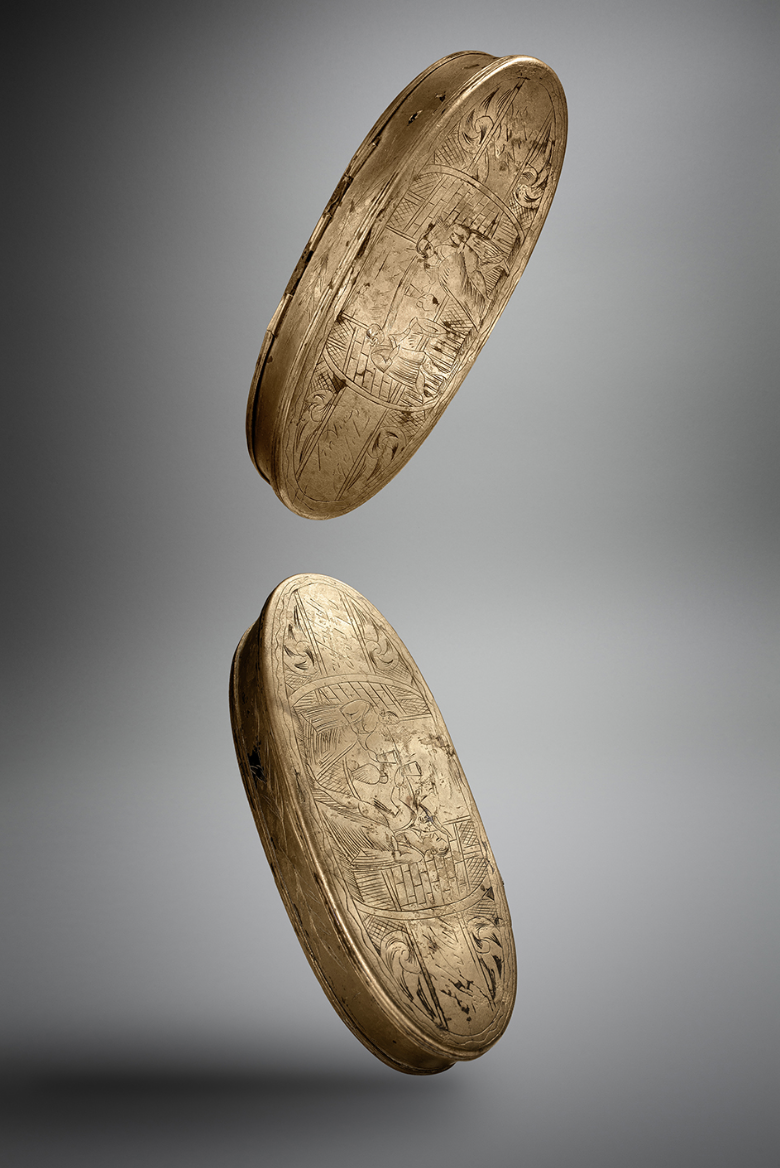
|
It is not the pursuit or portrayal of ‘treasure’ that fascinates Hannah, but the transformative journey these objects have taken from being every-day pieces
of rubbish, that can hint at even a small tale of the city’s past, to becoming highly cherished items for the finder. Hannah presents the artefacts suspended in air, affording them the space to speak of their own significance.
Hannah is a London-based, self-taught photographer with over 10 years experience. Her Mudlark project has created some fabulous opportunities for her, including exhibitions at both Tate Modern and the British Museum, a huge outdoor display on the Southbank and of course the commission by The Thames Festival Trust to photograph London’s mudlarkers for Foragers of the Foreshore.
Hannah is a London-based, self-taught photographer with over 10 years experience. Her Mudlark project has created some fabulous opportunities for her, including exhibitions at both Tate Modern and the British Museum, a huge outdoor display on the Southbank and of course the commission by The Thames Festival Trust to photograph London’s mudlarkers for Foragers of the Foreshore.
Step by step editing process:
In an attempt to aid my comparison I have taken some of the photographs of the objects taken from the skip and
edited out the cluttered background so that I can better compare them later on.
To do this I first select the clearest photograph for each object to end up with the best result.
edited out the cluttered background so that I can better compare them later on.
To do this I first select the clearest photograph for each object to end up with the best result.

|

|

|
when I have this photo up in photoshop I use the selection tool to outline the object I then inverse this effect so that everything but my object is selected meaning now when I use the eraser tool it will get rid of everything but the object once this is done I crop the photograph to get a closer picture and then save and upload this finished edit.
First edited photographs:
I have edited these photographs of the objects from the original pictures that I took this way I can see the differences between the original photographs and the second photoshoot where I have cleaned up the items more clearly because of the white background.
Edited in Photoshop


|
Original Photographs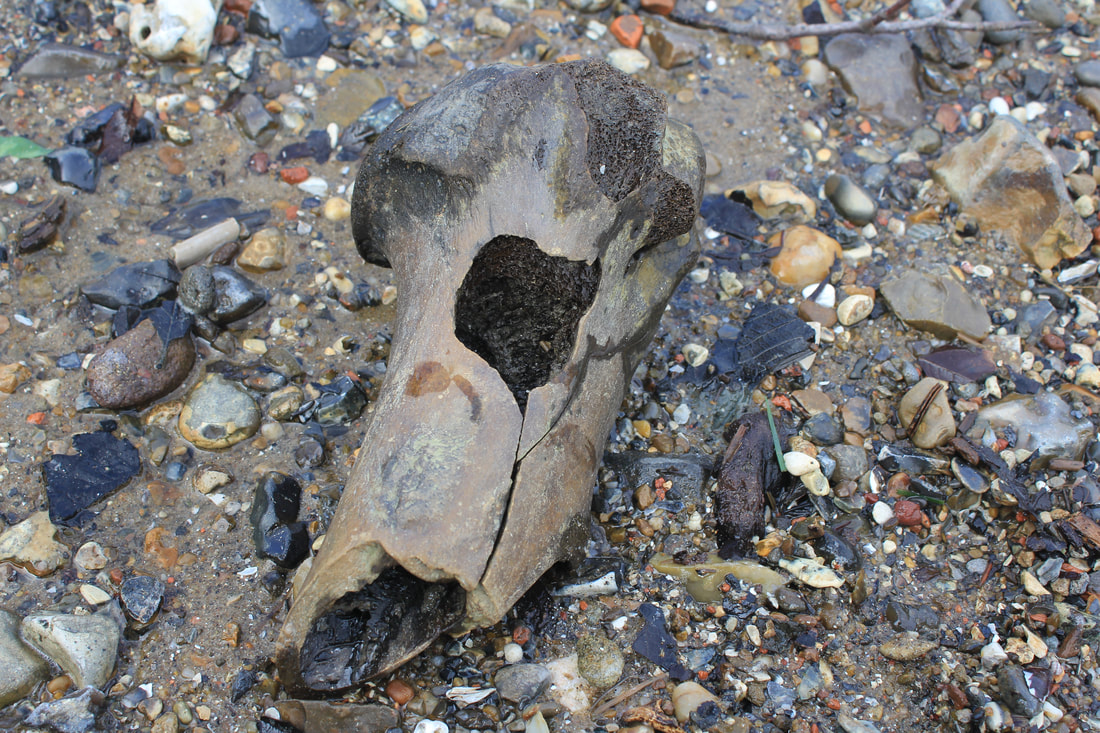

|
WWW
What went well with these photographs is that I by using photoshop to edit these original photographs erasing the background I can get a much cleaner image where I can focus all energy onto the main object and spot more details as it is my now primary focus
EBI
These photographs could be even better if I could cleaner edges on the edited photographs to resolve this I want to try a second photoshoot using a plain background instead of editing one in
Second Photoshoot:
With this second response I have decided to use a light box as a background for the objects to help get more of a clear shot
with a white background, which also means I am not going to use photoshop so I will hopefully I will have cleaner edges around the items sides opposed to when I am using photoshop to get the blank background.
with a white background, which also means I am not going to use photoshop so I will hopefully I will have cleaner edges around the items sides opposed to when I am using photoshop to get the blank background.
WWW
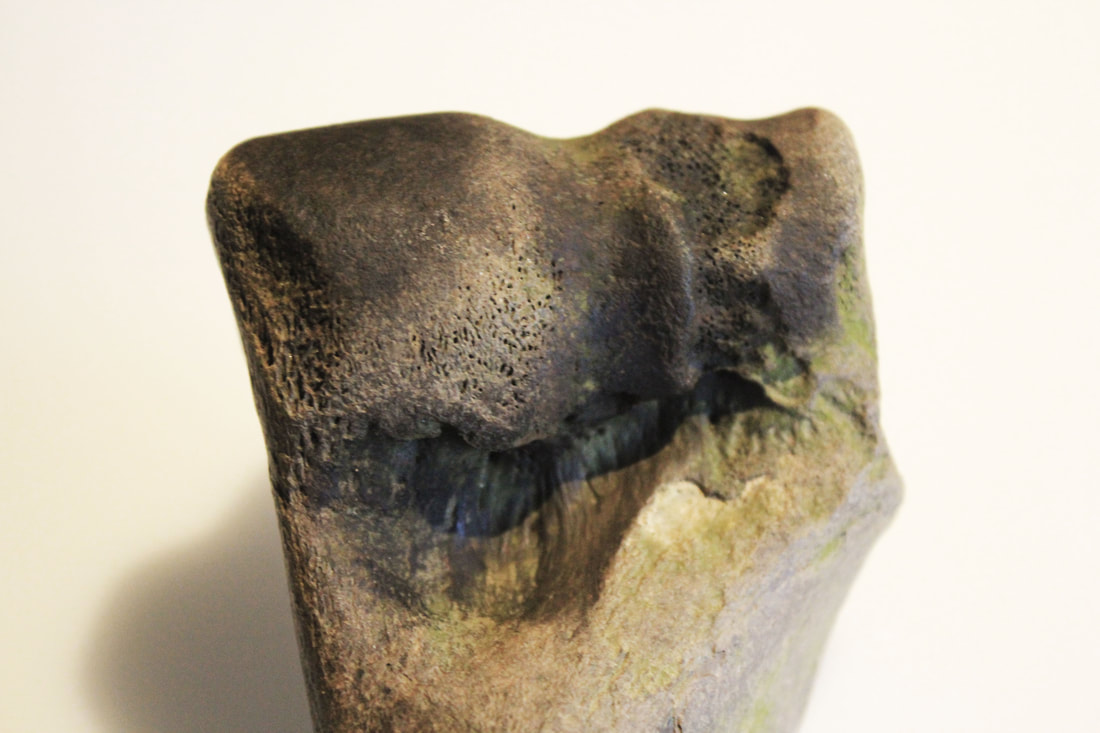
What went well with these photographs is that I used a white background as well as cleaning the objects so I could get a better idea of the degrading the thames has put these items through, I was able to get a much clearer photograph of each of my collected objects
EBI
These photographs could be even better if I could really focus on details on each object to get a better idea of how old they are
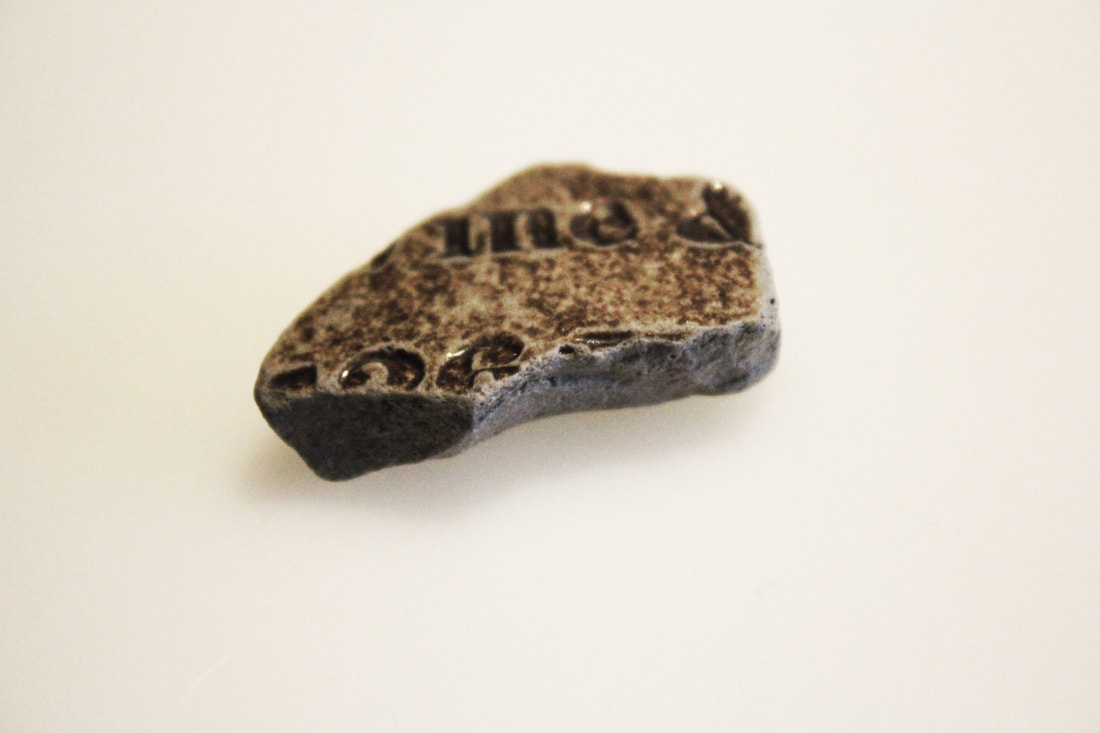
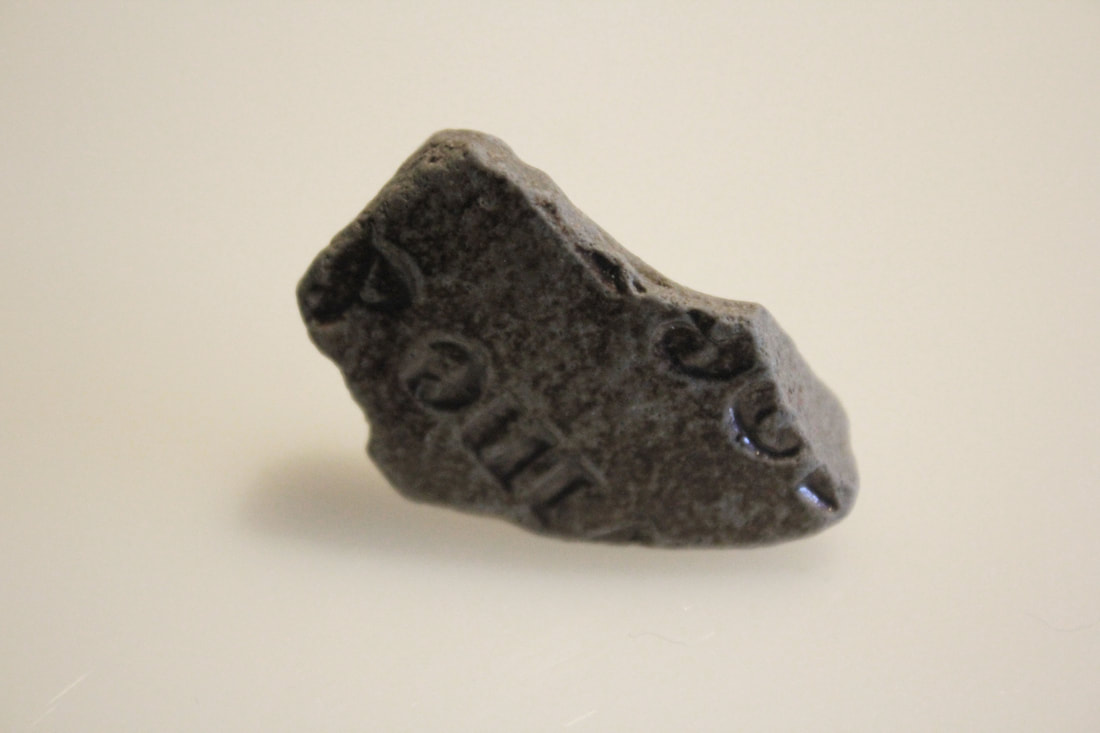
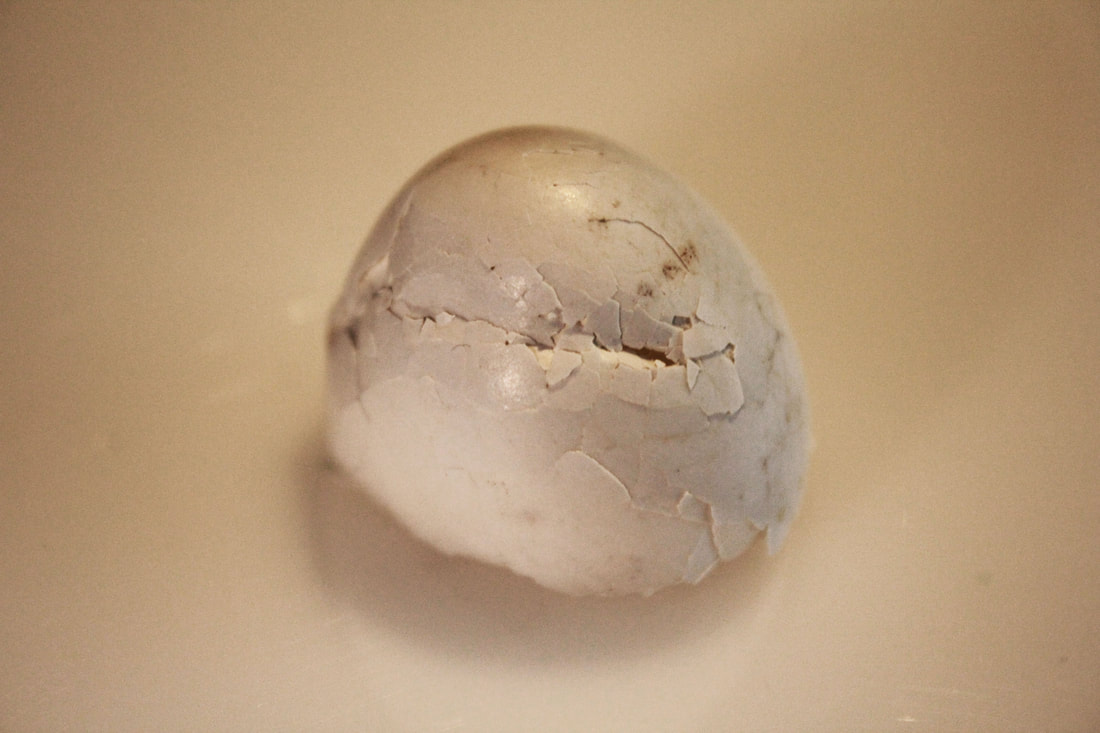
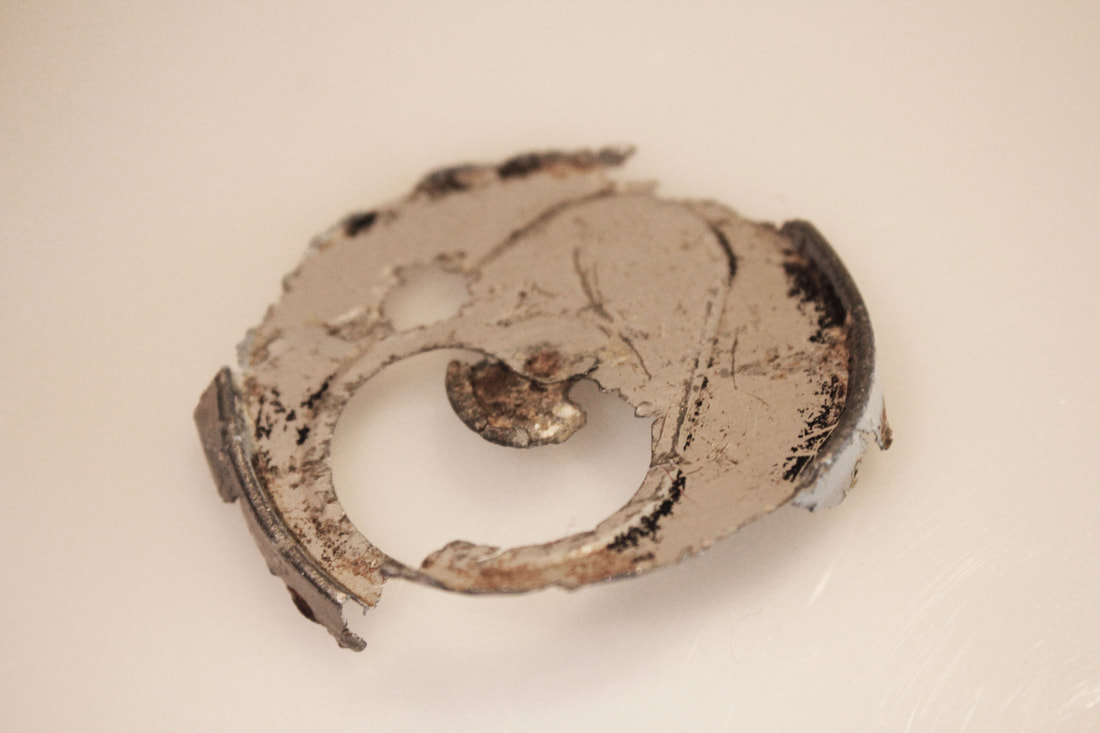
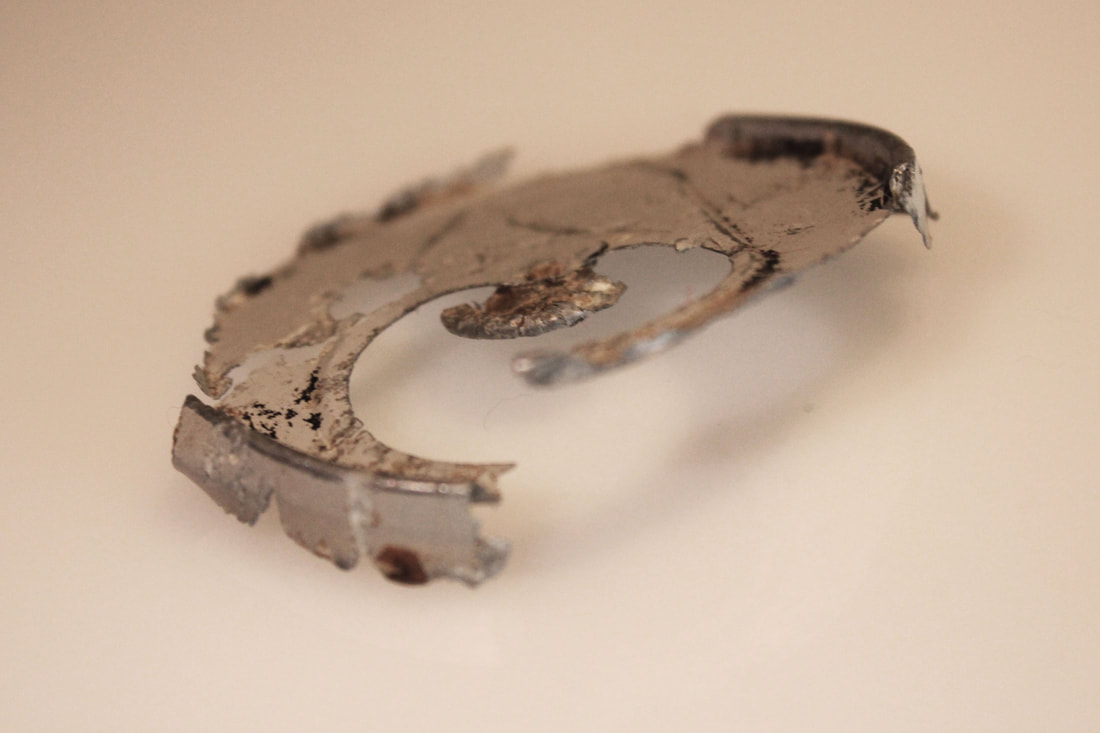
These are the collection of all of the different broken things I collected along the thames edges such as : pottery, bones, glass, tin and a lot of other things against a white background. This helps to further show the difference between the items I found in the skip and on the thames shore; items from the thames are much more regraded and broken where as items from the skip are more like discarded house hold objects in comparison.

|

|
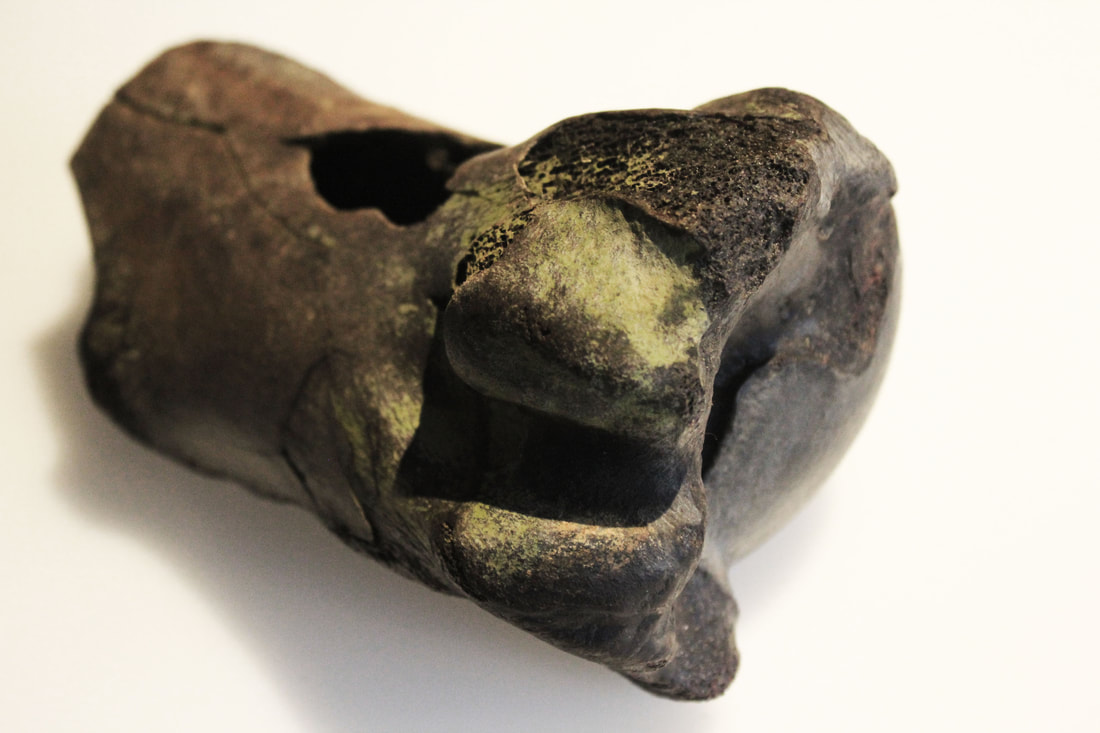
Final edited photographs:

|
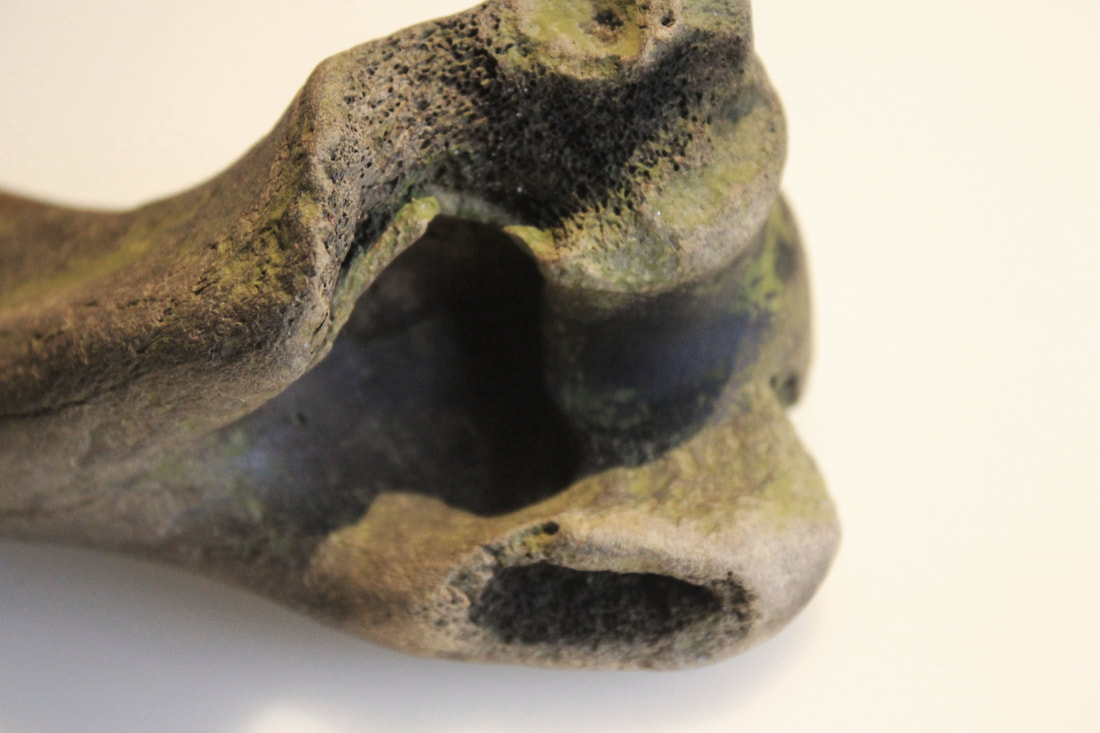
Bone fragment:
|
Broken pottery piece:
|
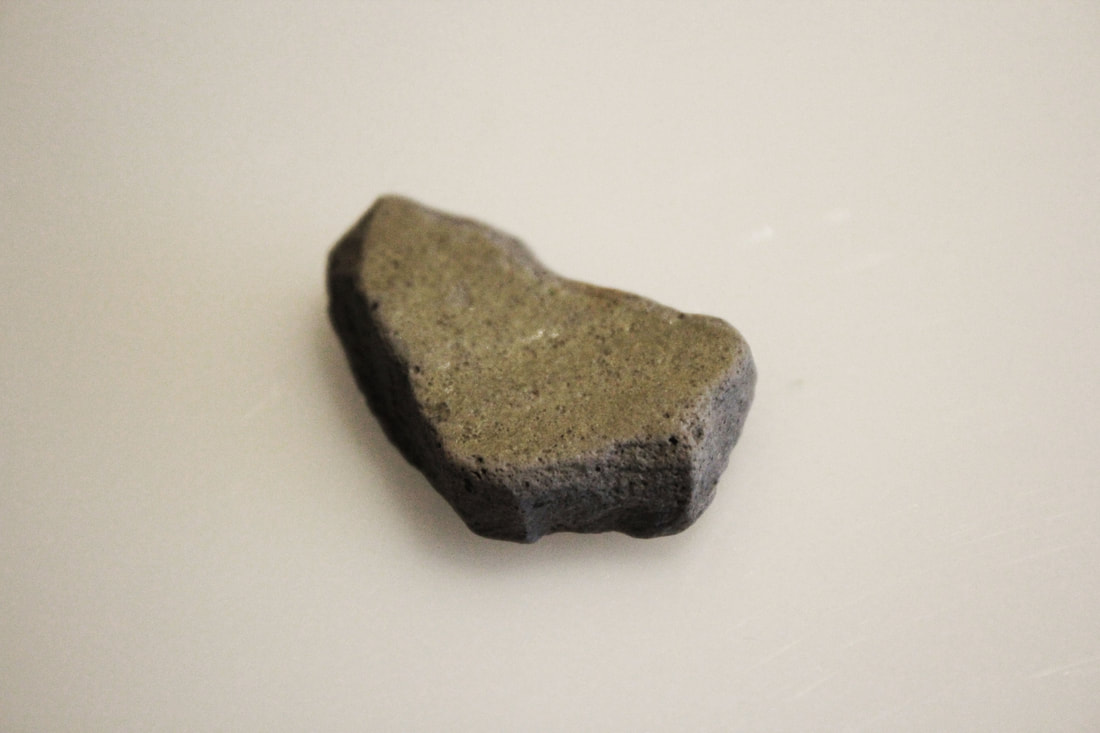
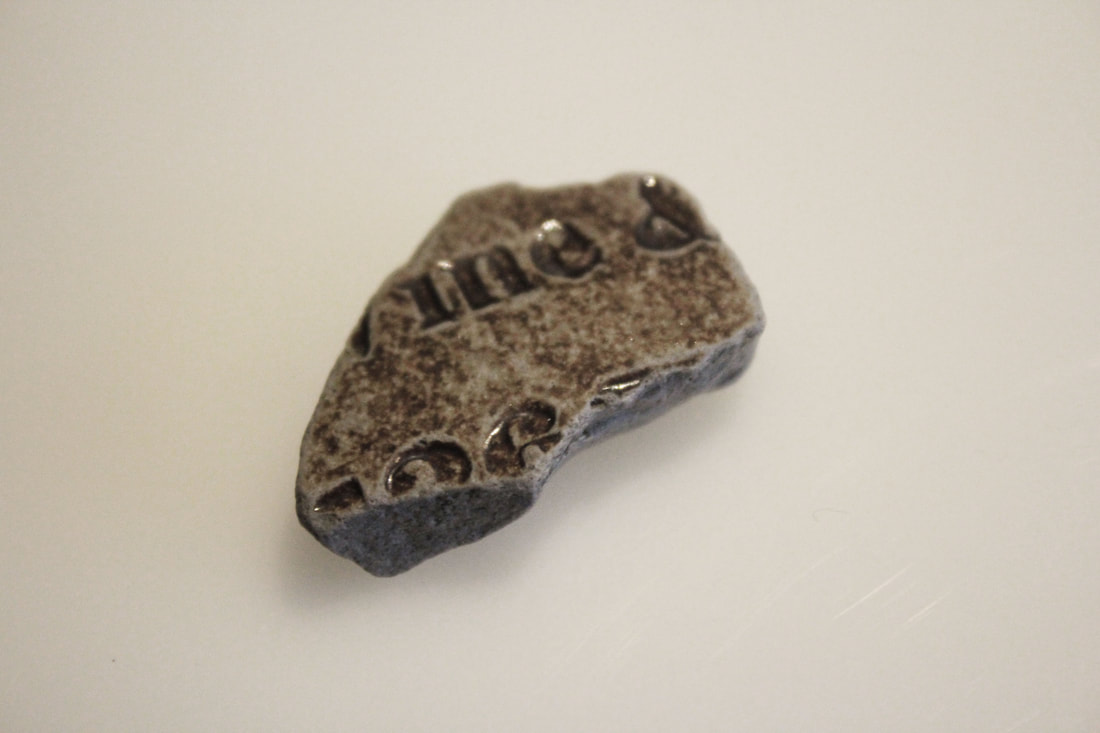
|

|
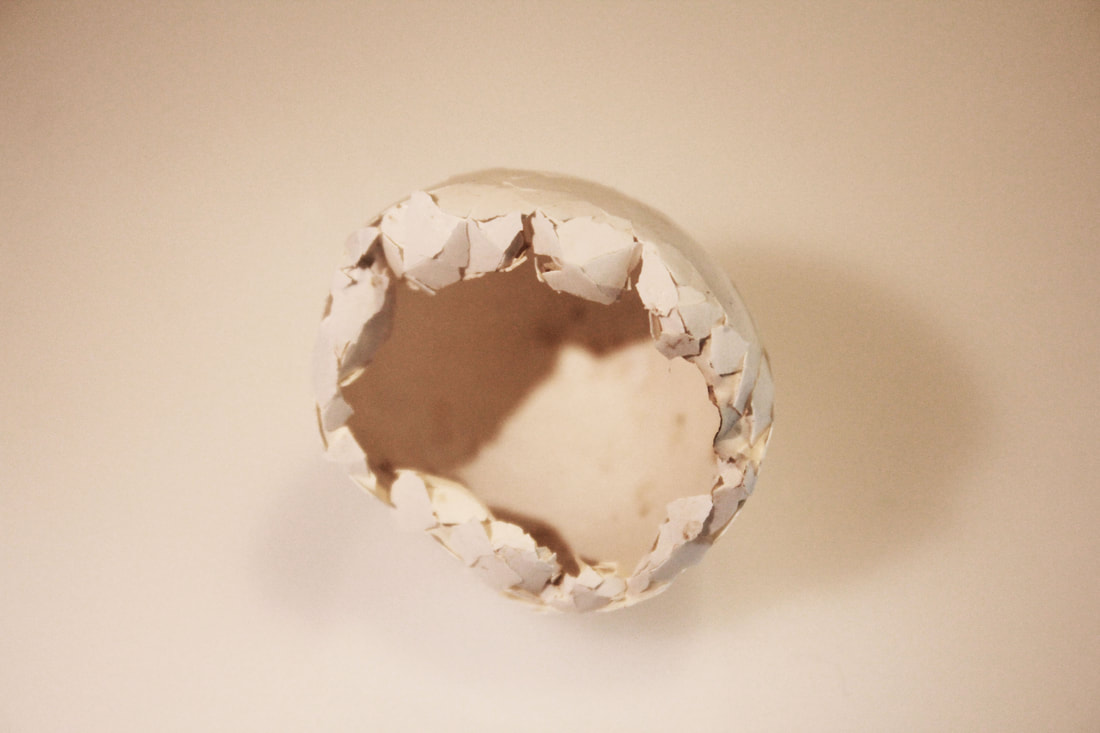
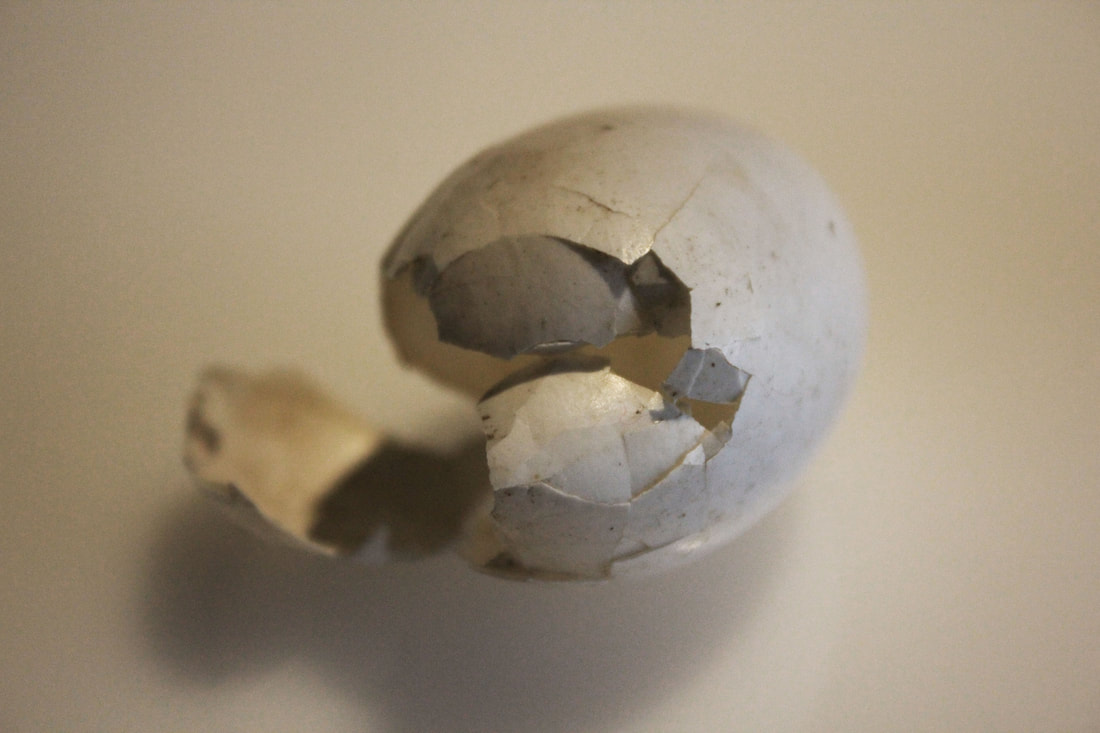
Broken bird egg:
|
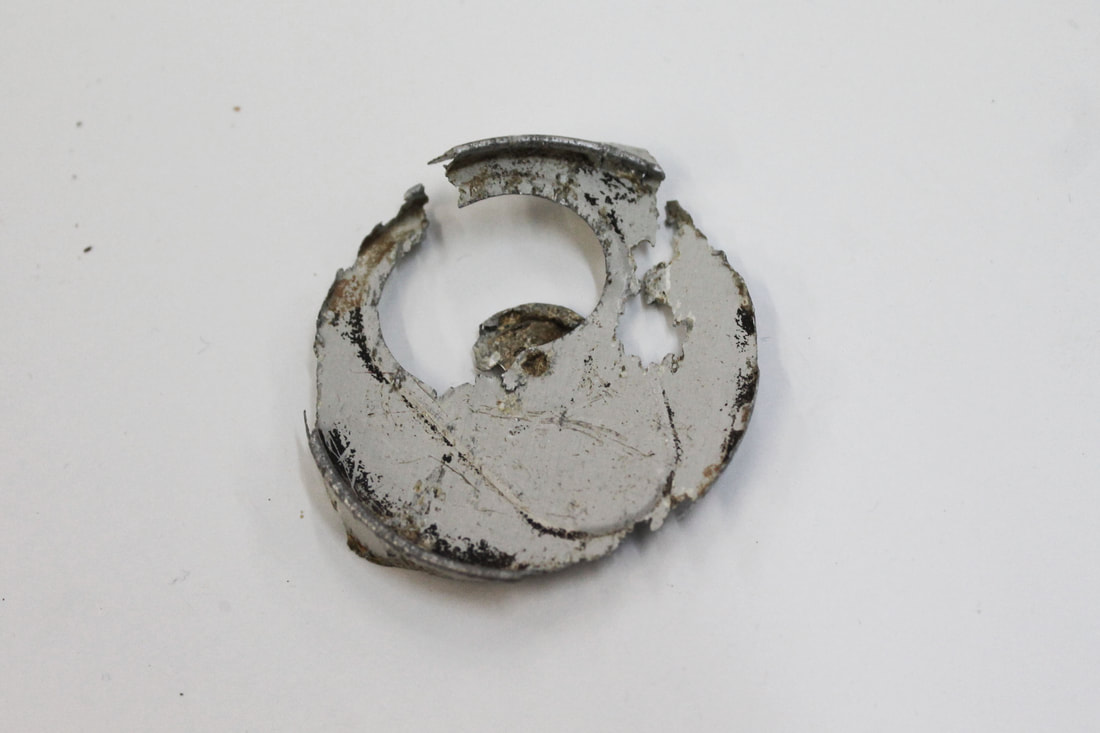
Broken can top: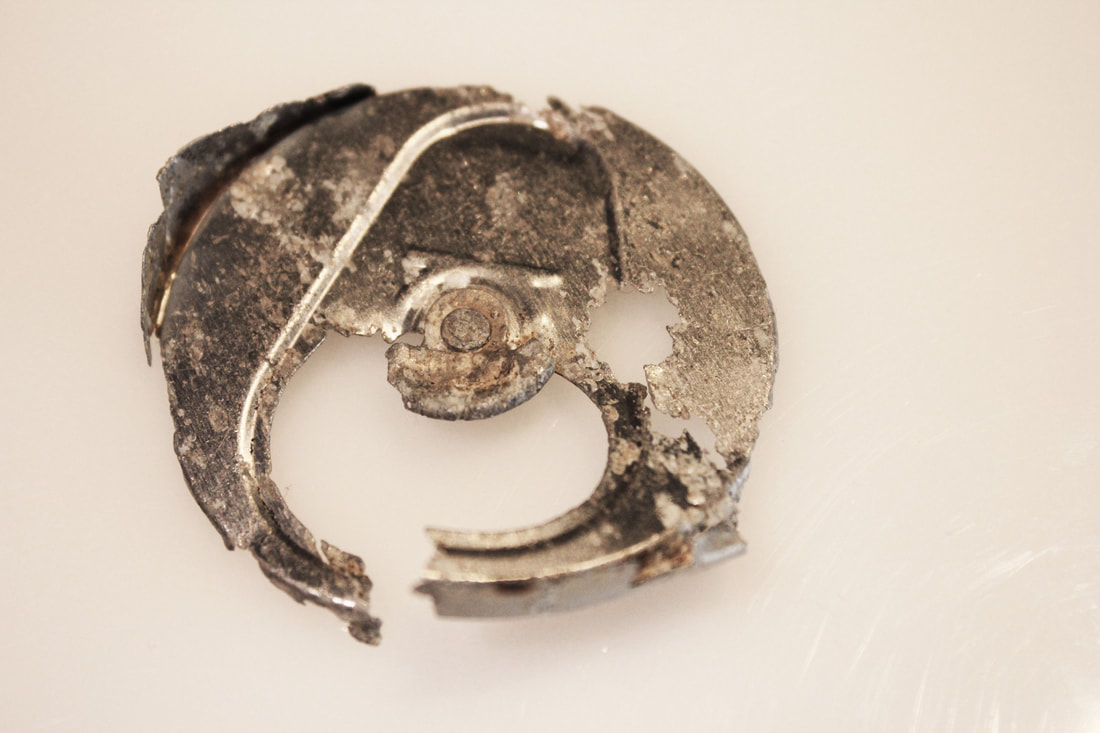
|


|
|
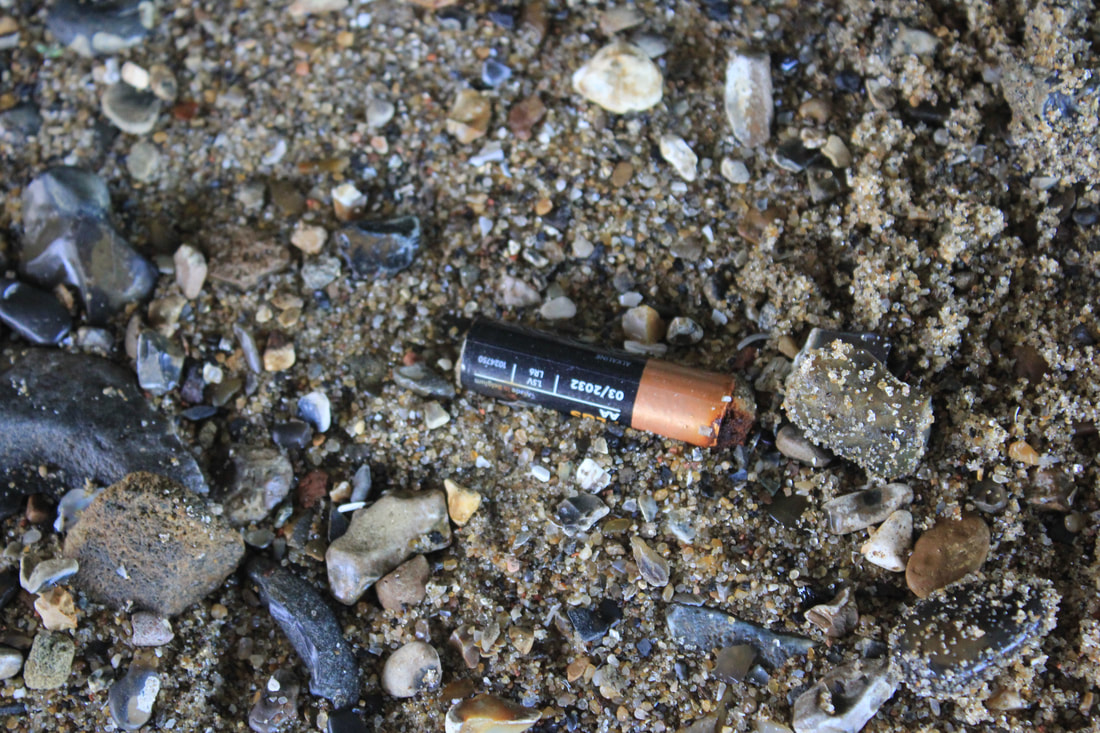
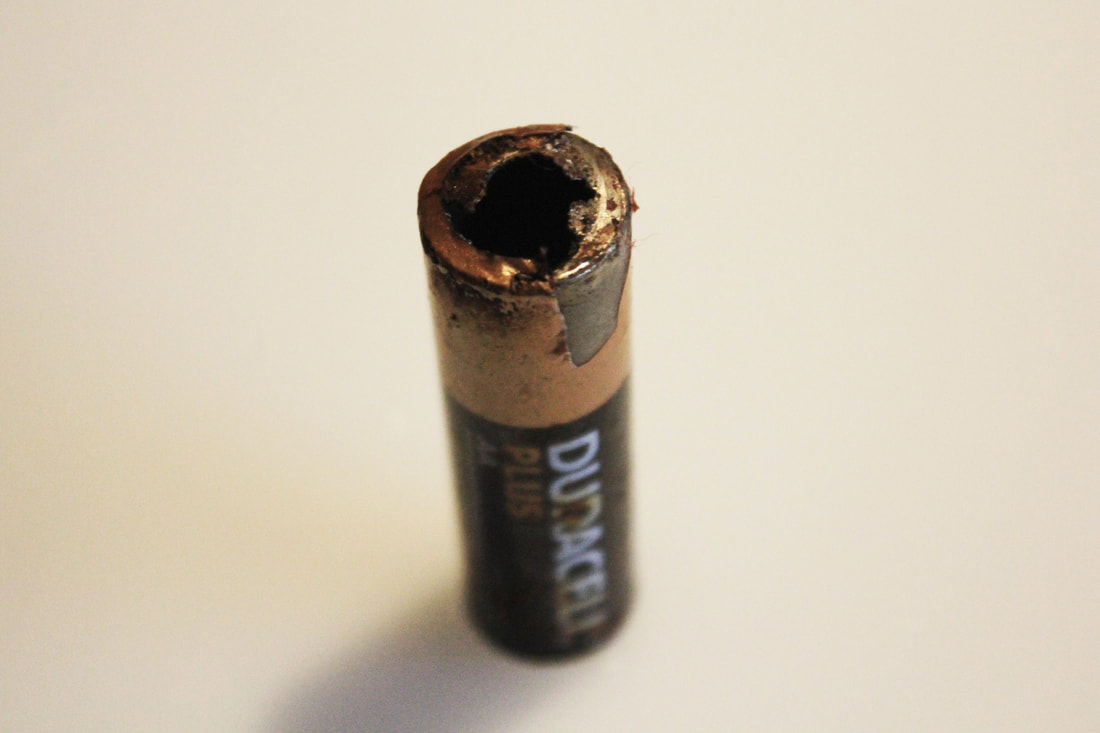
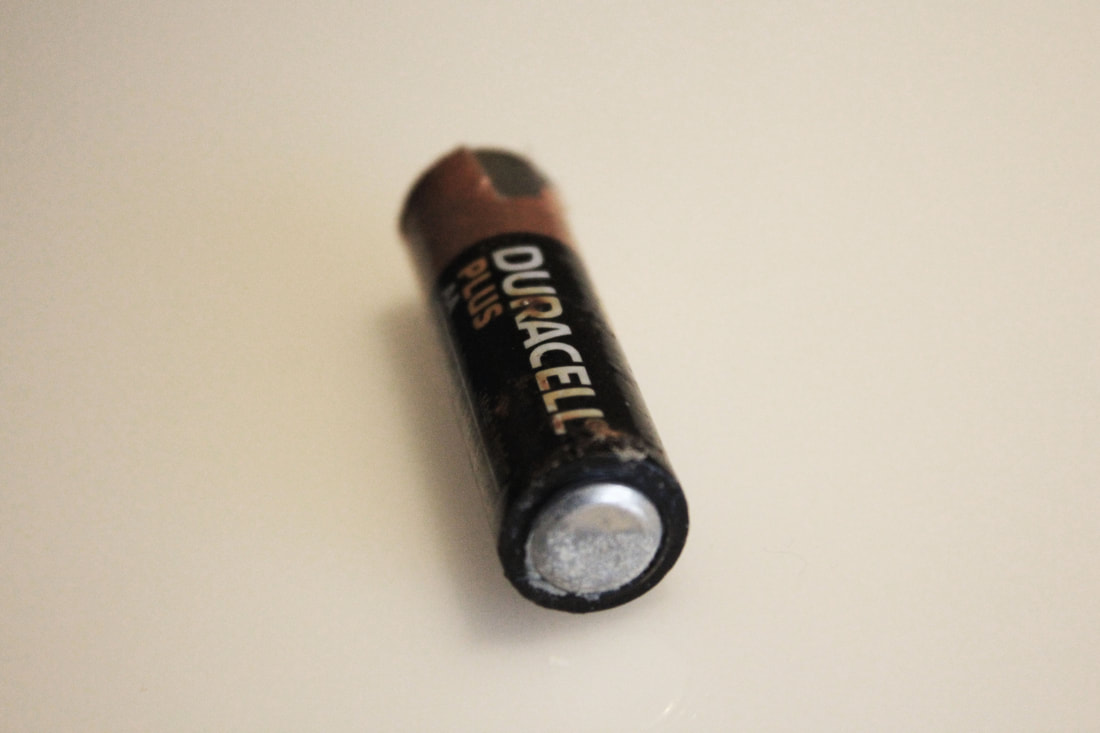
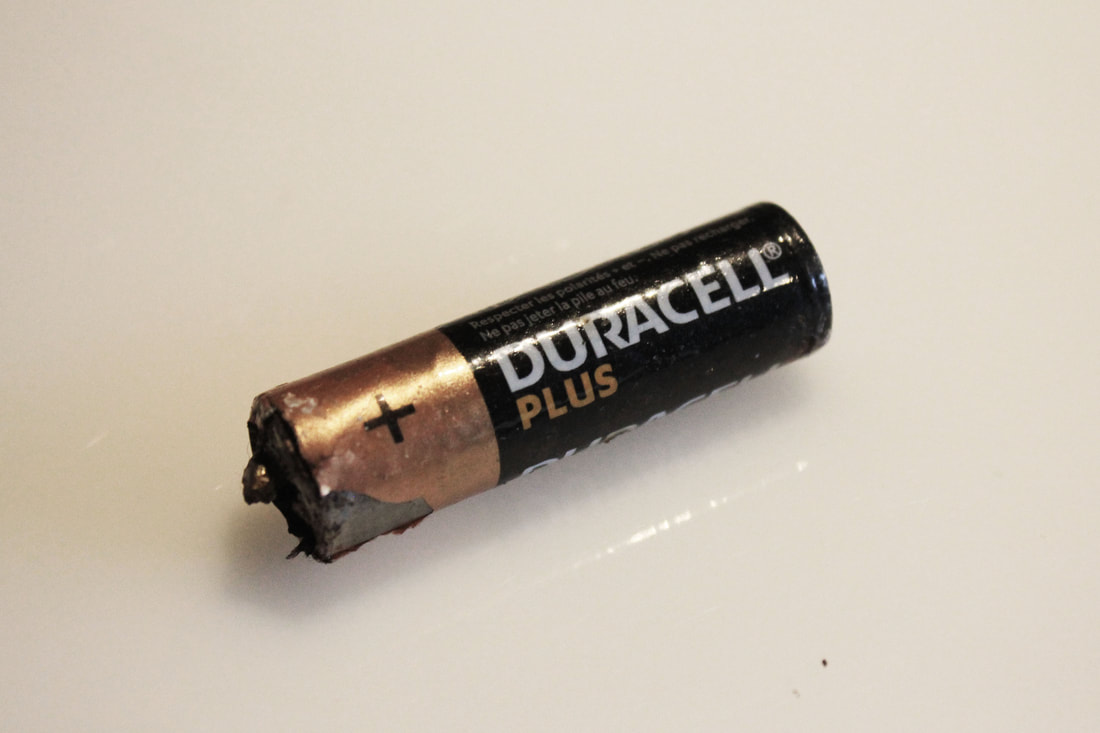
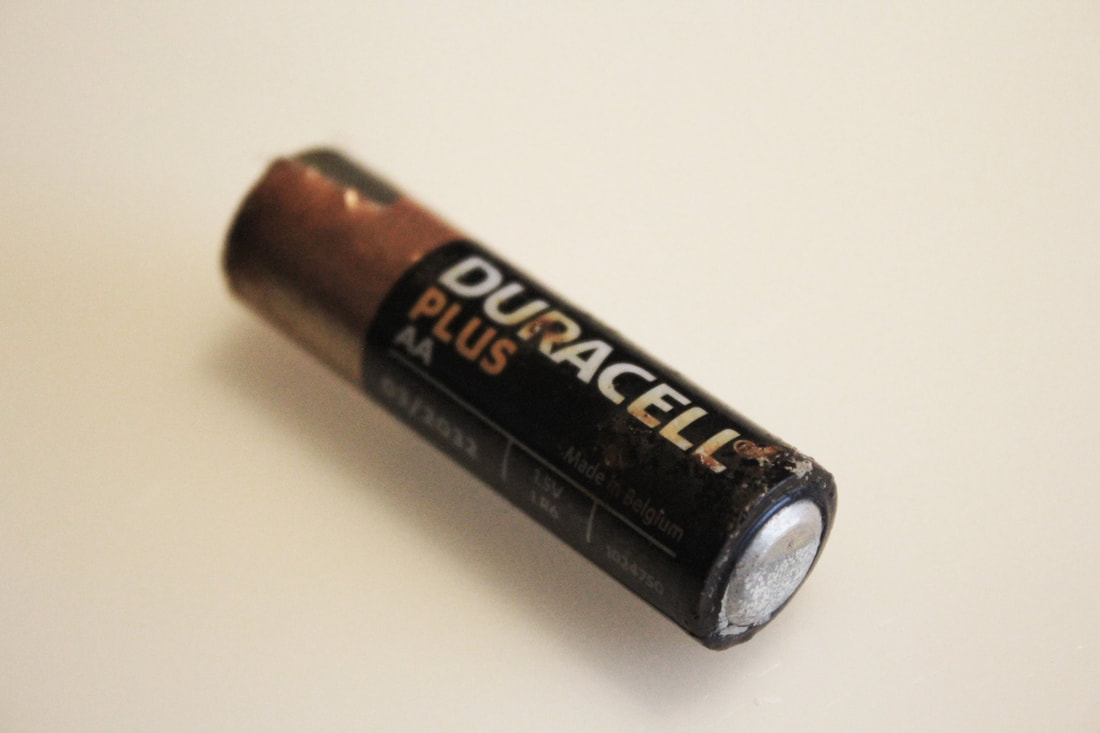
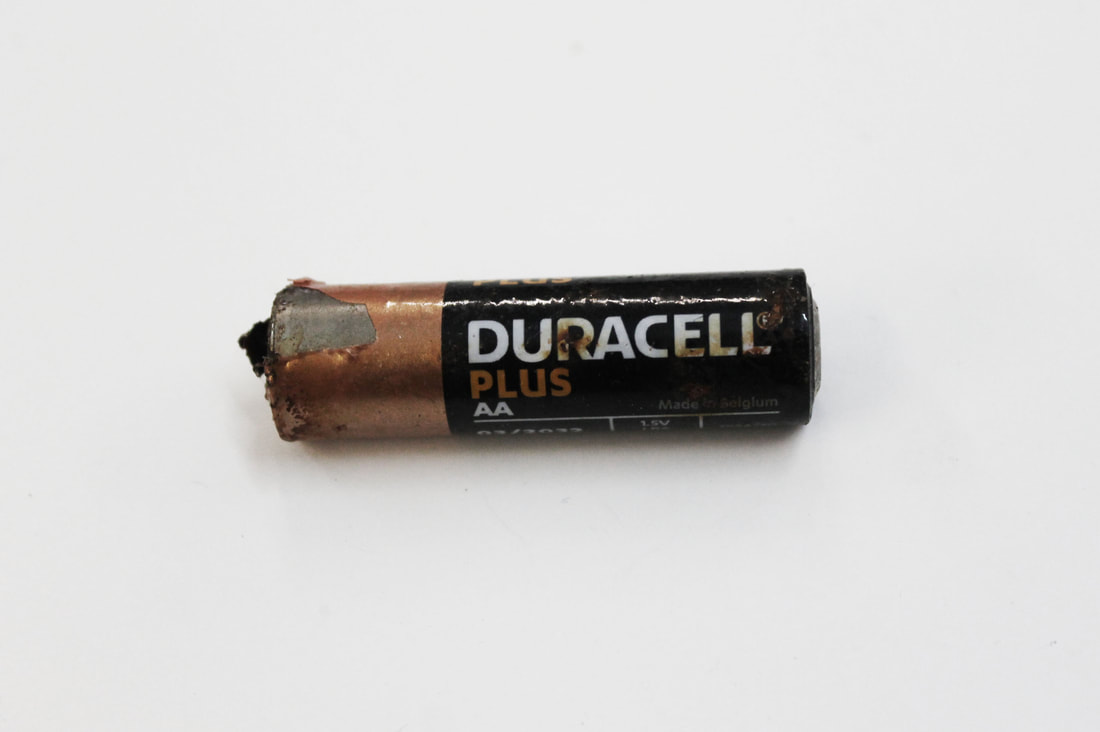
Old broken battery:
|
Bone fragment: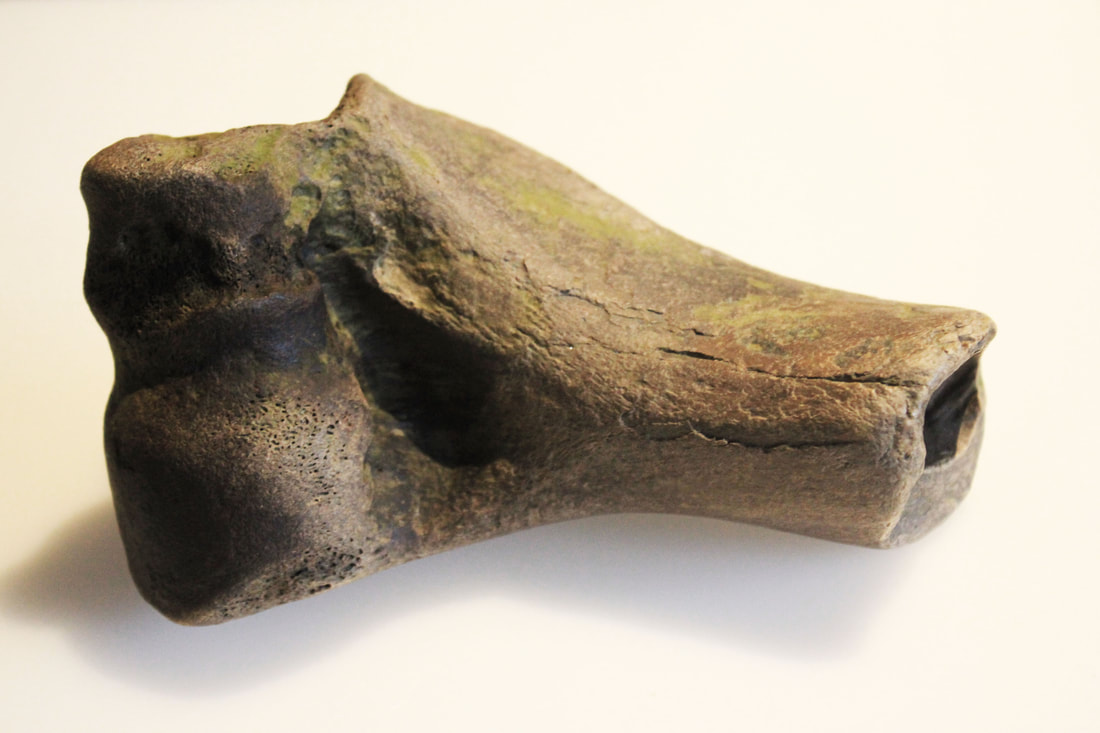
|
|
|
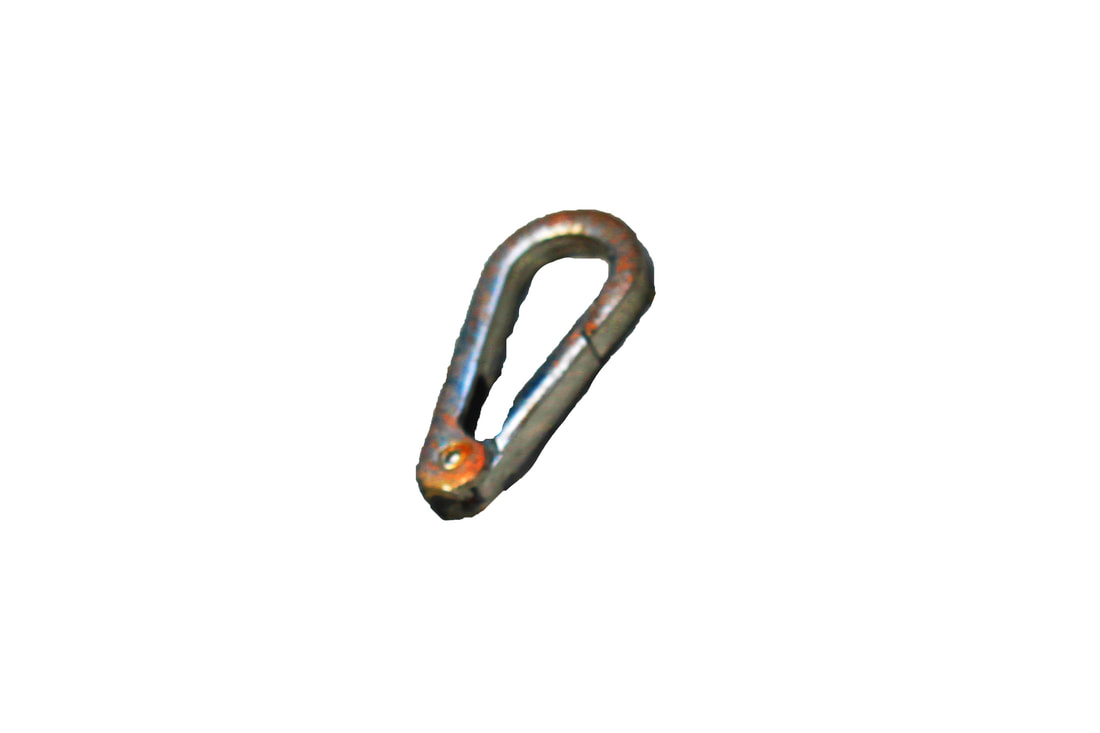
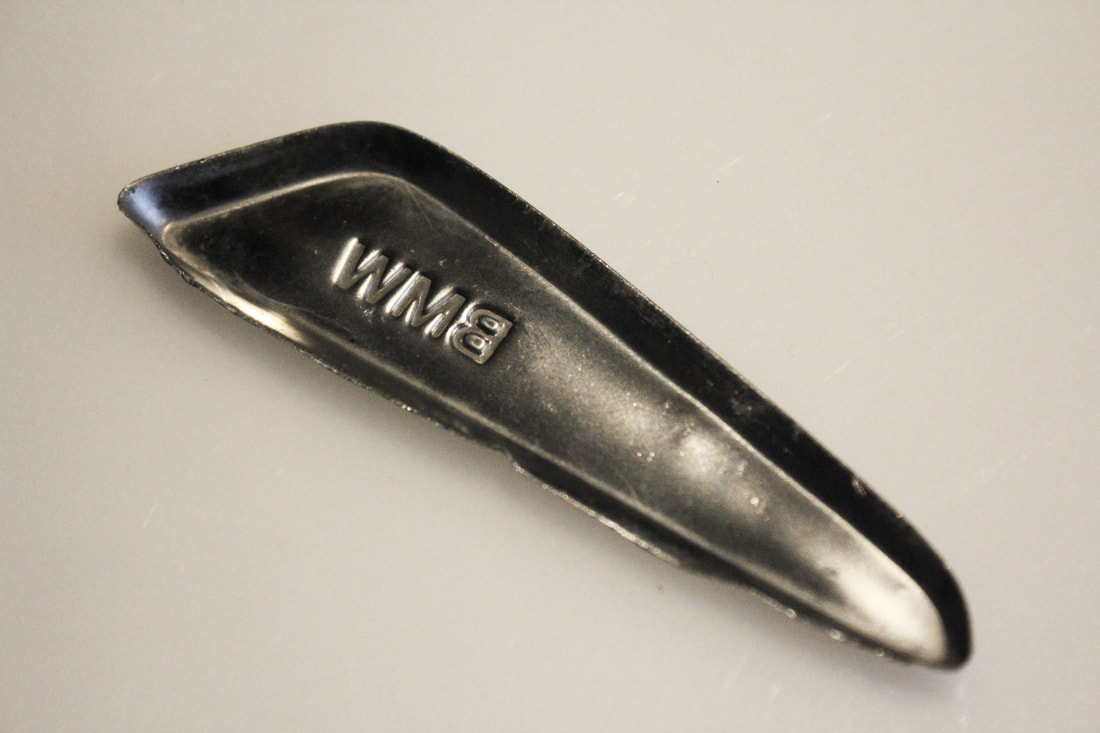
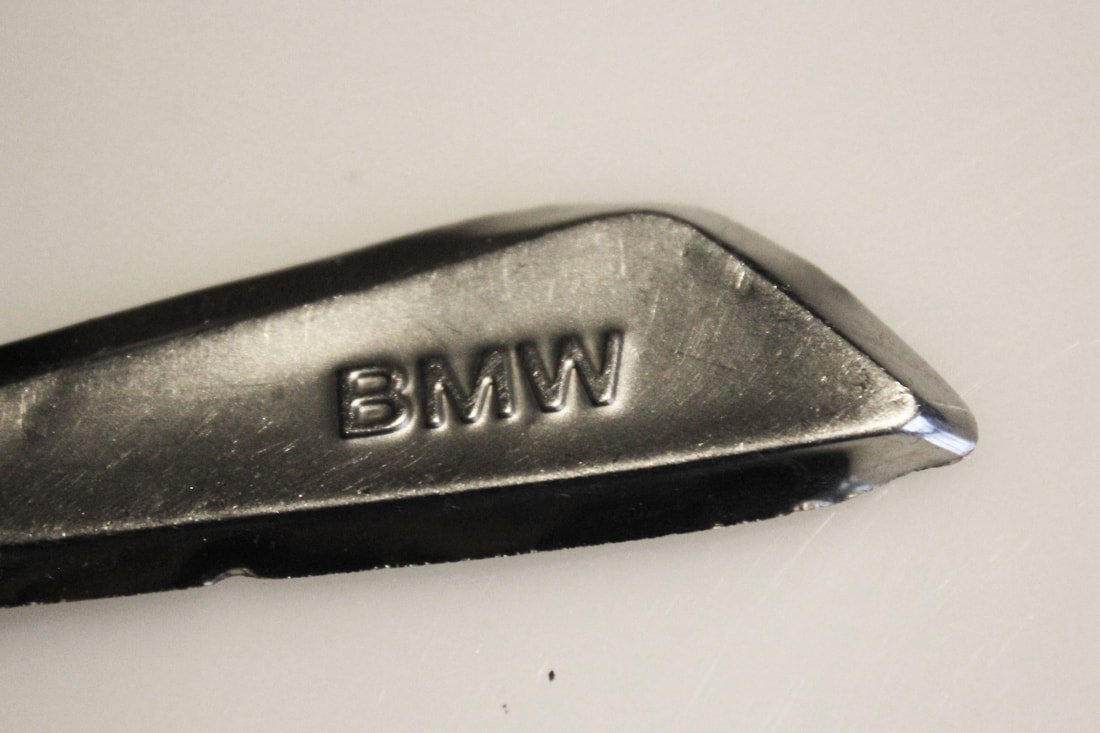
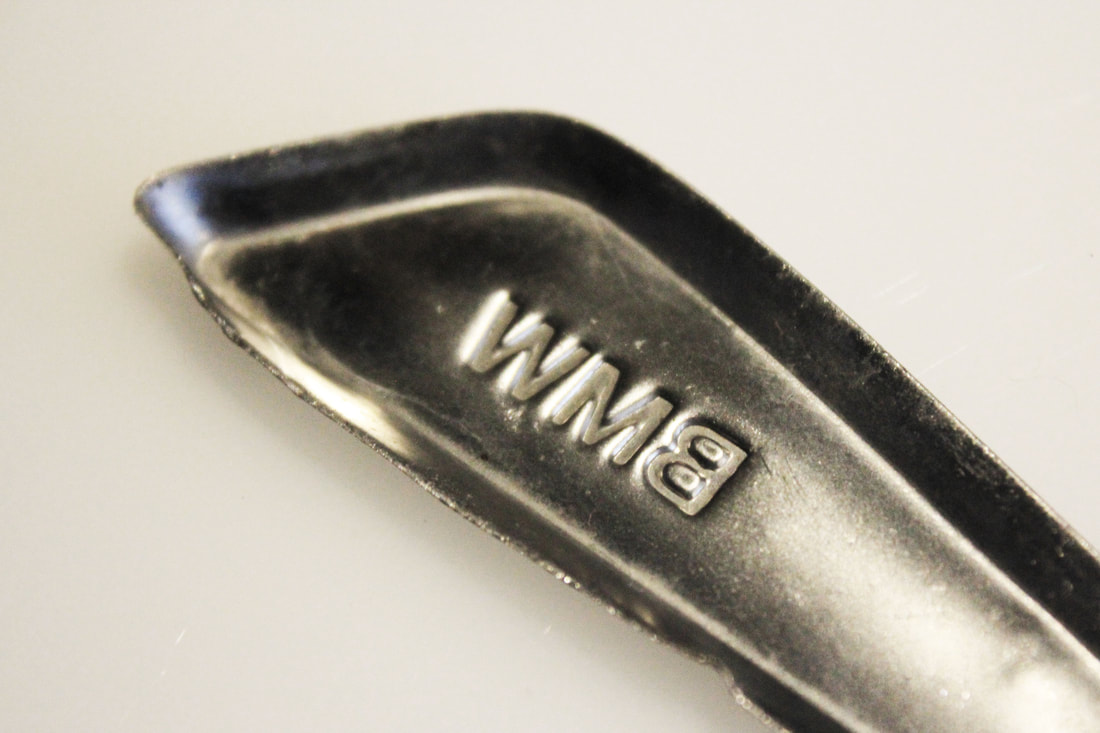
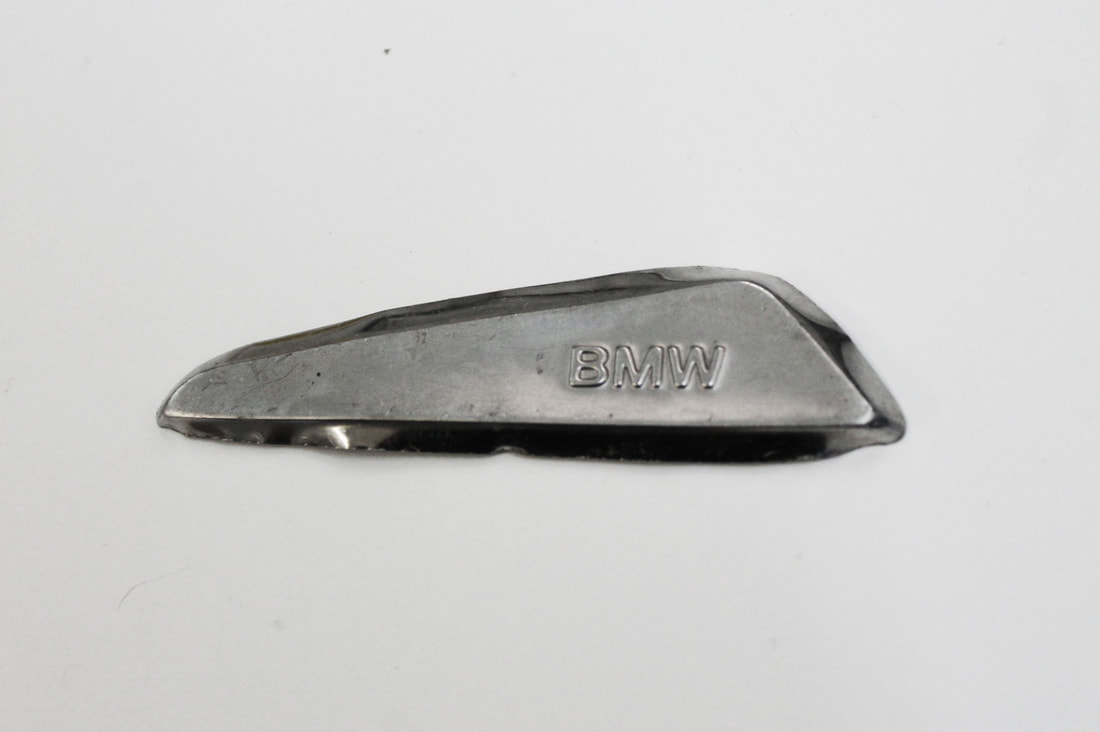
Car scrap:
|
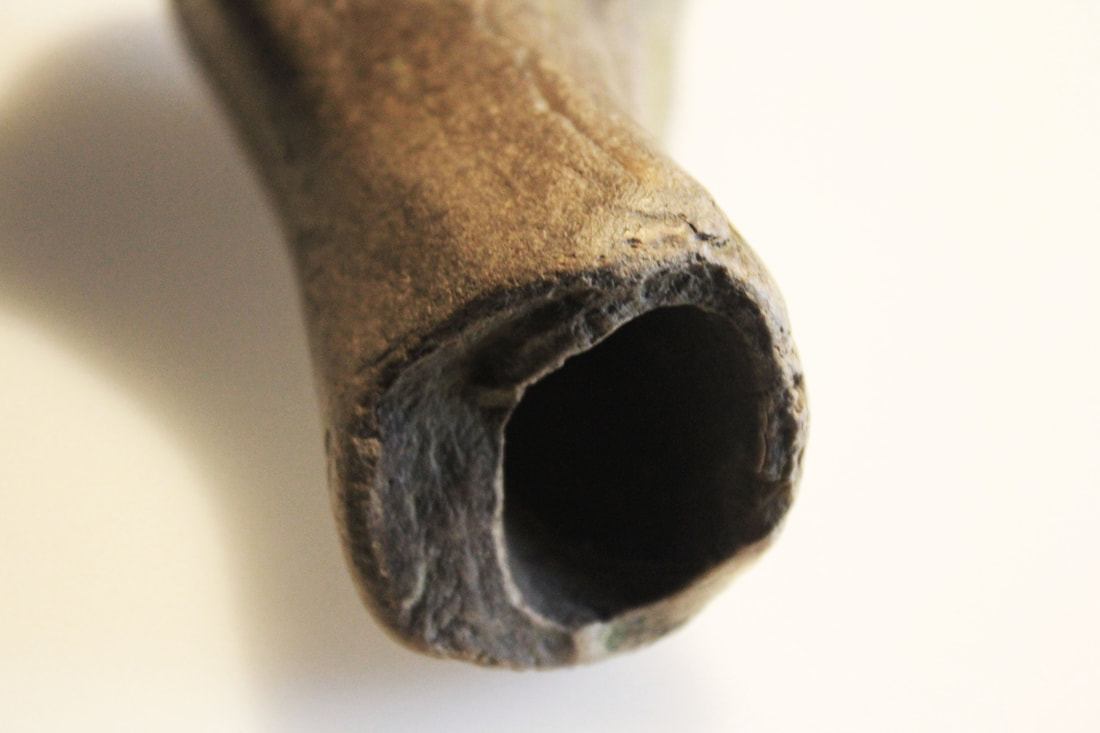
Broken pipe: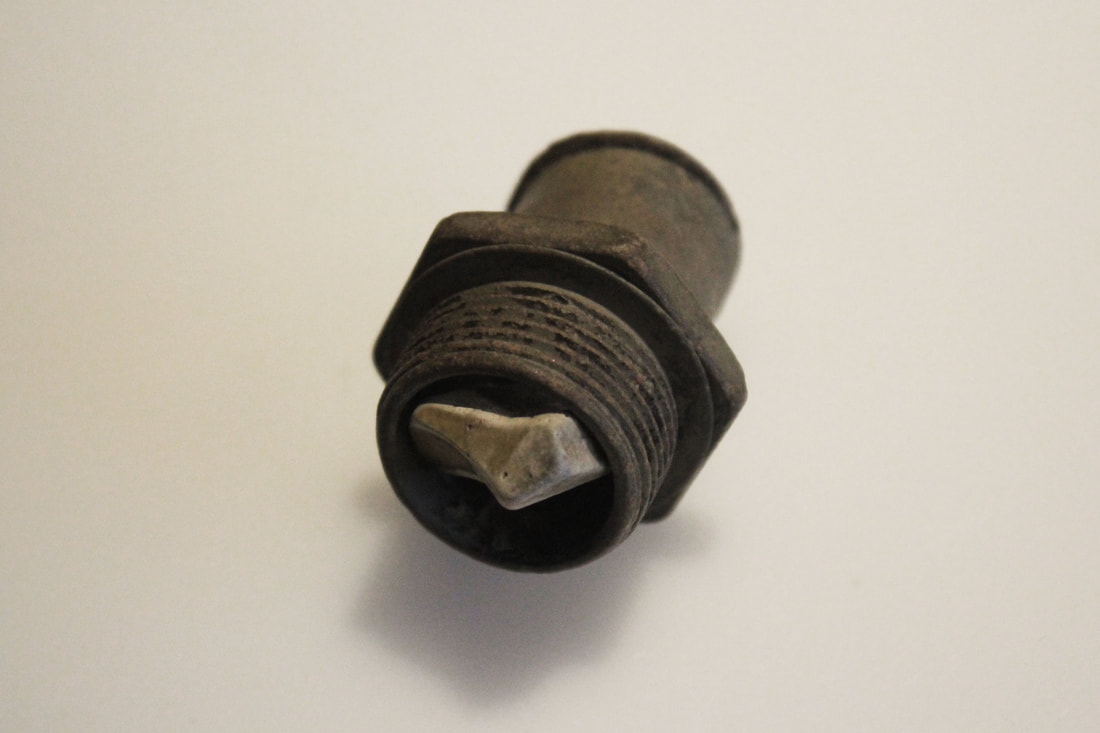
|
|
WWW
What went well with these photographs is that I through photoshop I was able to get a closer look at the overall items focusing on
details at different angles and place on each of the objects
EBI
These photographs could be even better if I could try get a clearer background without any shadows or colour tints to distract from the main focus which is the items in the photograph
Second Taken Photographs:
I wanted to do a second photoshoot of my found objects both from the Thames river and London skips, I wanted to get
better quality photographs against a cleaner white backdrop to do this I used a camera and over head lighting to get these cleaner photographs with clearer quality details.
better quality photographs against a cleaner white backdrop to do this I used a camera and over head lighting to get these cleaner photographs with clearer quality details.
WWW
What went well with these photographs is that I have photographed found objects both from the Thames river and London skips I have also managed to get clearer photographs by using a camera and over head lighting
EBI
These photographs could be even better if I could get brighter photographs for some of the items to help make the background whiter making the item standout better overall
Edited versions:
When I edited these photographs I focused on lighting and details so I mainly adjusted brightness, contrast, saturation and exposure to get the best results I also cropped a lot of the images to make the objects main focus of each edited photograph


|


|
WWW
What went well with these photographs is that I used photoshop to focus on adjusting the lighting and details successfully making
the picture brighter highlighting the objects better and increasing the overall contrast
EBI
These photographs could be even better if I could collect all new items which show better the effects of the elements as well as
time of the structure on the different objects
Next Development - Second thames visit
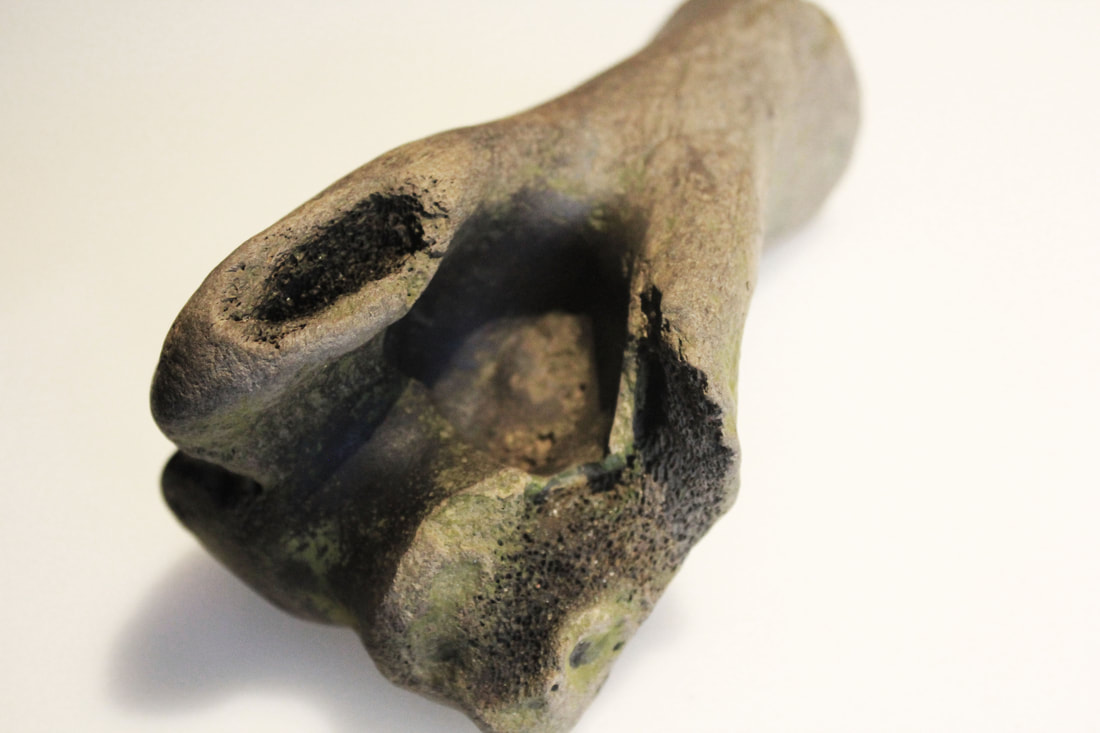
For this next development I decided to do another visit to the thames river bank but this time I timed it so I would be there whilst the tide was still in and I waited for it to go down meaning that everything on the bank was fresh and new since It had only just been washed up this also meant I found a lot more broken everyday human items compared to my previous visit where I found: bones, pottery, broken pipes and other rusted metal, these items were also newer as stuff I had previously collected had most likely been washed up for a while allowing for more rust and decay to happen.
My taken photographs:
WWW
What went well with these photographs is that I was able to get more clear photographs of not only the thames bank but also different people who were either looking out at the river or looking for interesting objects themselves.
These photographs give me a closer look at the location of the thames compared to the wide landscape shoots I previously took
EBI
These photographs could be even better if I could edit them in photoshop to be black and white like I did with my previous
photoshoot to help give them more of an older look
Edited photographs:
I edited these photographs and made them black and white because from my previous edits I decide these versions had the better result and added more of an old timey feel to the final photographs.


|


|

WWW
What went well with these photographs is that I by editing them to make them black and white I am able to evoke a sense of the past and a different time period which adds to my overall them of regeneration and taking something old and reviving it to have a new life.
I also really like being able to look closer at details such as shoe indents left in the sand as well as bird feet marks also the marks of hands on the pillars on the bank, all these small details add to the overall image of the thames.
My taken photographs:
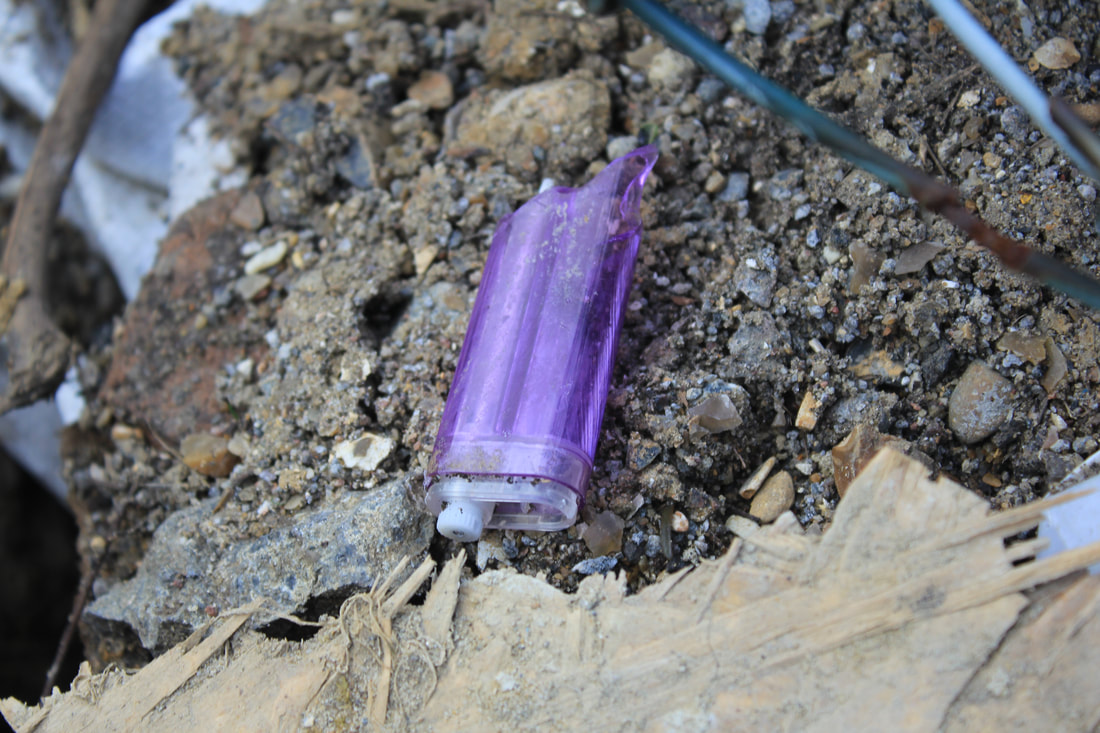
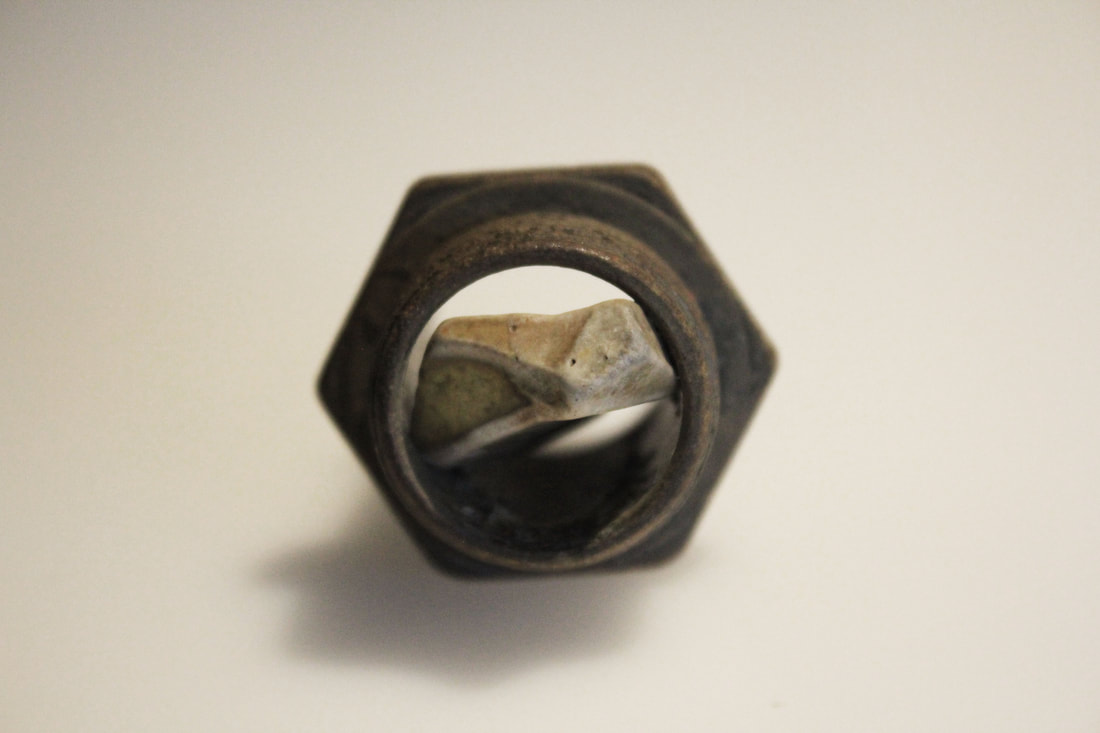
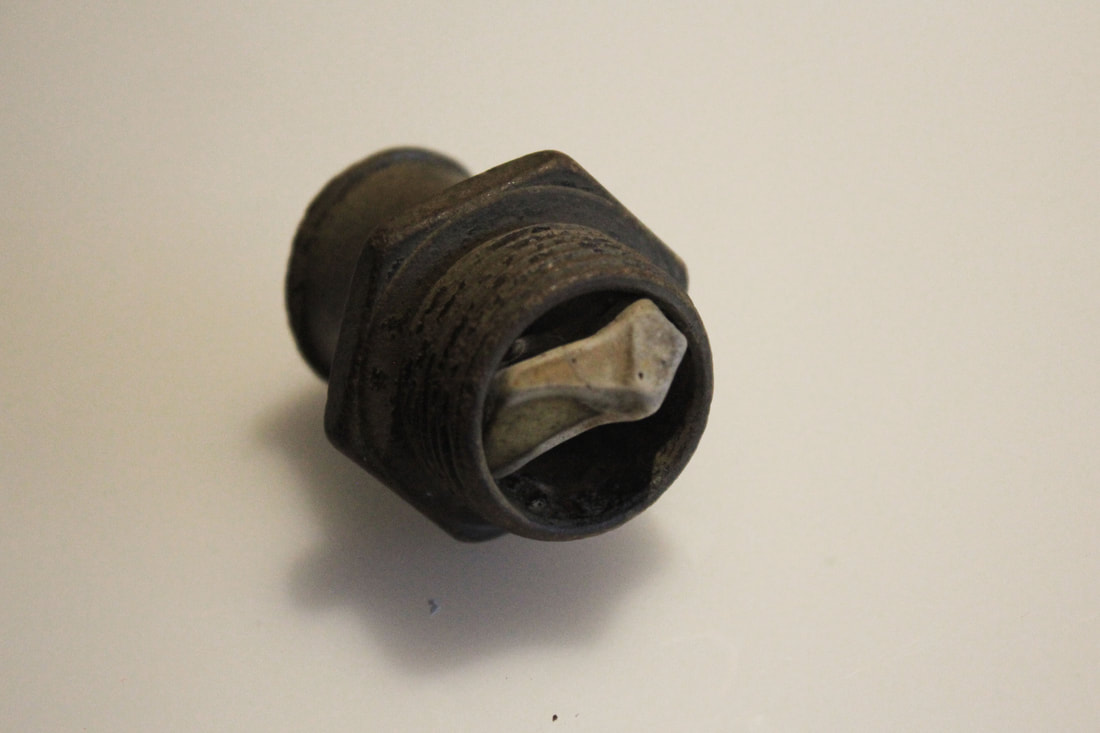
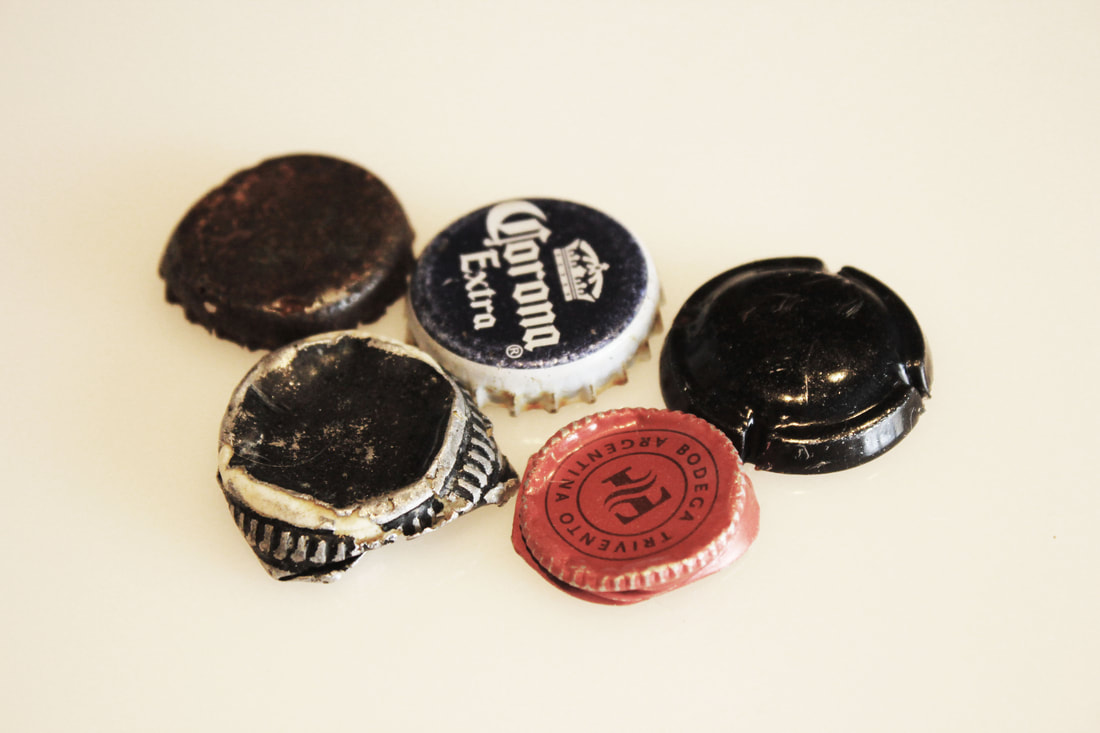
These objects that I collected consisted much more of normal everyday items than my previous thames bank visit they were also more distorted and intact because they were freshly washed up and likely hadn't had time to decay and break down.
WWW
What went well with these photographs is that I tried collecting all different objects this time focusing more on
abandoned everyday objects such as bottle lids and lighters, I was able to collect lots of items in all different states and conditions because of the environment they were in
EBI
These photographs could be even better if I could edit them in photoshop to brighten the background to increase contrast and also edit to enhance details to better show the different way these items have changed over time
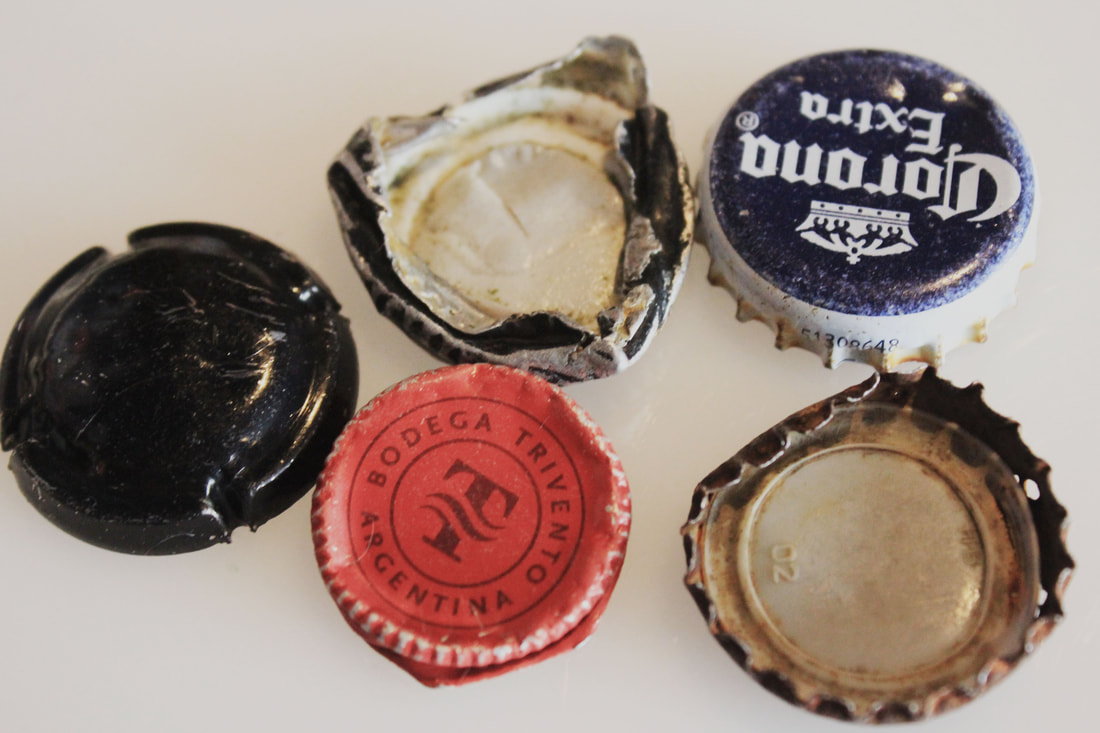
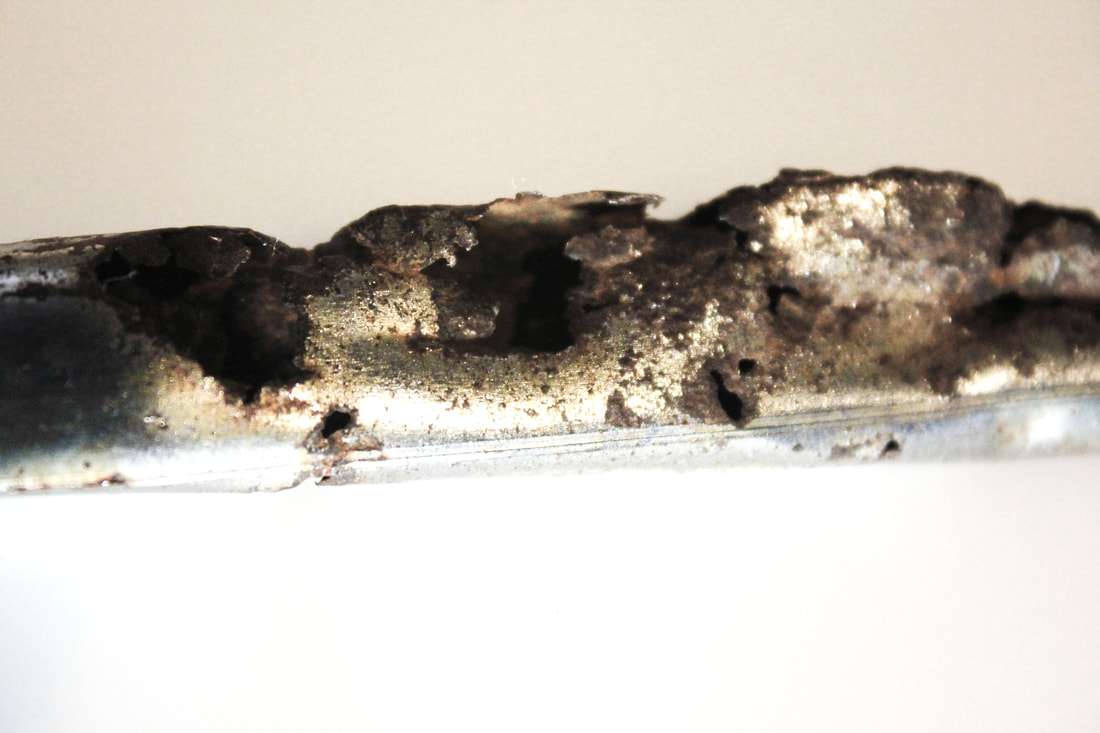
Edited photographs:
When editing these photographs in photoshop I wanted to really focus on highlighting areas that had been affected by
the elements such as the sand, water, current, sun, rocks and pebbles. I was particularly interested by the way different materials
were effected differently for instance the glass had be worn down and made smooth from the rough sand, the leather and been
torn up from rocks and water but hardened from the sun and some thicker metal had rusted and broken down but the thinner weaker metals had bent and distorted from pressure from the strong currents.
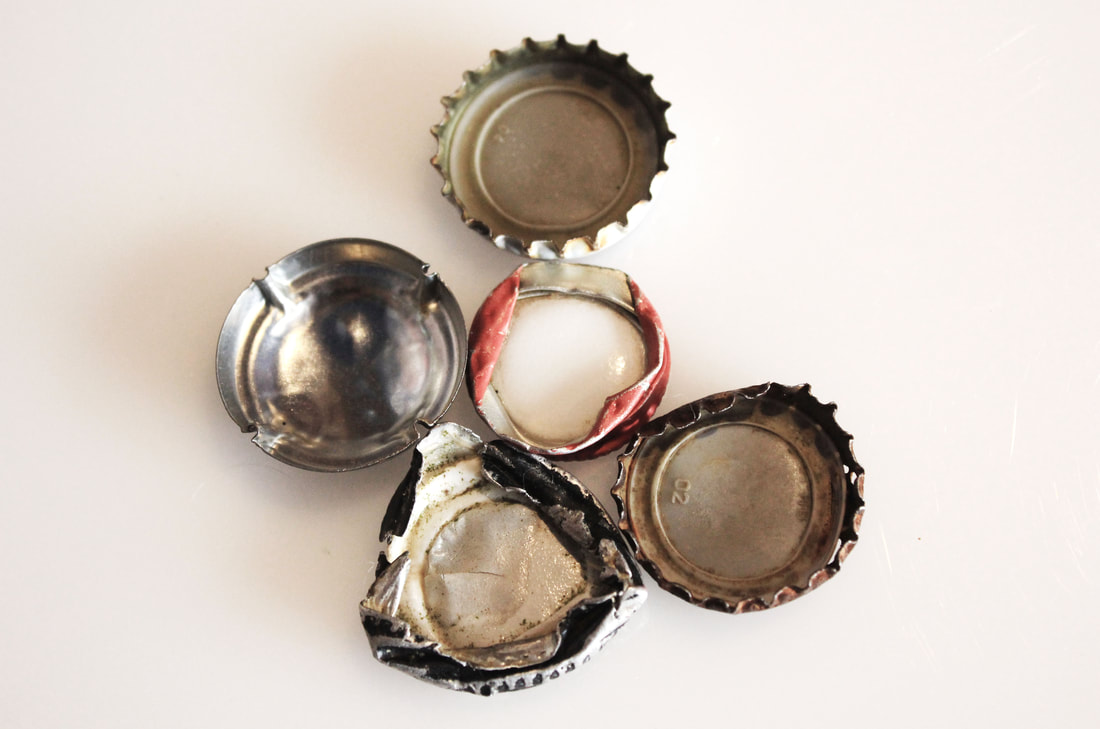
Discarded bottle caps:
|
|
|
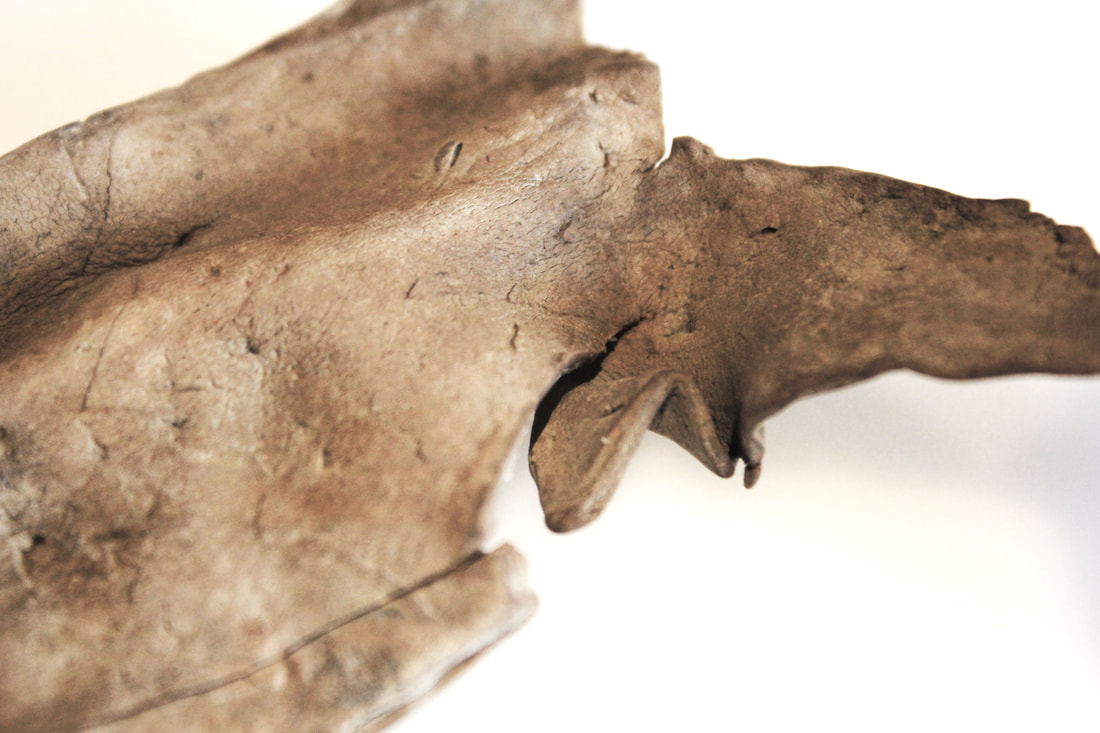
Dried scrap of leather: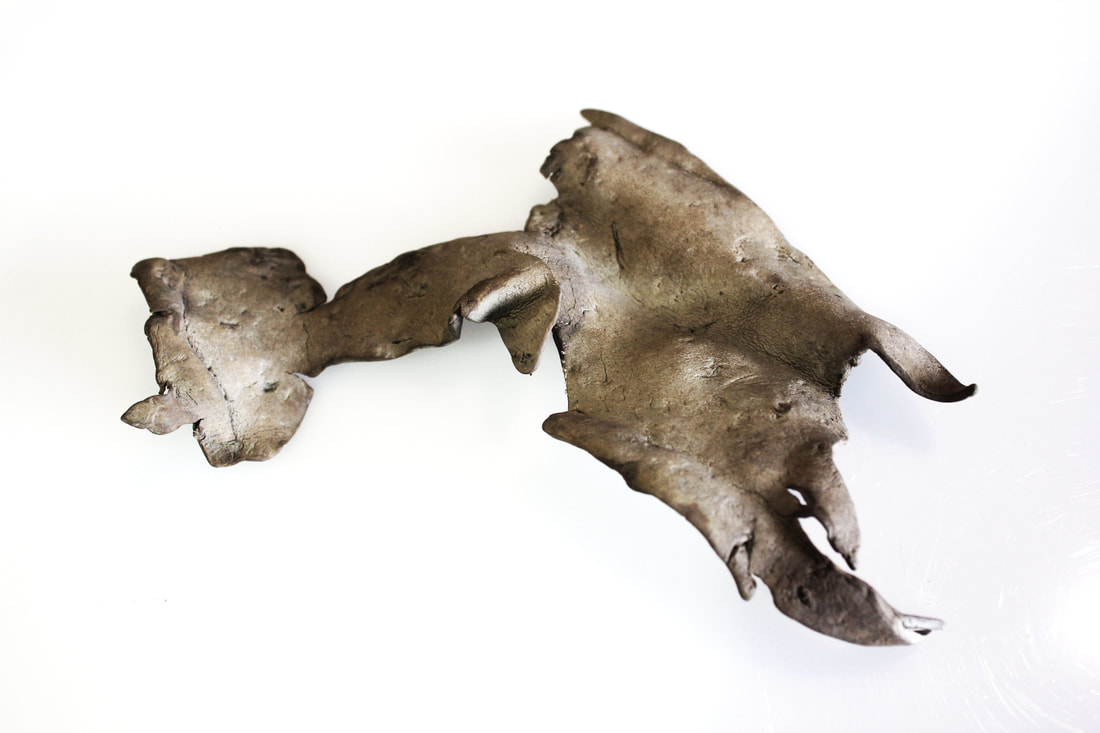
|
Part of glass bottle:
|


|
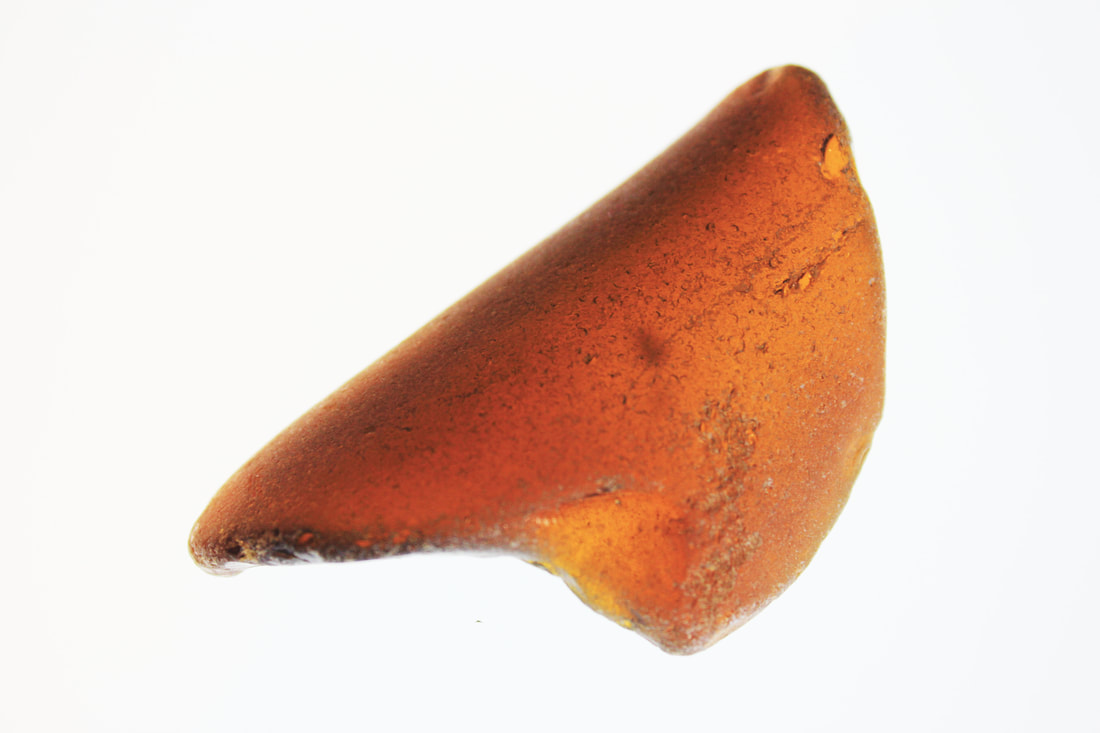
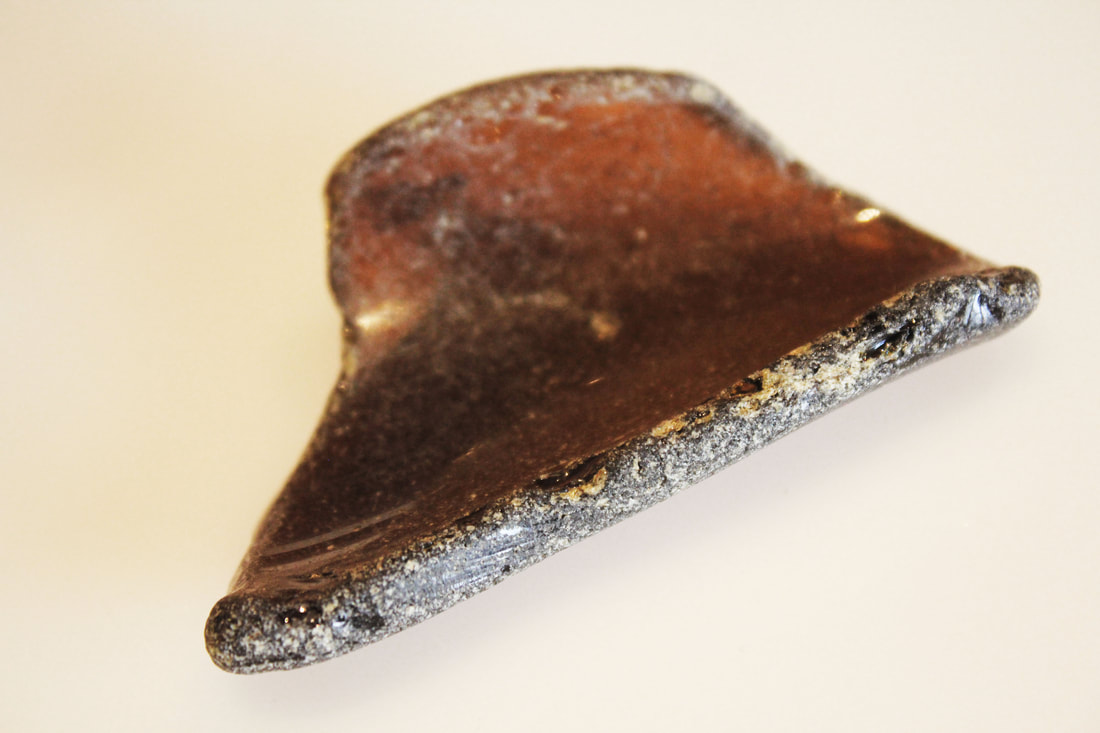
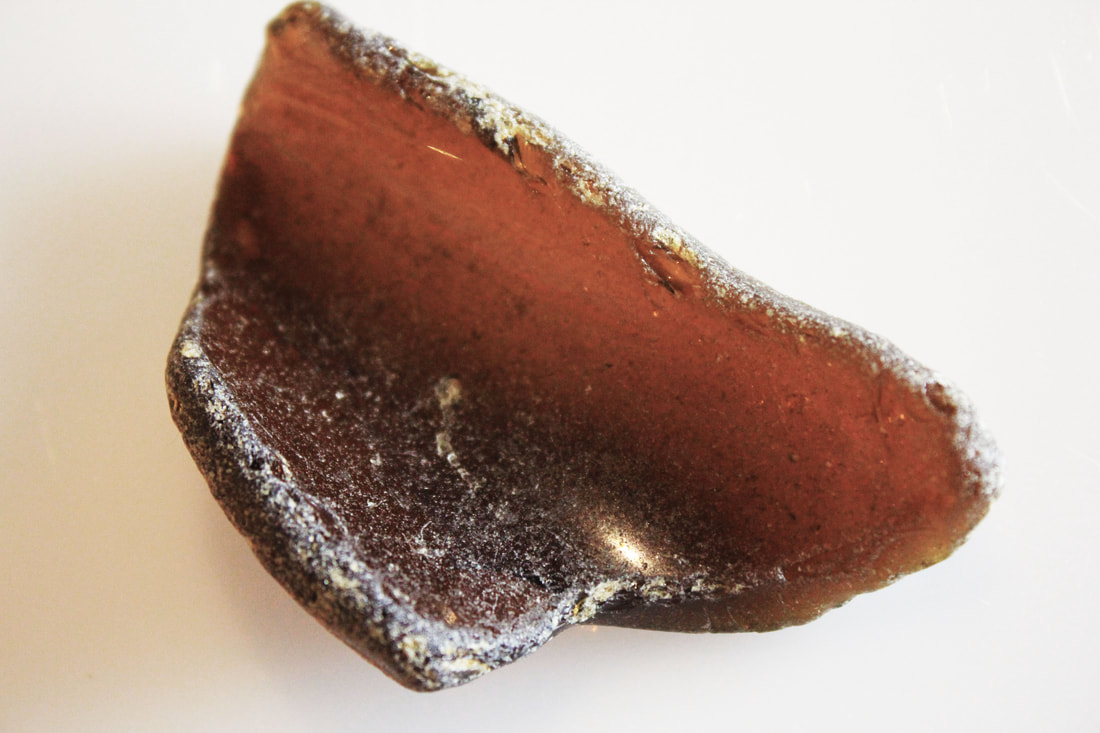
|
Worn down glass shard:
|
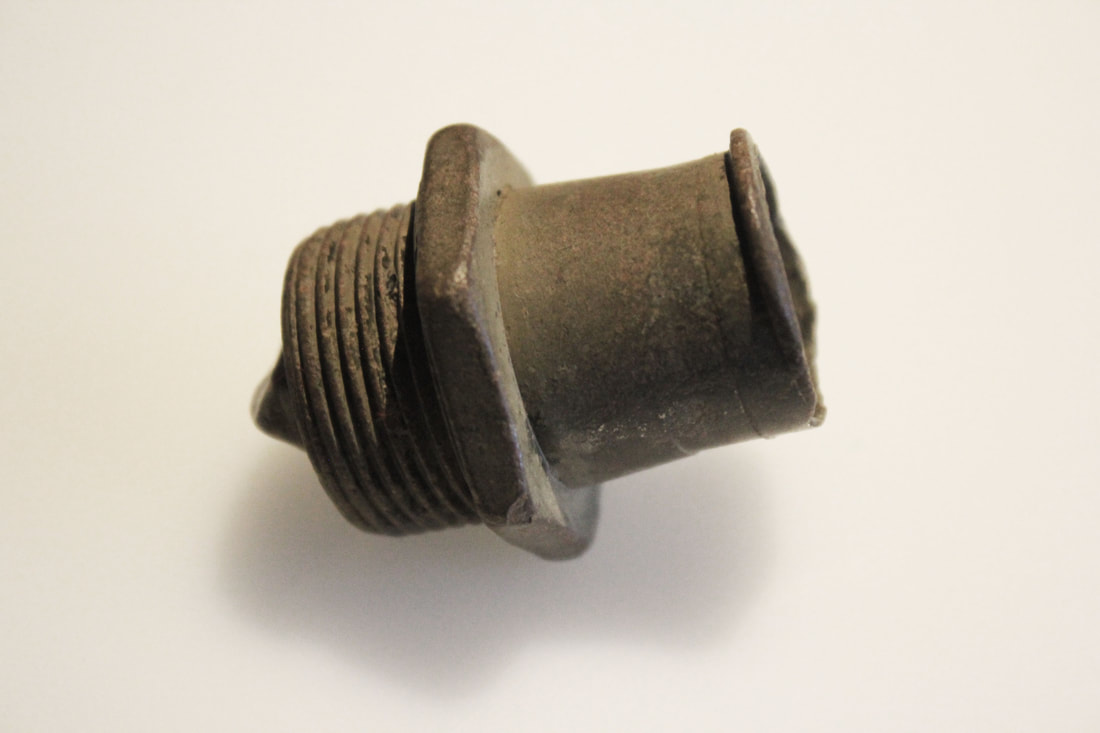
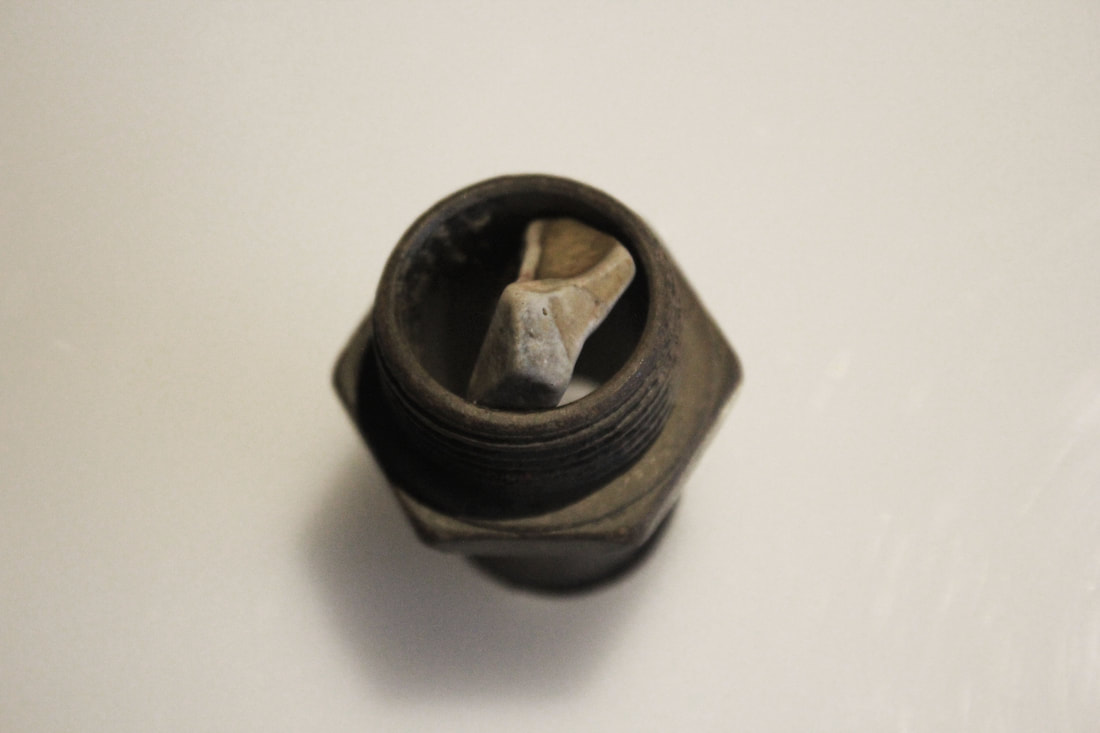
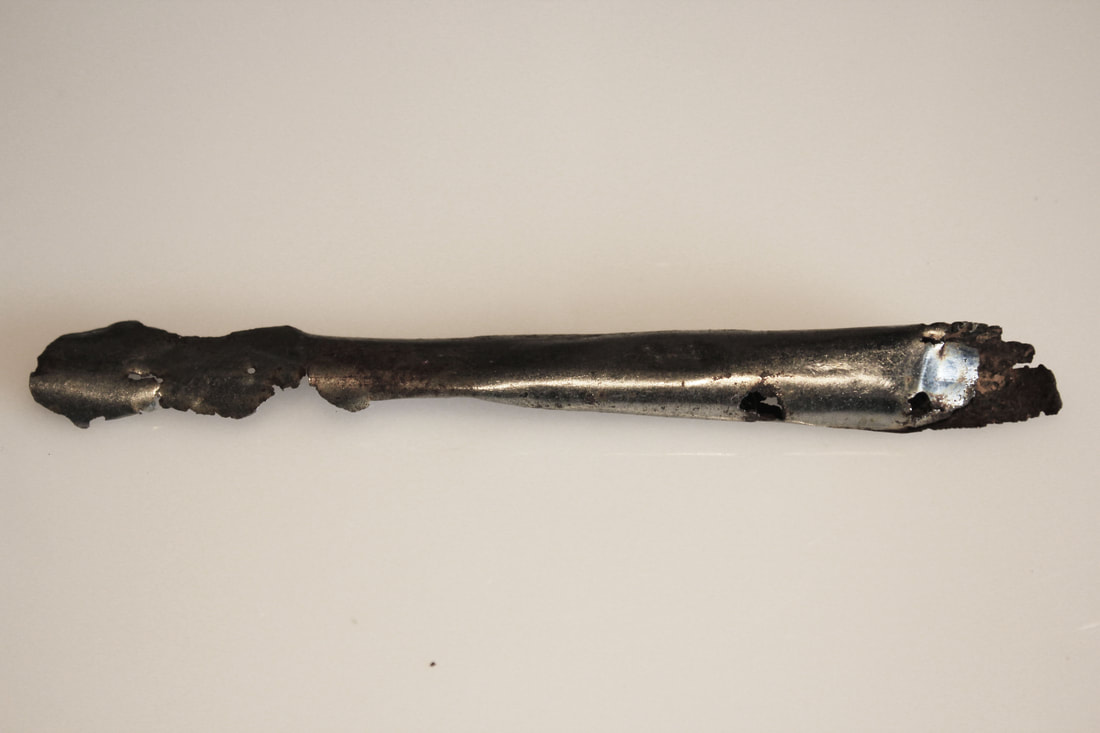
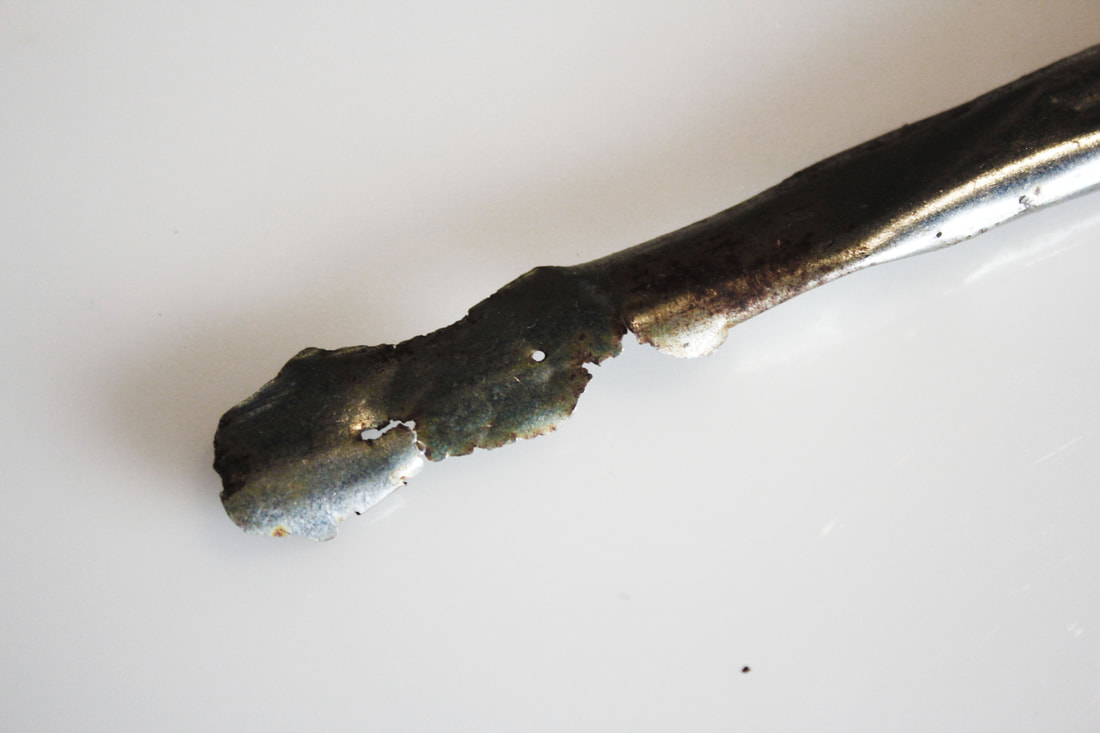
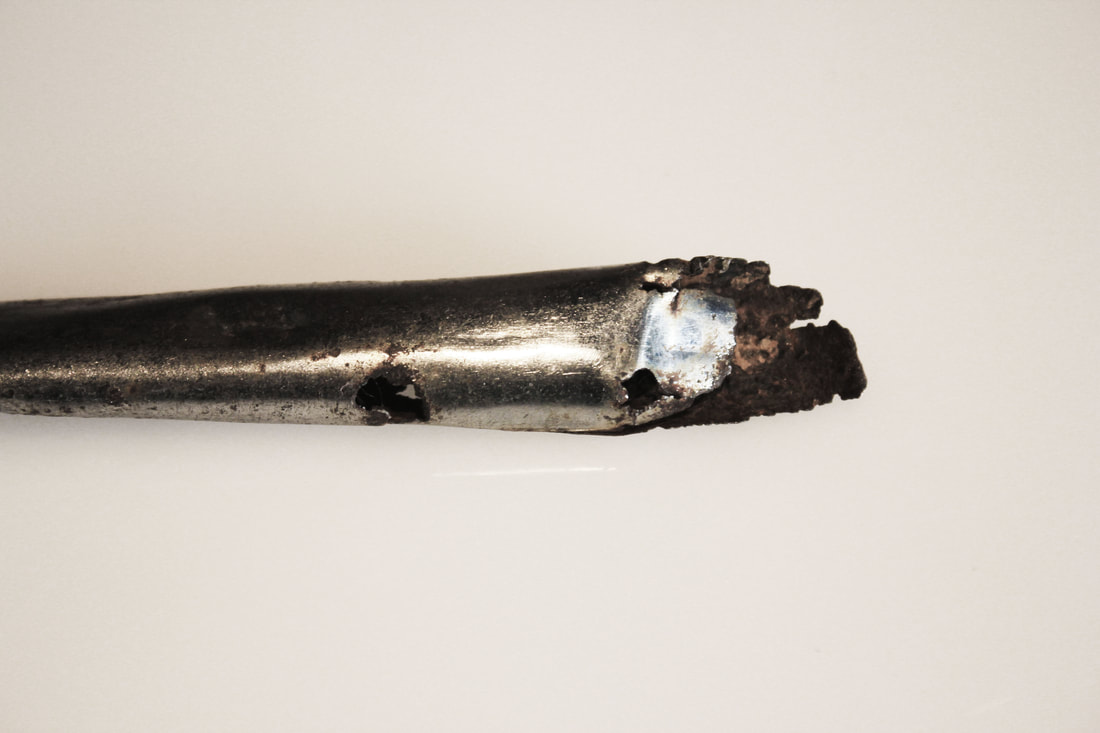
Broken pipe: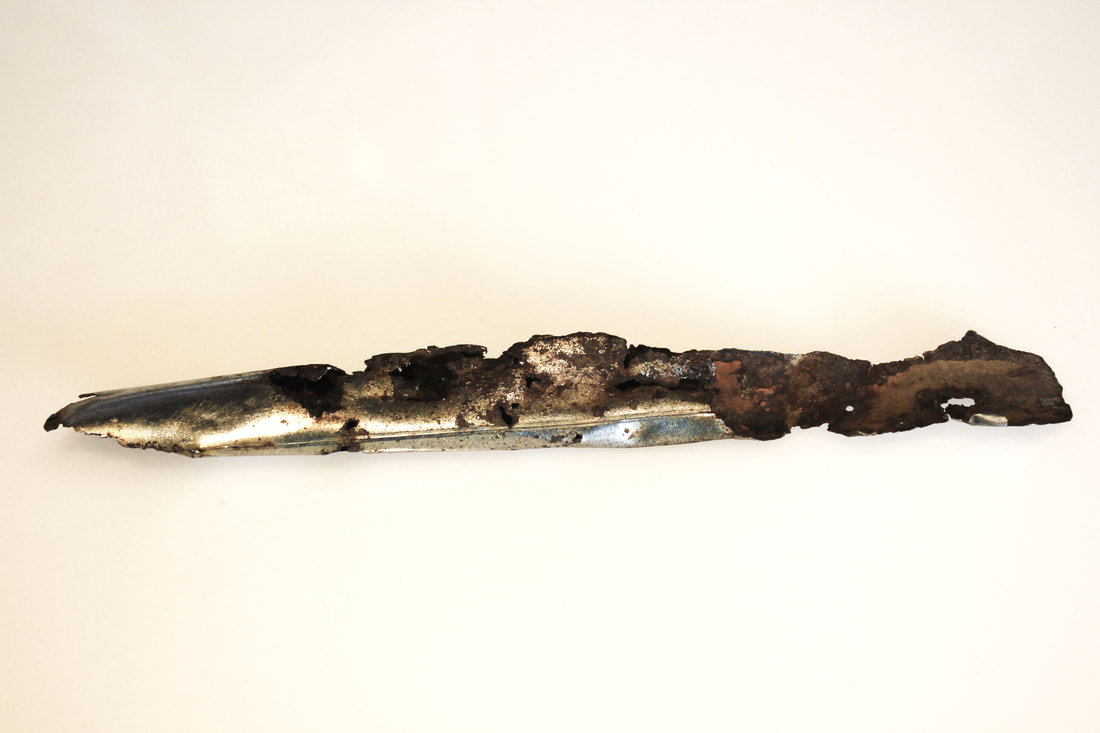
|
|

|
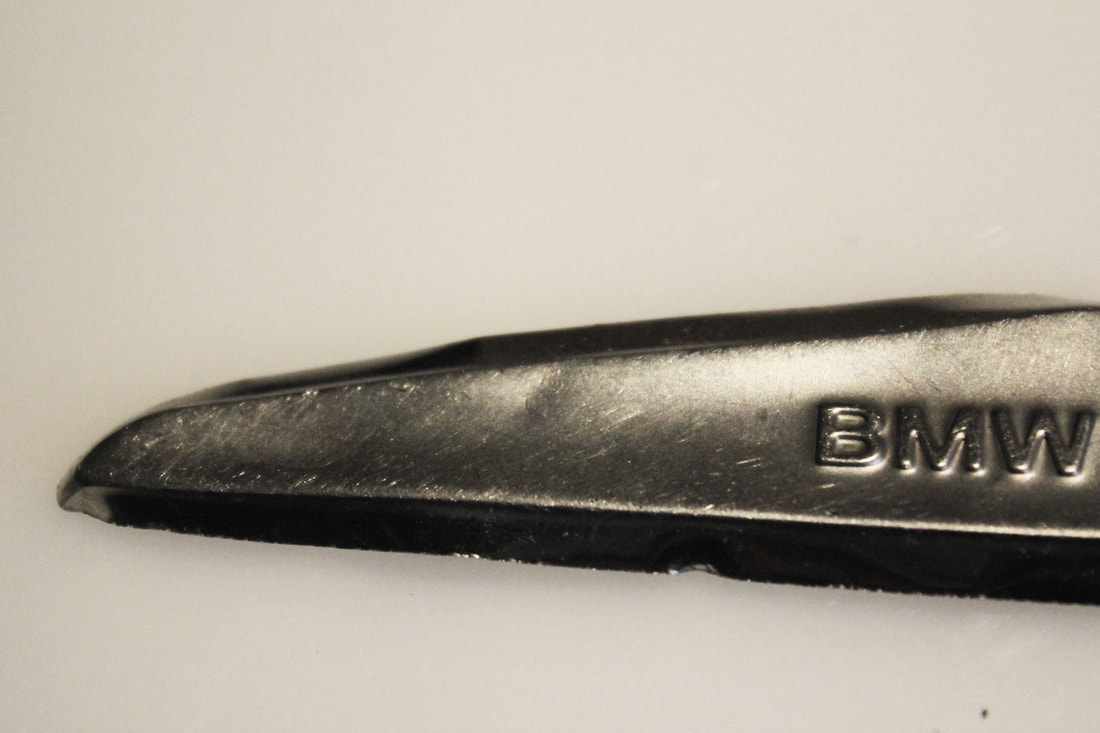
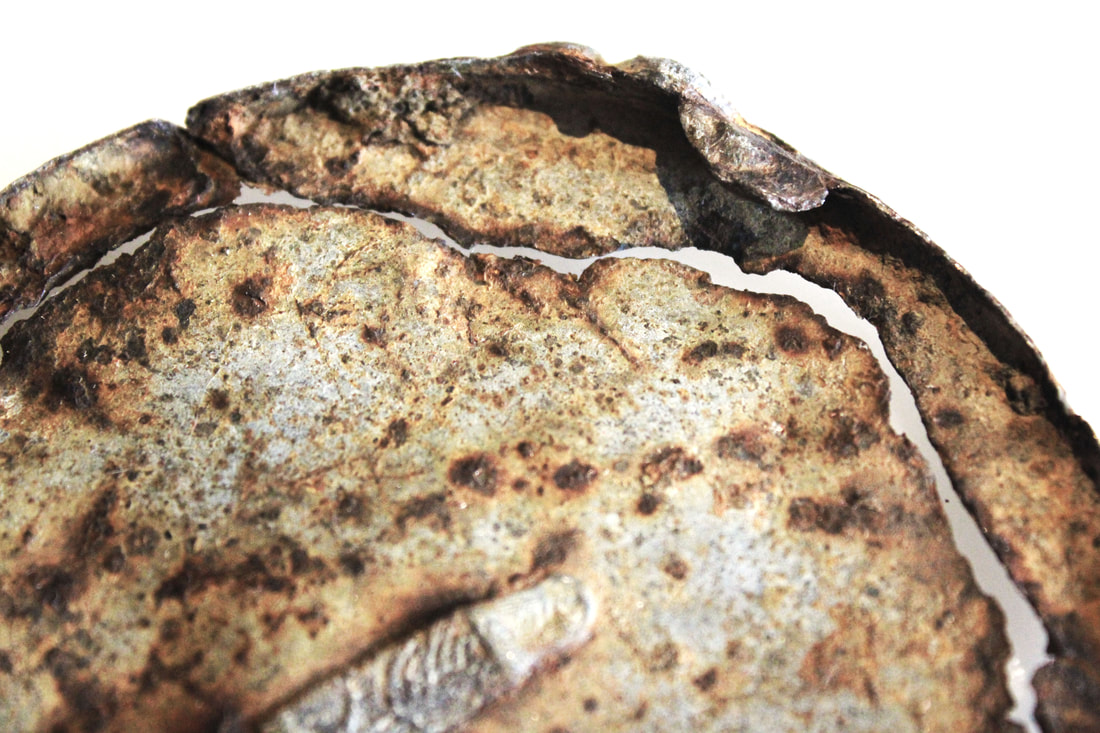
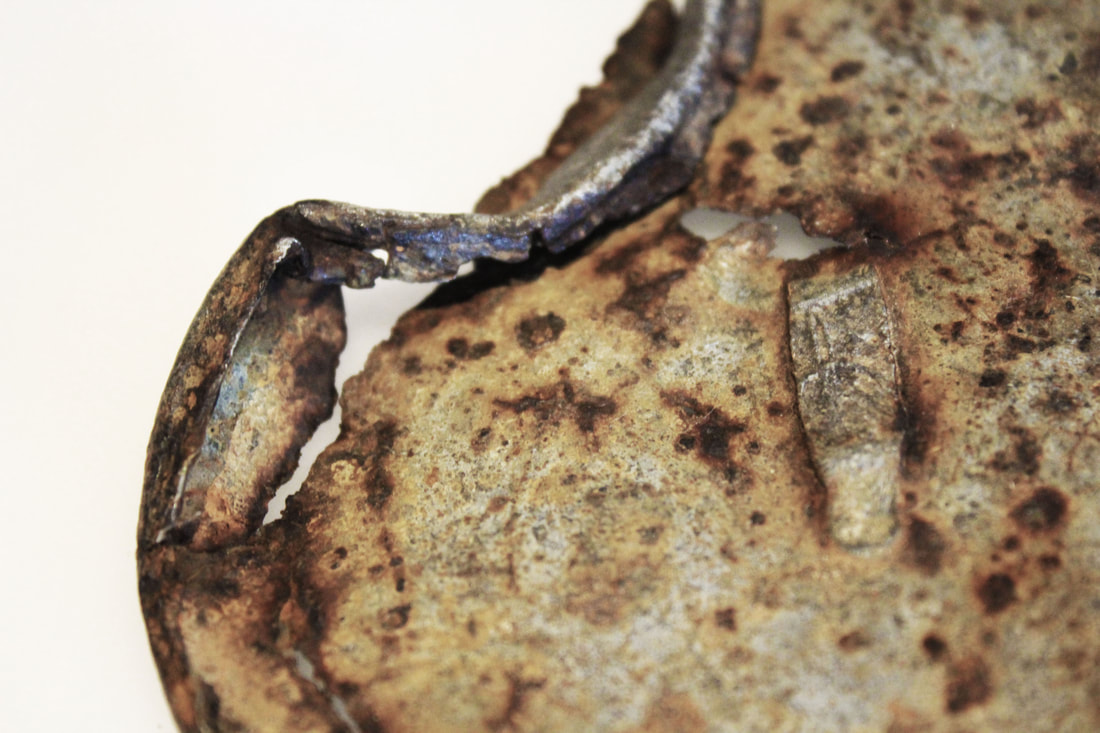
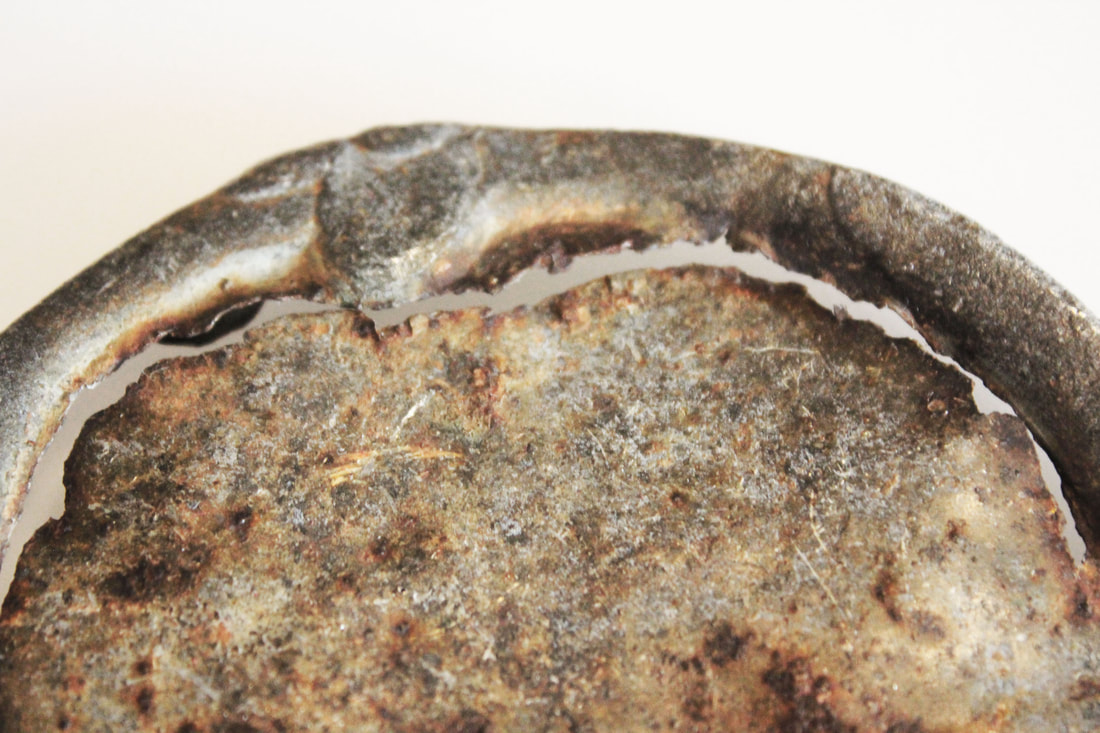
Broken top of a tin can:
|
WWW
What went well with these photographs is that I was able to capture lots of different angles to show all different aspects and
damage in each item, I was also able to enhance details better in photoshop
EBI
These photographs could be even better if I could try exploring further the effects that the environment and exposure has on these objects by experimenting with items left in the thames
Next Development
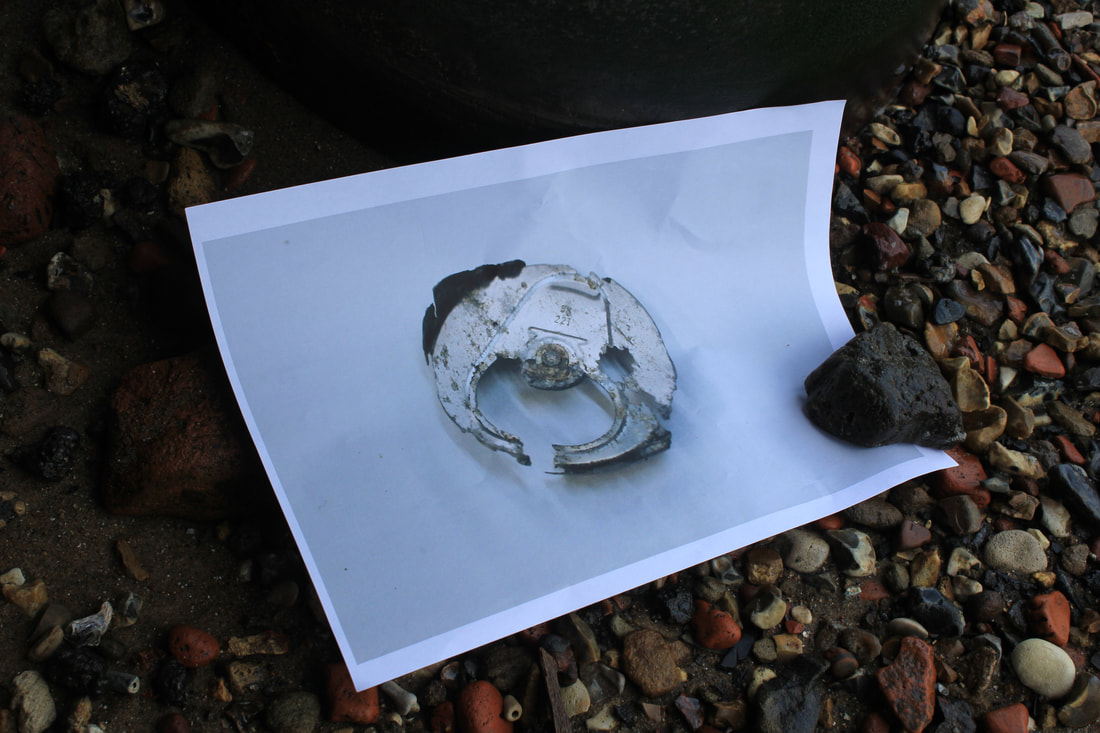
Printed out photographs:

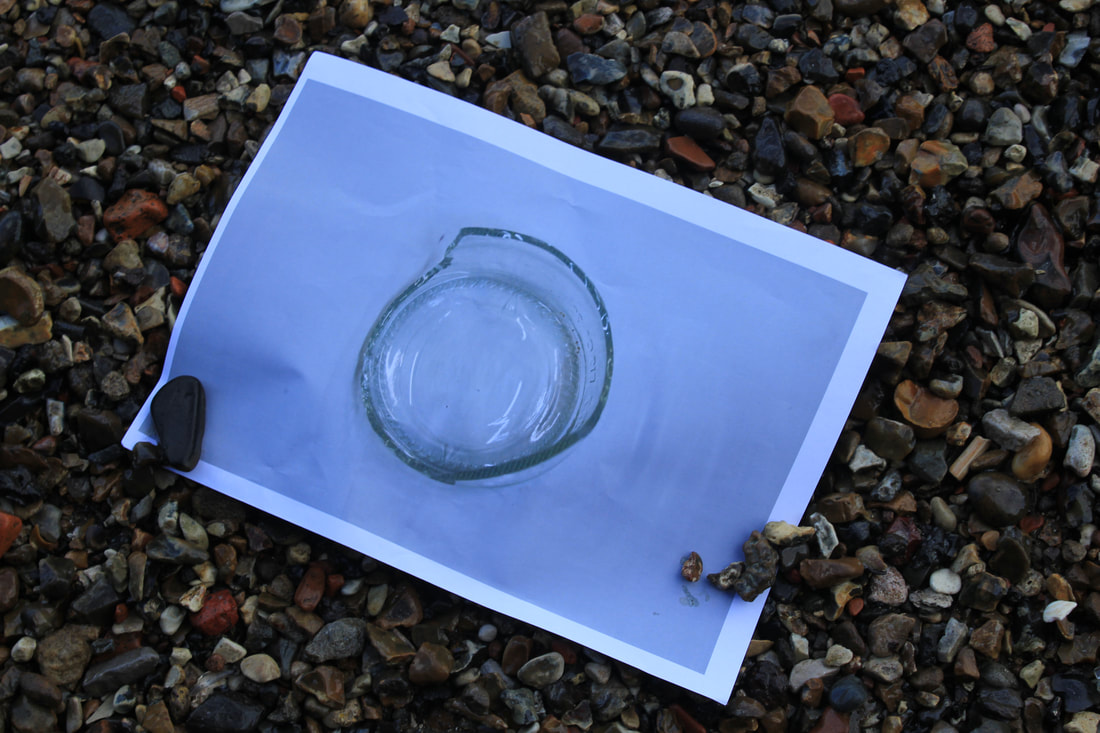
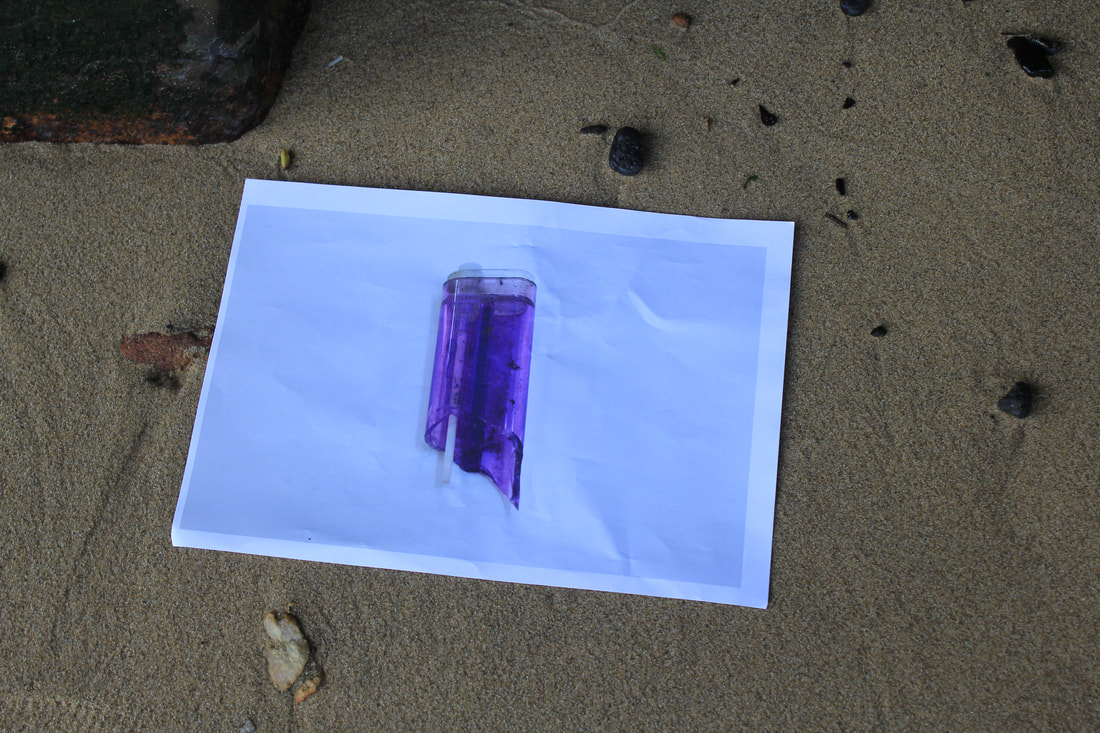
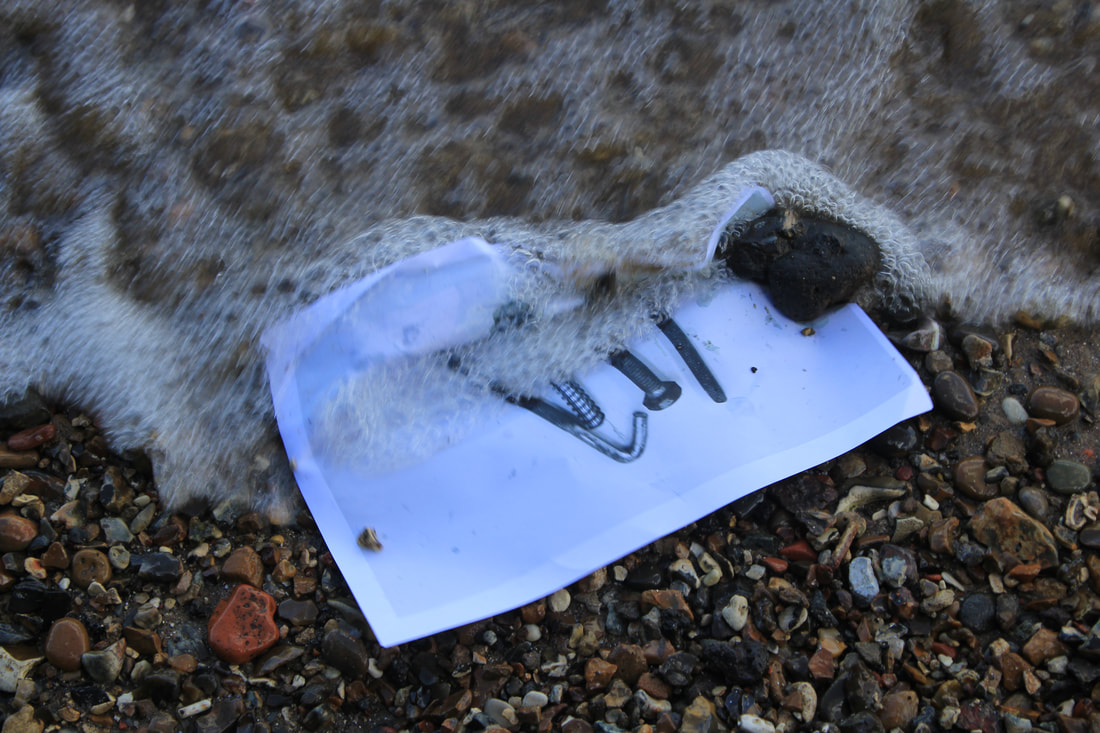
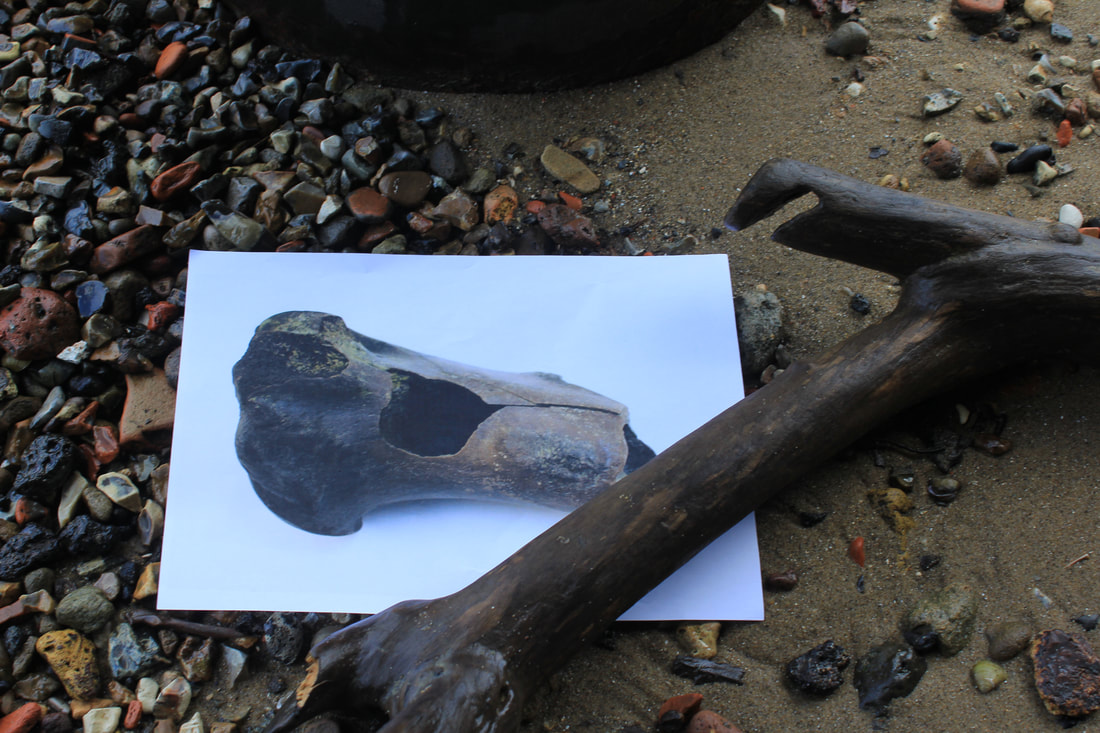
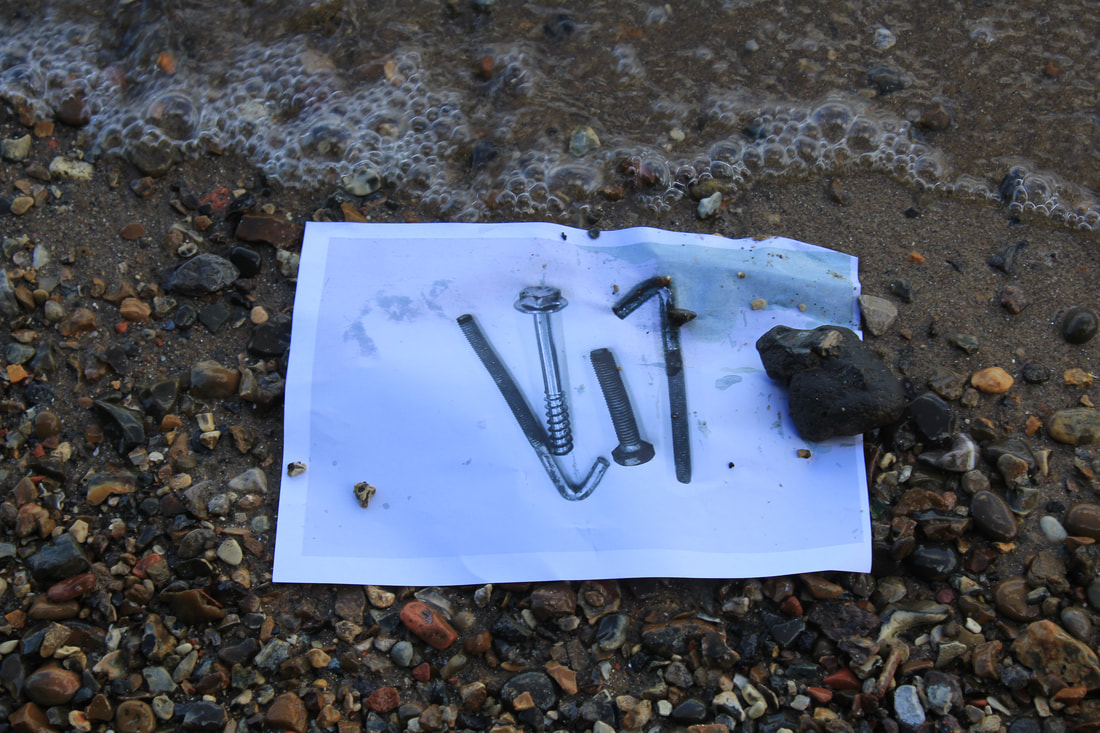
For this development I want to explore further the idea of objects degrading both over time and from exposure to elements such as water specifically the thames river in this instance, to look at this I have decided to print out five photographs of some of the objects that I have recovered from both the thames and skips on the street I have then taken these printouts to the thames in an attempt to see the kind of impact the water will have on the paper and the photograph
|
|
|
|
When I brought the printed images to the thames river I decided to put them along the shore where the water was coming in I also weighed them down with rocks and pebbles to keep them in place and left them there for five minutes enough to have an effect but not enough for the tide to come in and completely destroy them
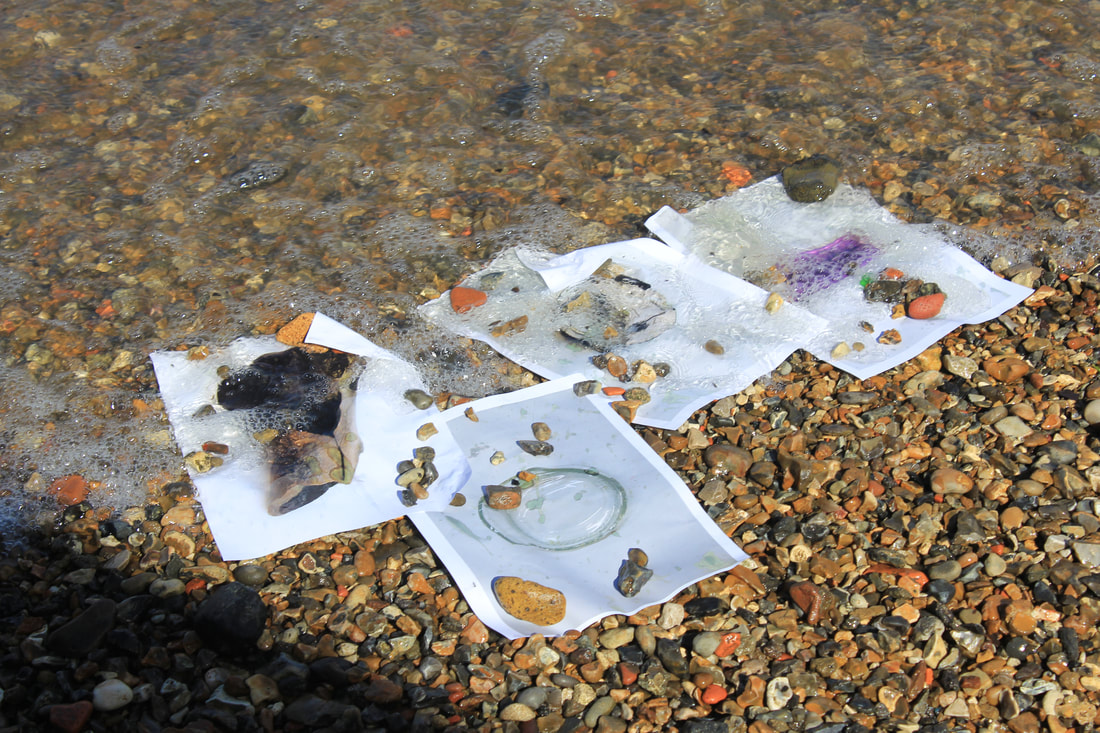
|

|
When each image was properly distorted and effected I carefully moved them further up the river bank, so that they could dry in the direct sunlight staying in the same crumpled up shapes they dry in. Things I most want to observe way the different ways that these photographs were altered for instance holes made from pebbles in the water, ink running and mixing all over the paper and the soaked paper crumpling up and becoming weak.
Final results:


WWW
What went well with these photographs is that I was able to capture the effects from all different types of exposure like
the hot sun, the strong currents in the water and the rough texture of the sand on the paper. I was intrigued by the different ways different elements effected the photos for instance water making the paper soft and fragile and also making the ink run,
the sand ripping the paper up and finally the sun drying it out leaving it in the shape created from the water
My Final development
For my final piece I wanted to create something which could display the objects which I have collected through out the course
of this project, for this idea a have taken a lot of inspiration from the concept of cabinets of curiosity which were popular in Europe around the 16th to 17th century it was a way of show casing rare and unique items before museums were created.
I think I could adjust this idea to fit my concept very well. I particularly like the idea of taking these old broken objects and giving them a second life regenerating them and presenting them as something interesting and unique.
Cabinet Of Curiosities
In 16th and 17th century Europe, a unique mode of collecting and organizing collections was developed. Merchants, aristocrats, scholars and other members of the elite, created their own cabinets filled with curiosities of every kind. Unlike museums, which have a scientific basis and a rational collecting activity, the cabinet was mostly aiming at amassing collections of curiosities.
|
Often the only thing that brought a cabinet’s objects together was their rarity. From scientific tools to antiquities, and from exotic animals to artworks, the cabinet was a place where anything could go, as long as it possessed the necessary ‘wow factor.’
A very common use of a cabinet was to replicate the world in an encyclopedic manner. Artifacts were used to represent the four seasons, the months of the year, the continents, or even the relationship between man and god. In the cabinet, science, philosophy, theology and popular imagination worked together harmoniously to animate the worldviews of the collector. |
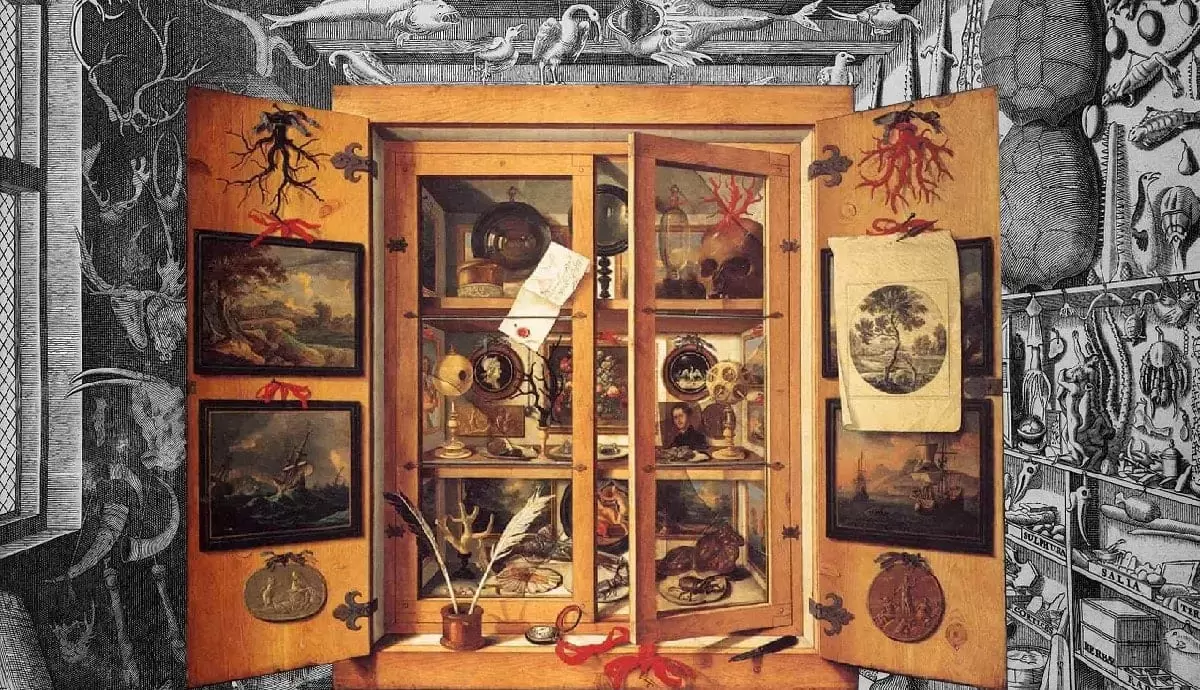
Cabinet of Curiosities, Domenico Remps, c. 1690,
|
Digging the Thames with Mark Dion
As part of Tate Modern’s pre-opening programme in 1999, artist Mark Dion and a team of local volunteers combed the shore of the river at Bankside in front of Tate Modern, and at Millbank, opposite Tate Britain. Their aim was to explore London’s rich history through its material remains, the artifacts buried within the mud and gravel of its beaches.
A wide variety of objects and fragments were uncovered, ranging from clay pipes, oyster shells and cattle teeth to plastic toys and shoes. The more unusual finds included a bottle containing a letter in Arabic script, pieces of Bellarmine pottery and a fragment of human shinbone. Tents were set up on the lawn outside Tate Britain, where each item was cleaned.
A number of professionals including Museum of London staff, Thames River Police and ecologists, helped to identify them.Once collected and processed Mark Dion created an artwork from the objects and artifacts.
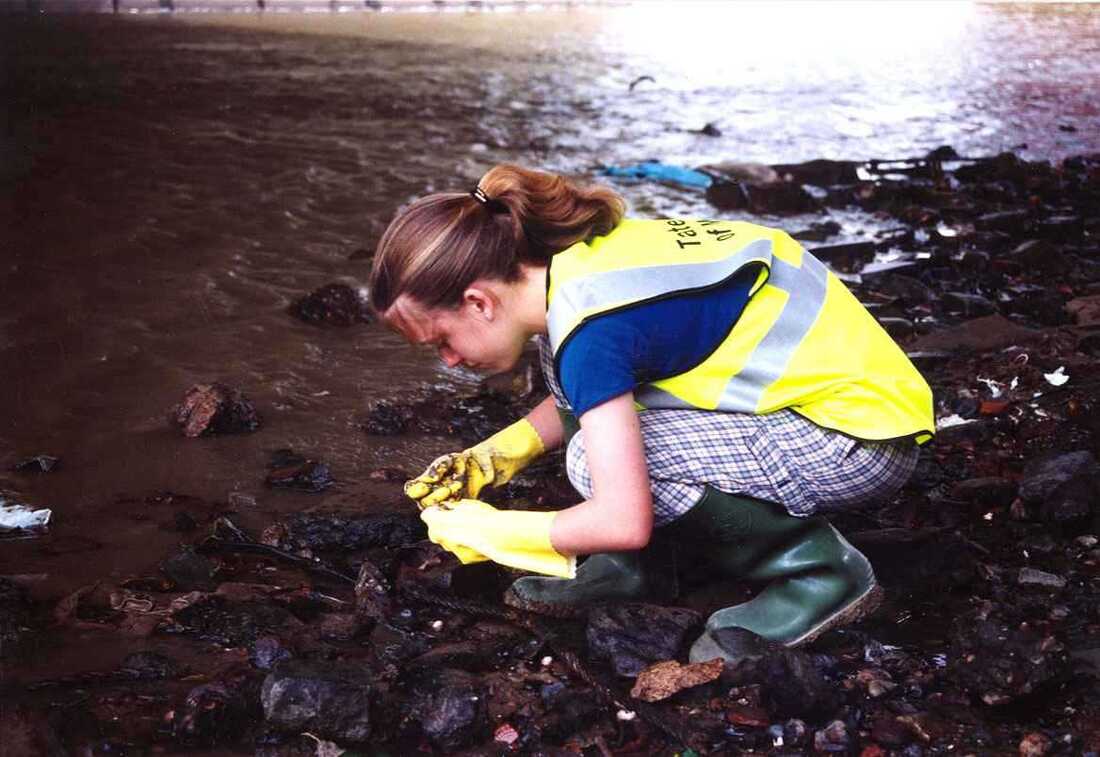
|
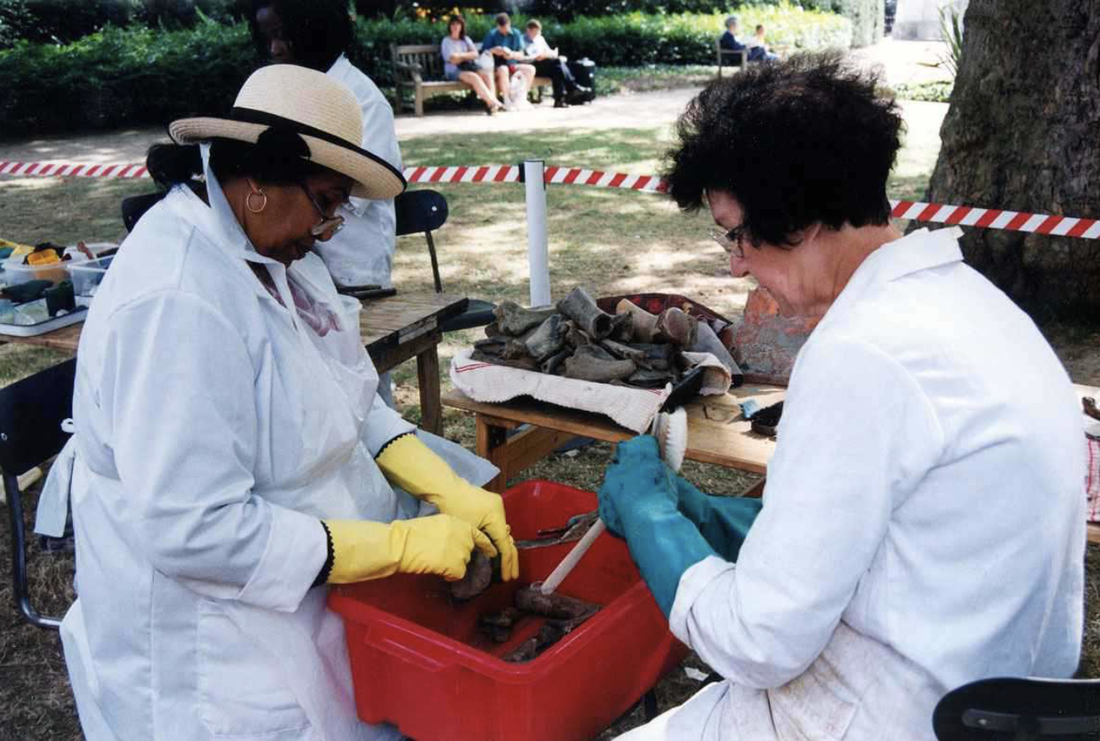
|
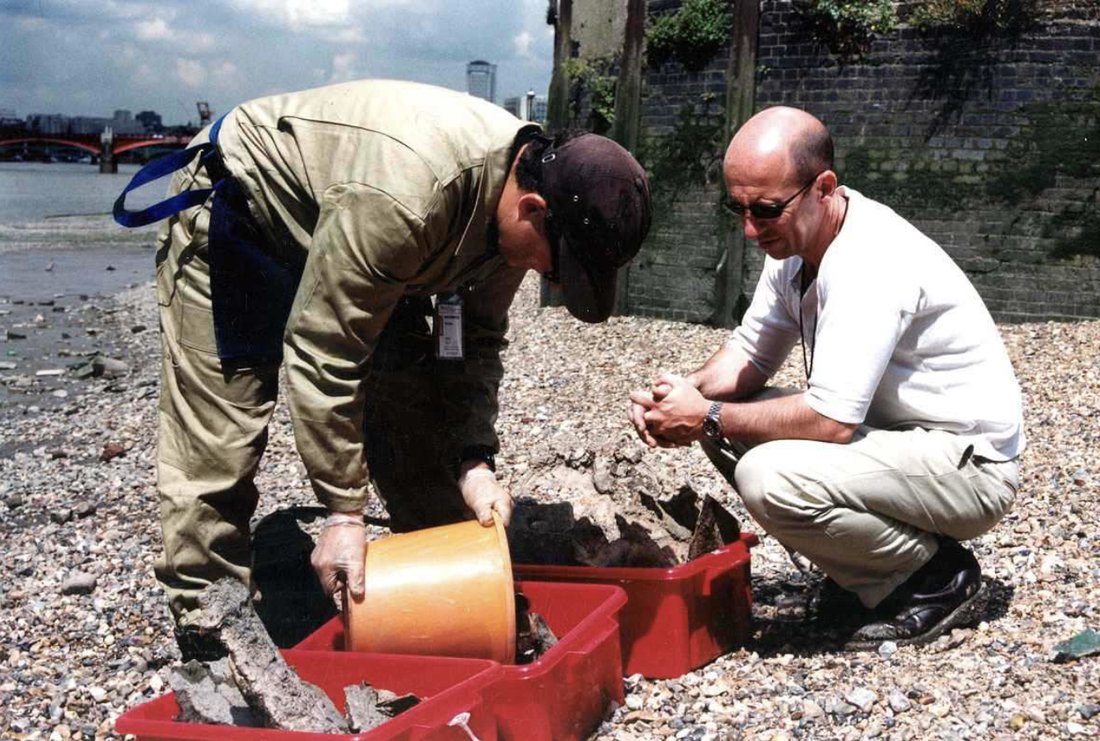
|
The finds are presented as an installation, arranged in a mahogany cabinet alongside photographs of the beachcombers and tidal flow charts.Objects found during the collection on the banks of the Thames were cleaned and analyzed by volunteer field workers. Working in shifts, the field workers worked through one box at a time of unsorted finds.
|
The finds are presented as an installation, arranged in a mahogany cabinet alongside photographs of the beachcombers and tidal flow charts. Objects found during the collection on the banks of the Thames were cleaned and analyzed by volunteer field workers.The field workers worked through one box of items at a time. These were cleaned and then organized into categories – ceramic, glass, bone, leather, shells, organic, plastic and metal. The objects were then put in a double-sided, mahogany chest in the style of a ‘cabinet of curiosities’. One side is devoted to the finds from Millbank, the other to those from Bankside. Items are organized loosely according to type, allowing antiques to sit alongside contemporary objects, lost treasures next to ephemera or junk.
|
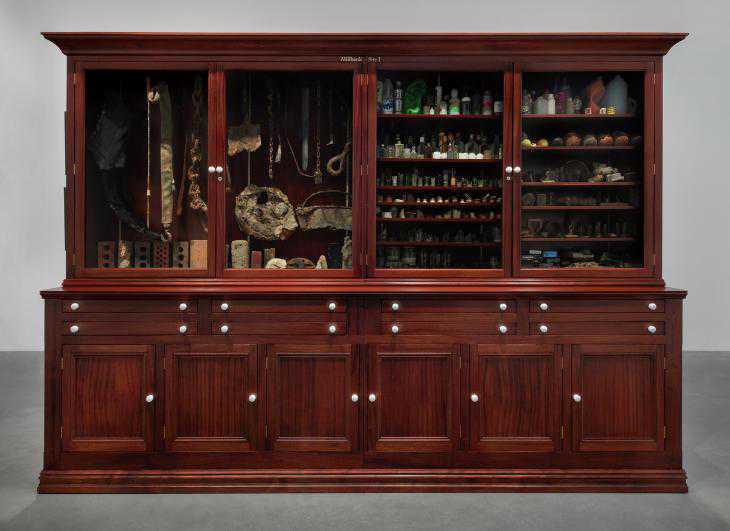
|
Joseph Cornell - Shadow boxes

|
Joseph Cornell was an American artist best remembered for his uses of Surrealist techniques of unexpected juxtaposition in his assemblage works housed in shallow wooden boxes. Cornell's best known works are glass fronted boxes into which he incorporated found objects arranged in narrative dioramas objects such as; Victorian-era dolls, bottles, old photographs, dime-store trinkets, and other found elements. Generally referred to as “shadow boxes,” Cornell often used the shadow boxes to address recurrent themes of interest such as childhood, space, and birds, and they represented an escape of sorts for their creator, who was famously reclusive.
|

|
My response and final piece:
To complete this idea I wanted to take themes from both of the previous authors work such as Mark Dions idea of using and presenting items washed up from the thames banks and I also liked the way in which Joseph Cornell present his items and I would like to recreate this in my own style using different materials to create my own display case. I wanted to try using materials from old items to create this structure as a way of being on track with my theme of regeneration, to do this I used a book from a charity shop as my base as well as the pages for wallpaper and even cardboard from old packaging to create shelving and structure to help show my found items.
Making Process:
When making this piece I wanted to use an old book from charity shop to be on theme with the idea of regeneration, I started off by hollowing out a section of the book with a craft knife and then I glue all of those pages so that they are stuck together, I have then collected which items that I want to use and started measuring out the shelf lengths. When i have all my plans i can start to put it all together so I can then cut out the cabinets shelfs using pieces of cardboard to do so.


Once I have those pieces ready I first want to add in the tissue paper using it as wallpaper for inside the carved out section to create a cleaner look which matches better the time period which these cabinets were popular in, i then start to add in my cardboard shelves when my wallpaper is glued down properly I cover these shelves in pages from the book to get a cleaner final look i glue this all down and when its completely stable i can start to add in the objects which i keep in place with the use hot glue.
The final thing i do once all that's done is to cute out a rectangle the same shape as the section in the book then i add in a clear sheet of plastic at the front of the book so i can see through to the front of the book as well as opening the book to see the objects.
The final thing i do once all that's done is to cute out a rectangle the same shape as the section in the book then i add in a clear sheet of plastic at the front of the book so i can see through to the front of the book as well as opening the book to see the objects.
My final result:

